Road Lane Line Detection using Computer Vision models
A tutorial on how to implement a computer vision data pipeline for road lane detection used by self-driving cars.
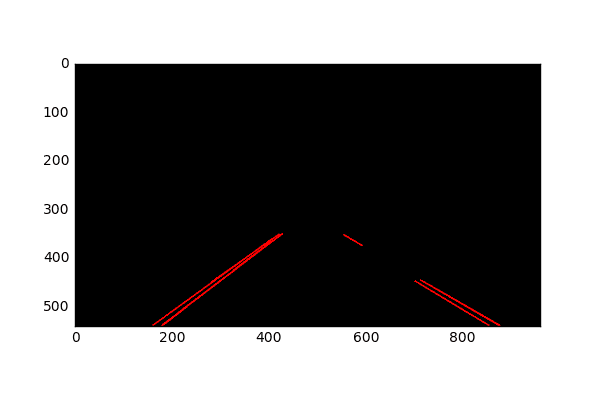
Fig. The hough transform identifies the lane lines in the image
Step 5: Extrapolate the individual, small lines and construct the left and right lane lines
The hough transform gives us small lines based on the intersections in hough space. Now, we can take this information and construct a global left lane line and a right lane line.
We do this by separating the small lines into two groups, one with a positive gradient and the other with a negative gradient. Due to the depth of the camera’s view, the lane lines slant towards each other as we go further in depth, so that should have the opposite gradients.
We then take the average gradient and intercept values for each group and construct our global lane lines from there. The lane lines are then extrapolated to the edge detected pixel with the minimum y-axis coordinate and the pixel with the maximum y-axis coordinate.
To implement this algorithm, we simply change the draw_lines function stated before to extrapolate the lines.
---------------------------------------------------------------------------
def draw_lines(img, lines, color=[255, 0, 0], thickness=2):
    """
    This function draws `lines` with `color` and `thickness`.
    """
    imshape = img.shape

    # these variables represent the y-axis coordinates to which
    # the line will be extrapolated to
    ymin_global = img.shape[0]
    ymax_global = img.shape[0]

    # left lane line variables
    all_left_grad = []
    all_left_y = []
    all_left_x = []

    # right lane line variables
    all_right_grad = []
    all_right_y = []
    all_right_x = []

    for line in lines:
        for x1,y1,x2,y2 in line:
            gradient, intercept = np.polyfit((x1,x2), (y1,y2), 1)
            ymin_global = min(min(y1, y2), ymin_global)

            if (gradient > 0):
                all_left_grad += [gradient]
                all_left_y += [y1, y2]
                all_left_x += [x1, x2]
            else:
                all_right_grad += [gradient]
                all_right_y += [y1, y2]
                all_right_x += [x1, x2]

    left_mean_grad = np.mean(all_left_grad)
    left_y_mean = np.mean(all_left_y)
    left_x_mean = np.mean(all_left_x)
    left_intercept = left_y_mean - (left_mean_grad * left_x_mean)

    right_mean_grad = np.mean(all_right_grad)
    right_y_mean = np.mean(all_right_y)
    right_x_mean = np.mean(all_right_x)
    right_intercept = right_y_mean - (right_mean_grad * right_x_mean)

    # Make sure we have some points in each lane line category
    if ((len(all_left_grad) > 0) and (len(all_right_grad) > 0)):
        upper_left_x = int((ymin_global - left_intercept) / left_mean_grad)
        lower_left_x = int((ymax_global - left_intercept) / left_mean_grad)
        upper_right_x = int((ymin_global - right_intercept) / right_mean_grad)
        lower_right_x = int((ymax_global - right_intercept) / right_mean_grad)

        cv2.line(img, (upper_left_x, ymin_global),
                      (lower_left_x, ymax_global), color, thickness)
        cv2.line(img, (upper_right_x, ymin_global),
                      (lower_right_x, ymax_global), color, thickness)
---------------------------------------------------------------------------

Fig. Extrapolated lane lines
Step 6: Add the extrapolated lines to the input image
We then overlay the extrapolated lines to the input image. We do this by adding a weight value to the original image based on the detected lane line coordinate.
---------------------------------------------------------------------------
def weighted_img(img, initial_img, α=0.8, β=1., λ=0.):
    """
    `img` is the output of the hough_lines(), An image with lines drawn on it.
    Should be a blank image (all black) with lines drawn on it.

    `initial_img` should be the image before any processing.

    The result image is computed as follows:

    initial_img * α + img * β + λ
    NOTE: initial_img and img must be the same shape!
    """
    return cv2.addWeighted(initial_img, α, img, β, λ)

# outline the input image
colored_image = weighted_img(houged, image)
---------------------------------------------------------------------------

Fig. Line lanes overlaid on the input image
Step 7: Add pipeline to video
Once we have designed and implemented the entire car lane detection pipeline, we apply the transformation frame by frame. We need a video of car driving on lane lines to do this.
---------------------------------------------------------------------------
from moviepy.editor import VideoFileClip
from IPython.display import HTML

def process_image(image):
    # grayscale the image
    grayscaled = grayscale(image)

    # apply gaussian blur
    kernelSize = 5
    gaussianBlur = gaussian_blur(grayscaled, kernelSize)

    # canny
    minThreshold = 100
    maxThreshold = 200
    edgeDetectedImage = canny(gaussianBlur, minThreshold, maxThreshold)

    # apply mask
    lowerLeftPoint = [130, 540]
    upperLeftPoint = [410, 350]
    upperRightPoint = [570, 350]
    lowerRightPoint = [915, 540]

    pts = np.array([[lowerLeftPoint, upperLeftPoint, upperRightPoint,
                    lowerRightPoint]], dtype=np.int32)
    masked_image = region_of_interest(edgeDetectedImage, pts)

    # hough lines
    rho = 1
    theta = np.pi/180
    threshold = 30
    min_line_len = 20
    max_line_gap = 20

    houged = hough_lines(masked_image, rho, theta, threshold, min_line_len,
                         max_line_gap)

    # outline the input image
    colored_image = weighted_img(houged, image)
    return colored_image

output = 'car_lane_detection.mp4'
clip1 = VideoFileClip("insert_car_lane_video.mp4")
white_clip = clip1.fl_image(process_image)
%time white_clip.write_videofile(output, audio=False)
---------------------------------------------------------------------------
And there you have it: an end to end implementation of car lane detection in python!
Original. Reposted with permission.
Bio: Vijay Ramakrishnan is a Machine Learning engineer at Mindmeld Inc, a conversational AI company that Cisco acquired in 2017. Former Project Manager at Qualcomm and Data engineer at Google. Loves to scale machine learning systems, develop self-driving technologies and conversational AI products.
Related: