4 Useful Intermediate SQL Queries for Data Science
SQL is the essential language for developers, engineers, and data professionals. Intermediate knowledge in SQL gives you an edge in your data science career.

Photo by Shubham Dhage on Unsplash
So in this post, we will discuss some of the essential intermediate SQL queries for data professionals. We will discuss 4 SQL queries, and the question is, why learn these 4 SQL queries?
We all are familiar with making a database in SQL, but more important is knowing how to clean and filter data effectively according to our needs. That's how these queries help us, so let's see what these queries are
- Trigger in SQL, and how to use it in our query?
- Partition By in SQL
- Limit in SQL, and how do we use LIMIT syntax to limit our query in a SQL table?
- COALESCE function in the SQL, and how it helps us to get rid of NULL values?
1. Trigger in SQL
TRIGGER in SQL | Source: Image by author
In this post, we will talk about the power of triggers in SQL.
What is a Trigger in SQL?
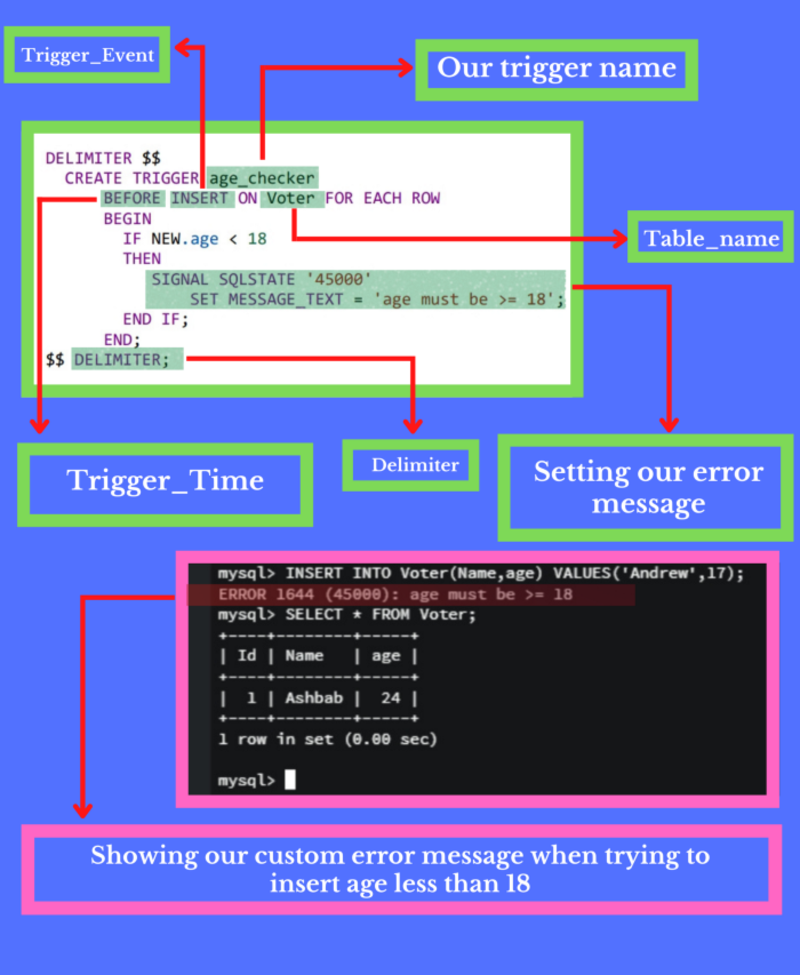
The trigger is a SQL code that runs automatically when an event is performed. for example: In the below query, our trigger runs when the user tries to Insert values in the table.
The trigger is mainly divided into three parts
1. Trigger_Time
2. Trigger_Event
3. Table_name
1. Trigger_Time: Trigger time means when you want this trigger to run, for example, before or after an event.
In our below query, we used before why? Because we want our code to run before the code is inserted into our table.
2. Trigger_Event: The trigger event is when we want to run this trigger, such as INSERT, UPDATE, and DELETE
In the above example, we use INSERT because we want to run our trigger when the INSERT event is performed.
3. Table_name: table name is the name of our table
So let's discuss the trigger syntax in detail with a proper practical explanation
of the code between BEGIN and END is whenever we insert a value in the Voter table, the trigger checks the age, whether it is less than 18 or greater than 18. Nothing happens if it is greater than or equal to 18, but if it is less than 18, the trigger will show an error, and we set the message.
For example, see the above image, we set message_text = ' age must be >=18', so whenever we try to insert the value less than 18, this error message shows. In the output section, when we try to insert Andrew, 17, the query shows an error, which contains our custom message. So that's what triggers in SQL and how to use them in your query.
Check the below code for a more practical understanding
DELIMITER $$
/* creating a trigger whose name is age_checker */
  CREATE TRIGGER age_checker
     /* defining when our trigger run before inserting or after inserting
        in our case we choose before inserting that's why we use BEFORE */
      BEFORE INSERT ON Voter FOR EACH ROW
      BEGIN
     /* Now we are checking the inserted value in our age column if it is
        less then 18 then show our error message */
        IF NEW.age < 18
        THEN
           SIGNAL SQLSTATE '45000'
              /* setting our error message in the MESSAGE_TEXT */
              SET MESSAGE_TEXT = 'AGE MUST BE >= 18';
        END IF;
     END;
DELIMETER;
2. Partition by in SQL
PARTITION BY in SQL | Source: Image by author
This post will discuss partition and how to use it in SQL.
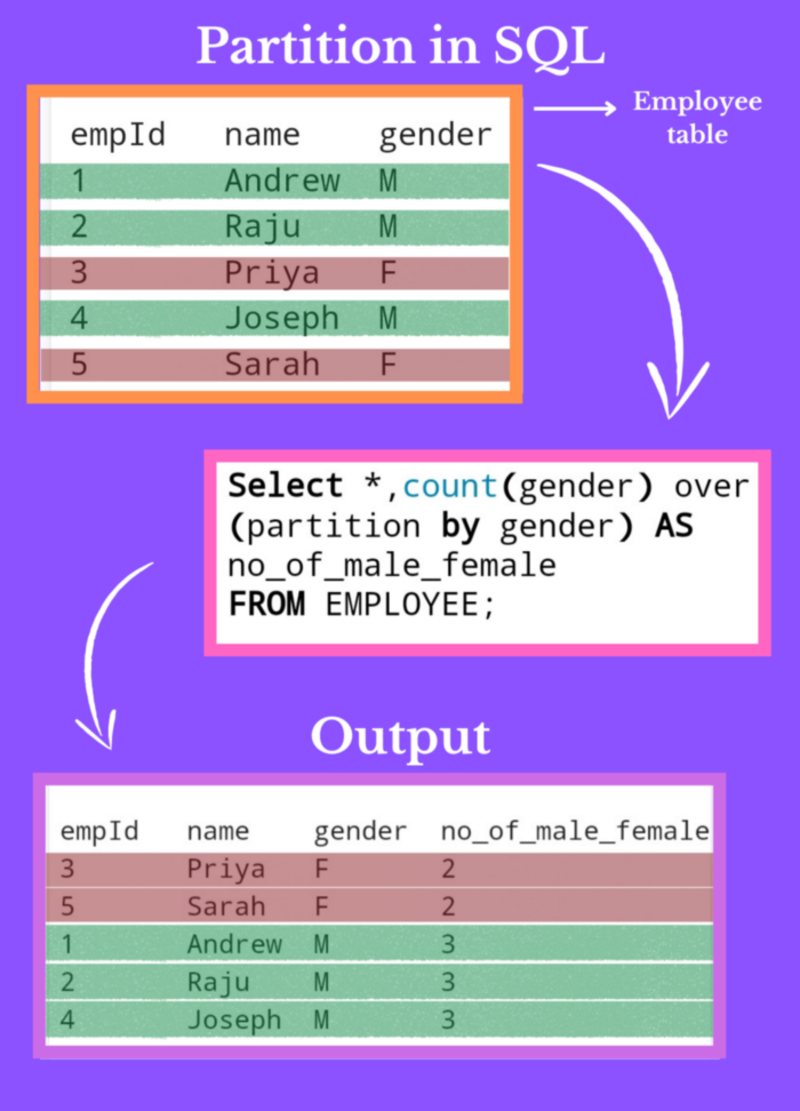
So the first question is, what is a partition in SQL?
The work of a partition is to group the rows with similar values but without limiting the rows.
Let's take an example for more clarity.
Please see the second image above.
There are five rows in the table in which there is a column named gender with three male candidates and two female candidates, so what if we want a new column that shows the number of males and females?
The partition syntax group the rows according to a similar value, which means that in our query, we use partition by gender. It means that we want to group our rows according to gender, so there are only two unique values in the gender column first is M and the second is F, so it divides the rows into two groups.
1 The rows which contain M in the gender column
2 The rows have F in the gender column, so that's the work of partition in SQL, and we use the count function to count several rows in the group.
In the output, you can see that the new column is built whose name is no_of_male_female, and this column contains the number of rows in the group. For example, there are two rows in the F group, so it shows 2, and there are three rows in the M group, so it shows 3.
Some might wonder
what the difference is between group by and partition by in SQL because both works are similar. So the answer is that if you use a group, your five rows convert only into two rows. Why?
Because the group by shows the number of groups, in our above query, our table is divided into two groups, M and F, so the group by only shows the first row of every group, which means that if the group contains ten rows but it shows only 1 row in the output because it shows 1 row of every group.
But if you use partition by then, your number of rows remains unchanged as you see the number of rows in the output and the number of rows in the table remains the same.
Partition in SQL shows all rows.
Both have advantages and disadvantages you can use them according to your requirements.
Check the below code if you need it
/* count function used to count number of gender after partition and then
   show output in no_of_male_female column */

SELECT * , COUNT(gender) OVER (PARTITION BY gender)
AS no_of_male_female FROM EMPLOYEE;
3. Limit query
LIMIT in SQL | Source: Image by author
LIMIT in SQL and How it works, although LIMIT is not supported in some SQL databases, such as SQL servers and MS access.
LIMIT clause is widely used in SQL databases and primarily to limit the row.
For example: If we want to find the top 10 or worst ten albums from the database, then the limit is beneficial. We use LIMIT 10 in the last of the query, and our work is done.
But here is a question how does LIMIT work, and how can we use it effectively?
We can use LIMIT in two types
1. LIMIT ( any constant value )
For example, the below code selects the first eight rows from the table
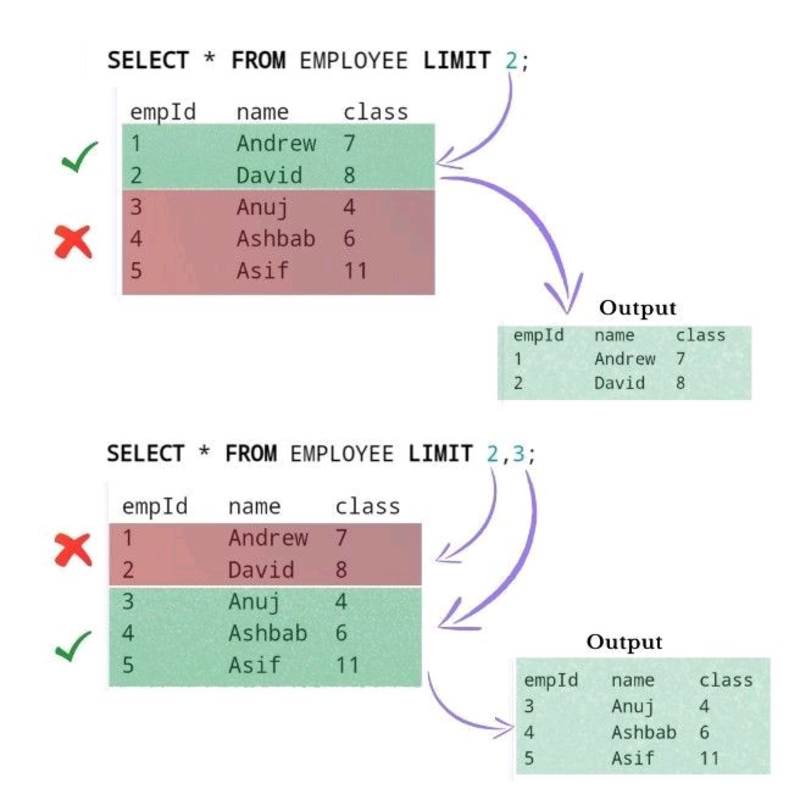
SELECT * FROM table_name LIMIT 8;
2. LIMIT(x, y)
It's a more precise way to limit our tables.
The x argument is used to eliminate several rows from the top.
The y argument shows the number of rows you want after elimination.
For example:
Select * FROM table_name LIMIT 3,2;
this query eliminates three rows from the top and then shows the two rows after eliminating the three rows.
Check the below code.
/* This command is used to select first two rows */

SELECT * FROM EMPLOYEE LIMIT 2;


/* This command is used to select 3 rows after eliminating first two rows */

SELECT * FROM EMPLOYEE LIMIT 2,3;
4. COALESCE function
COALESCE function in SQL | Source: Image by author
Do you know that there are some great functions in SQL which save you time?
Here I am talking about the COALESCE function, and this function amazes you, so please read the full post.
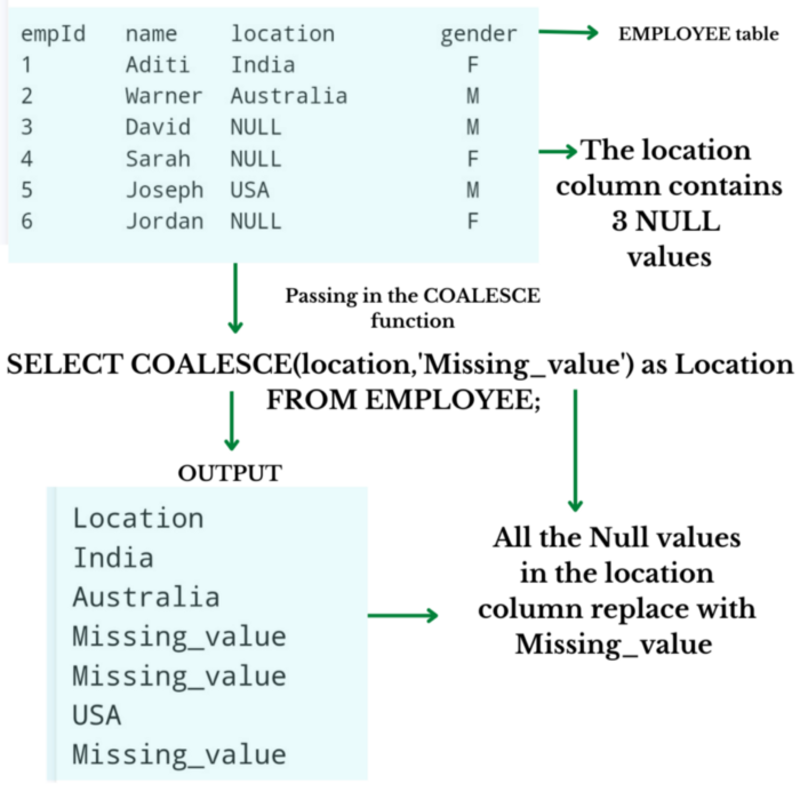
The COALESCE function takes n number of values.
COALESCE(value_1,value_2,......, value_n)
So let's understand this; please see the above 4th image. You see that there is an EMPLOYEE table that contains a column whose name is located, and in that column, there are 3 NULL values. So what if we want to replace that NULL value with a meaningful word? So as in the above image, we want to replace all the NULL values with the word Missing_value.
We can do that with COALESCE function simply by seeing the code in the above image. The COALESCE function replaces all the NULL values with the word Missing_value.
Let's understand COALESCE function step by step.
Step 1: The first argument we pass in the COALESCE function is the column name in which we want to find NULL values. That's why we use location.
Step 2: If it found some values, then nothing happens; as you will see in the output of the code in the image, the value remains the same, but if it found NULL values, then what it does that it simply replaces that NULL values with the word we give as the second argument in COALESCE function and we gave Missing_value as a second argument, and that's why it replaces all NULL value present in the location column with Missing_value.
So that's how to COALESCE function work in SQL. We were given the example of using a single column. We also do the same thing if we want to replace NULL values in multiple columns; we can also do that by following the above syntax.
Check the below code.
/* So we are targeting the location column from our EMPLOYEE table and
   then replacing the NULL values with Missing_value text */
SELECT COALESCE(location,"Missing_value") as Location
FROM EMPLOYEE;
I hope this post will briefly explain how you use these essential queries in SQL and what are the benefits of using it. If you have any questions, feel free to ask in the comment section.
Ashbab Khan is a data scientist, SQL expert, and creative tech writer.
Original. Reposted with permission.