ELMo: Contextual Language Embedding
Create a semantic search engine using deep contextualised language representations from ELMo and why context is everything in NLP.
By Josh Taylor, Advanced Analytics Specialist
Semantic sentence similarity using the state-of-the-art ELMo natural language model
This article will explore the latest in natural language modelling; deep contextualised word embeddings. The focus is more practical than theoretical with a worked example of how you can use the state-of-the-art ELMo model to review sentence similarity in a given document as well as creating a simple semantic search engine. The full code can be viewed in the Colab notebook here.
The importance of context in NLP
As we know, language is complex. Context can completely change the meaning of the individual words in a sentence. For example:
He kicked the bucket.
I have yet to cross-off all the items on my bucket list.
The bucket was filled with water.
In these sentences, whilst the word ‘bucket’ is always the same, it’s meaning is very different.

Words can have different meanings depending on context
Whilst we can easily decipher these complexities in language, creating a model which can understand the different nuances of the meaning of words given the surrounding text is difficult.
It is for this reason that traditional word embeddings (word2vec, GloVe, fastText) fall short. They only have one representation per word, therefore they cannot capture how the meaning of each word can change based on surrounding context.
Introducing ELMo; Deep Contextualised Word Representations
Enter ELMo. Developed in 2018 by AllenNLP, it goes beyond traditional embedding techniques. It uses a deep, bi-directional LSTM model to create word representations.
Rather than a dictionary of words and their corresponding vectors, ELMo analyses words within the context that they are used. It is also character based, allowing the model to form representations of out-of-vocabulary words.
This therefore means that the way ELMo is used is quite different to word2vec or fastText. Rather than having a dictionary ‘look-up’ of words and their corresponding vectors, ELMo instead creates vectors on-the-fly by passing text through the deep learning model.
A worked example, a practical use for ELMo in less than 5 minutes
Lets get started! I will add the main snippets of code here but if you want to review the full set of code (or indeed want the strange satisfaction that comes with clicking through each of the cells in a notebook), please see the corresponding Colab output here.
As per my last few posts, the data we will be using is based on Modern Slavery returns. These are mandatory statements by companies to communicate how they are addressing Modern Slavery both internally, and within their supply chains. We will be deep-diving into ASOS’s return in this article (a British, online fashion retailer).
If you are interested in seeing other posts in what is fast becoming a mini-series of NLP experiments performed on this dataset, I have included links to these at the end of this article.
1. Get the text data, clean and tokenize
It is amazing how simple this is to do using Python string functions and spaCy. Here we do some basic text cleaning by:
a) removing line breaks, tabs and excess whitespace as well as the mysterious ‘xa0’ character;
b) splitting the text into sentences using spaCy’s ‘.sents’ iterator.
ELMo can receive either a list of sentence strings or a list of lists (sentences and words). Here we have gone for the former. We know that ELMo is character based, therefore tokenizing words should not have any impact on performance.
nlp = spacy.load('en_core_web_md')

#text represents our raw text document

text = text.lower().replace('\n', ' ').replace('\t', ' ').replace('\xa0',' ') #get rid of problem chars
text = ' '.join(text.split()) #a quick way of removing excess whitespace
doc = nlp(text)

sentences = []
for i in doc.sents:
  if len(i)>1:
    sentences.append(i.string.strip()) #tokenize into sentences
2. Get the ELMo model using TensorFlow Hub:
If you have not yet come across TensorFlow Hub, it is a massive time saver in serving-up a large number of pre-trained models for use in TensorFlow. Luckily for us, one of these models is ELMo. We can load in a fully trained model in just two few lines of code. How satisfying…
url = "https://tfhub.dev/google/elmo/2"
embed = hub.Module(url)
To then use this model in anger we just need a few more lines of code to point it in the direction of our text document and create sentence vectors:
# This tells the model to run through the 'sentences' list and return the default output (1024 dimension sentence vectors).
embeddings = embed(
    sentences,
    signature="default",
    as_dict=True)["default"]

#Start a session and run ELMo to return the embeddings in variable x
with tf.Session() as sess:
  sess.run(tf.global_variables_initializer())
  sess.run(tf.tables_initializer())
  x = sess.run(embeddings)
3. Use visualisation to sense-check outputs
It is amazing how often visualisation is overlooked as a way of gaining greater understanding of data. Pictures speak a thousand words and we are going to create a chart of a thousand words to prove this point (actually it is 8,511 words).
Here we will use PCA and t-SNE to reduce the 1,024 dimensions which are output from ELMo down to 2 so that we can review the outputs from the model. I have included further reading on how this is achieved at the end of the article if you want to find out more.
from sklearn.decomposition import PCA

pca = PCA(n_components=50) #reduce down to 50 dim
y = pca.fit_transform(x)

from sklearn.manifold import TSNE

y = TSNE(n_components=2).fit_transform(y) # further reduce to 2 dim using t-SNE
Using the amazing Plotly library, we can create a beautiful, interactive plot in no time at all. The below code shows how to render the results of our dimensionality reduction and join this back up to the sentence text. Colour has also been added based on the sentence length. As we are using Colab, the last line of code downloads the HTML file. This can be found below:
Sentence encode
Interactive sentence embedding drive.google.com
The code to create this is below:
import plotly.plotly as py
import plotly.graph_objs as go
from plotly.offline import download_plotlyjs, init_notebook_mode, plot, iplot

init_notebook_mode(connected=True)

data = [
    go.Scatter(
        x=[i[0] for i in y],
        y=[i[1] for i in y],
        mode='markers',
        text=[i for i in sentences],
    marker=dict(
        size=16,
        color = [len(i) for i in sentences], #set color equal to a variable
        opacity= 0.8,
        colorscale='Viridis',
        showscale=False
    )
    )
]
layout = go.Layout()
layout = dict(
              yaxis = dict(zeroline = False),
              xaxis = dict(zeroline = False)
             )
fig = go.Figure(data=data, layout=layout)
file = plot(fig, filename='Sentence encode.html')

from google.colab import files
files.download('Sentence encode.html')
Exploring this visualisation, we can see ELMo has done sterling work in grouping sentences by their semantic similarity. In fact it is quite incredible how effective the model is:

Download the HTML for yourself (link above) to see ELMo in action
4. Create a semantic search engine:
Now that we are confident that our language model is working well, lets put it to work in a semantic search engine. The idea is that this will allow us to search through the text not by keywords but by semantic closeness to our search query.
This is actually really simple to implement:
- First we take a search query and run ELMo over it;
- We then use cosine similarity to compare this against the vectors in our text document;
- We can then return the ’n’ closest matches to the search query from the document.
Google Colab has some great features to create form inputs which are perfect for this use case. For example, creating an input is as simple as adding #@param after a variable. The below shows this for a string input:
search_string = "example text" #@param {type:"string"}
In addition to using Colab form inputs, I have used ‘IPython.display.HTML’ to beautify the output text and some basic string matching to highlight common words between the search query and the results.
Lets put it to the test. Let us see what ASOS are doing with regards to a code of ethics in their Modern Slavery return:
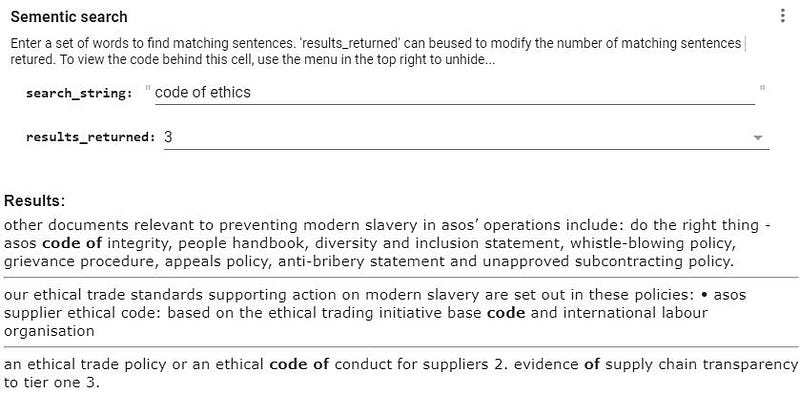
A fully interactive semantic search engine in just a few minutes!
This is magical! The matches go beyond keywords, the search engine clearly knows that ‘ethics’ and ethical are closely related. We find hits for both a code of integrity and also ethical standards and policies. Both relevant to our search query but not directly linked based on key words.
I hope you enjoyed the post. Please do leave comments if you have any questions or suggestions.
Further reading:
Below are my other posts in what is now becoming a mini series on NLP and exploration of companies Modern Slavery returns:
To find out more on the dimensionality reduction process used, I recommend the below post:
Finally, for more information on state of the art language models, the below is a good read:
http://jalammar.github.io/illustrated-bert/
Bio: Josh Taylor (@josh_taylor_01) is a specialist in producing insights through advanced analytics, machine learning and visualisation, currently working for Her Majesty's Government. All opinions are my own.
Original. Reposted with permission.
Related:
- Word Embeddings & Self-Supervised Learning, Explained
- Data Representation for Natural Language Processing Tasks
- Top 20 Python Libraries for Data Science in 2018