Apache Spark Cluster on Docker
Build your own Apache Spark cluster in standalone mode on Docker with a JupyterLab interface.
By André Perez, Data Engineer at Experian

Apache Spark is arguably the most popular big data processing engine. With more than 25k stars on GitHub, the framework is an excellent starting point to learn parallel computing in distributed systems using Python, Scala and R.
To get started, you can run Apache Spark on your machine by using one of the many great Docker distributions available out there. Jupyter offers an excellent dockerized Apache Spark with a JupyterLab interface but misses the framework distributed core by running it on a single container. Some GitHub projects offer a distributed cluster experience however lack the JupyterLab interface, undermining the usability provided by the IDE.
I believe a comprehensive environment to learn and practice Apache Spark code must keep its distributed nature while providing an awesome user experience.
This article is all about this belief.
In the next sections, I will show you how to build your own cluster. By the end, you will have a fully functional Apache Spark cluster built with Docker and shipped with a Spark master node, two Spark worker nodes and a JupyterLab interface. It will also include the Apache Spark Python API (PySpark) and a simulated Hadoop distributed file system (HDFS).
TL;DR
This article shows how to build an Apache Spark cluster in standalone mode using Docker as the infrastructure layer. It is shipped with the following:
- Python 3.7 with PySpark 3.0.0 and Java 8;
- Apache Spark 3.0.0 with one master and two worker nodes;
- JupyterLab IDE 2.1.5;
- Simulated HDFS 2.7.
To make the cluster, we need to create, build and compose the Docker images for JupyterLab and Spark nodes. You can skip the tutorial by using the out-of-the-box distribution hosted on my GitHub.
Requirements
Table of contents
- Cluster overview;
- Creating the images;
- Building the images;
- Composing the cluster;
- Creating a PySpark application.
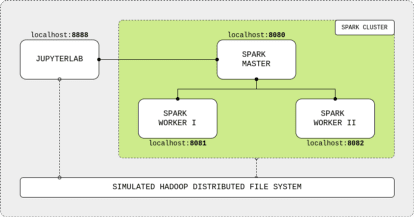
1. Cluster overview
The cluster is composed of four main components: the JupyterLab IDE, the Spark master node and two Spark workers nodes. The user connects to the master node and submits Spark commands through the nice GUI provided by Jupyter notebooks. The master node processes the input and distributes the computing workload to workers nodes, sending back the results to the IDE. The components are connected using a localhost network and share data among each other via a shared mounted volume that simulates an HDFS.
As mentioned, we need to create, build and compose the Docker images for JupyterLab and Spark nodes to make the cluster. We will use the following Docker image hierarchy:
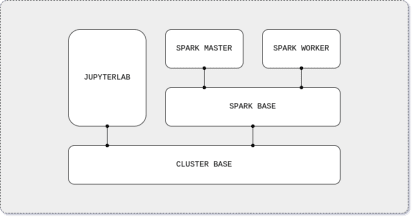
The cluster base image will download and install common software tools (Java, Python, etc.) and will create the shared directory for the HDFS. On the Spark base image, the Apache Spark application will be downloaded and configured for both the master and worker nodes. The Spark master image will configure the framework to run as a master node. Similarly, the Spark worker node will configure Apache Spark application to run as a worker node. Finally, the JupyterLab image will use the cluster base image to install and configure the IDE and PySpark, Apache Spark’s Python API.
2. Creating the images
2.1. Cluster base image
For the base image, we will be using a Linux distribution to install Java 8 (or 11), Apache Spark only requirement. We also need to install Python 3 for PySpark support and to create the shared volume to simulate the HDFS.
First, let’s choose the Linux OS. Apache Spark official GitHub repository has a Dockerfile for Kubernetes deployment that uses a small Debian image with a built-in Java 8 runtime environment (JRE). By choosing the same base image, we solve both the OS choice and the Java installation. Then, we get the latest Python release (currently 3.7) from Debian official package repository and we create the shared volume.
2.2. Spark base image
For the Spark base image, we will get and setup Apache Spark in standalone mode, its simplest deploy configuration. In this mode, we will be using its resource manager to setup containers to run either as a master or a worker node. In contrast, resources managers such as Apache YARN dynamically allocates containers as master or worker nodes according to the user workload. Furthermore, we will get an Apache Spark version with Apache Hadoop support to allow the cluster to simulate the HDFS using the shared volume created in the base cluster image.
Let’s start by downloading the Apache Spark latest version (currently 3.0.0) with Apache Hadoop support from the official Apache repository. Then, we play a bit with the downloaded package (unpack, move, etc.) and we are ready for the setup stage. Lastly, we configure four Spark variables common to both master and workers nodes:
- SPARK_HOME is the installed Apache Spark location used by the framework for setting up tasks;
- SPARK_MASTER_HOST is the master node hostname used by worker nodes to connect;
- SPARK_MASTER_PORT is the master node port used by worker nodes to connect;
- PYSPARK_PYTHON is the installed Python location used by Apache Spark to support its Python API.
2.3. Spark master image
For the Spark master image, we will set up the Apache Spark application to run as a master node. We will configure network ports to allow the network connection with worker nodes and to expose the master web UI, a web page to monitor the master node activities. In the end, we will set up the container startup command for starting the node as a master instance.
We start by exposing the port configured at SPARK_MASTER_PORT environment variable to allow workers to connect to the master node. Then, we expose the SPARK_MASTER_WEBUI_PORT port for letting us access the master web UI page. Finally, we set the container startup command to run Spark built-in deploy script with the master class as its argument.
2.4. Spark worker image
For the Spark worker image, we will set up the Apache Spark application to run as a worker node. Similar to the master node, we will configure the network port to expose the worker web UI, a web page to monitor the worker node activities, and set up the container startup command for starting the node as a worker instance.
First, we expose the SPARK_WORKER_WEBUI_PORT port to allow access to the worker web UI page, as we did with the master node. Then, we set the container startup command to run Spark built-in deploy script with the worker class and the master network address as its arguments. This will make workers nodes connect to the master node on its startup process.
2.5. JupyterLab image
For the JupyterLab image, we go back a bit and start again from the cluster base image. We will install and configure the IDE along with a slightly different Apache Spark distribution from the one installed on Spark nodes.
We start by installing pip, Python’s package manager, and the Python development tools to allow the installation of Python packages during the image building and at the container runtime. Then, let’s get JupyterLab and PySpark from the Python Package Index (PyPI). Finally, we expose the default port to allow access to JupyterLab web interface and we set the container startup command to run the IDE application.
3. Building the images
The Docker images are ready, let’s build them up. Note that since we used Docker arg keyword on Dockerfiles to specify software versions, we can easily change the default Apache Spark and JupyterLab versions for the cluster.
4. Composing the cluster
The Docker compose file contains the recipe for our cluster. Here, we will create the JuyterLab and Spark nodes containers, expose their ports for the localhost network and connect them to the simulated HDFS.
We start by creating the Docker volume for the simulated HDFS. Next, we create one container for each cluster component. The jupyterlab container exposes the IDE port and binds its shared workspace directory to the HDFS volume. Likewise, the spark-master container exposes its web UI port and its master-worker connection port and also binds to the HDFS volume.
We finish by creating two Spark worker containers named spark-worker-1 and spark-worker-2. Each container exposes its web UI port (mapped at 8081 and 8082 respectively) and binds to the HDFS volume. These containers have an environment step that specifies their hardware allocation:
- SPARK_WORKER_CORE is the number of cores;
- SPARK_WORKER_MEMORY is the amount of RAM.
By default, we are selecting one core and 512 MB of RAM for each container. Feel free to play with the hardware allocation but make sure to respect your machine limits to avoid memory issues. Also, provide enough resources for your Docker application to handle the selected values.
To compose the cluster, run the Docker compose file:
Once finished, check out the components web UI:
- JupyterLab at localhost:8888;
- Spark master at localhost:8080;
- Spark worker I at localhost:8081;
- Spark worker II at localhost:8082;
5. Creating a PySpark application
With our cluster up and running, let’s create our first PySpark application.
Open the JupyterLab IDE and create a Python Jupyter notebook. Create a PySpark application by connecting to the Spark master node using a Spark session object with the following parameters:
- appName is the name of our application;
- master is the Spark master connection URL, the same used by Spark worker nodes to connect to the Spark master node;
- config is a general Spark configuration for standalone mode. Here, we are matching the executor memory, that is, a Spark worker JVM process, with the provisioned worker node memory.
Run the cell and you will be able to see the application listed under “Running Applications” at the Spark master web UI. At last, we install the Python wget package from PyPI and download the iris data set from UCI repository into the simulated HDFS. Then we read and print the data with PySpark.
That’s all folks. I hope I have helped you to learn a bit more about Apache Spark internals and how distributed applications works. Happy learning!
Bio: André Perez (@dekoperez) is a Data Engineer at Experian & MSc. Data Scientist student at University of Sao Paulo.
Original. Reposted with permission.
Related:
- The Benefits & Examples of Using Apache Spark with PySpark
- Five Interesting Data Engineering Projects
- Skills to Build for Data Engineering