Building a REST API with Tensorflow Serving (Part 2)
This post is the second part of the tutorial of Tensorflow Serving in order to productionize Tensorflow objects and build a REST API to make calls to them.
By Guillermo Gomez, Data Scientist & Machine Learning Engineer
Once these Tensorflow objects have been generated, it’s time to make them publicly available to everyone. By building a REST API around the object, people will be able to use your service in their project. Let’s see how we can do it!
Docker in a nutshell
For this part I’m assuming we have basic knowledge of Docker. For those unfamiliar with this, Docker is a tool to build isolated environments (containers) in your computer in such a way that it doesn’t get into conflict with any file or program in your local filesystem (the host). Among all its advantages, I would highlight these:
- Unlike with virtual machines, you can run containers with only what’s strictly necessary to run a single component of your project. This helps you generate containers as light as you want.
- Docker networking capabilities allows you easily communicate multiple containers to each other.
- Even if your OS is not fully compatible with the tool you want to use, with containers you don’t run into compatibility issues anymore.
- Docker containers will run in the same way regardless of the hosting environment, be in your computer or a server running in a cloud service.
Whenever I step into learning something new I recommend go for a tutorial or quick start in the documentation itself. Tensorflow Serving has a short one in its Github repo:
# Download the TensorFlow Serving Docker image and repo
docker pull tensorflow/serving

git clone https://github.com/tensorflow/serving
# Location of demo models
TESTDATA="$(pwd)/serving/tensorflow_serving/servables/tensorflow/testdata"

# Start TensorFlow Serving container and open the REST API port
docker run -t --rm -p 8501:8501 \
    -v "$TESTDATA/saved_model_half_plus_two_cpu:/models/half_plus_two" \
    -e MODEL_NAME=half_plus_two \
    tensorflow/serving &

# Query the model using the predict API
curl -d '{"instances": [1.0, 2.0, 5.0]}' \
    -X POST http://localhost:8501/v1/models/half_plus_two:predict

# Returns => { "predictions": [2.5, 3.0, 4.5] }
Pay attention to the arguments passed to the docker run command, specifically the ones accepting external values:
-p 8501:8501, publishes the container’s port specified at the right of the colon, and is mapped to the same port in the host, specified at the left of the colon. For REST API, Tensorflow Serving makes use of this port, so don’t change this parameter in your experiments.-v "$TESTDATA/saved_model_half_plus_two_cpu:/models/half_plus_two", attaches a volume to the container. This volume contains a copy of the folder where you saved your Tensorflow object. Just a level above the folder named/1/. This folder will appear in the container, under/models/.-e MODEL_NAME=half_plus_two, defines an environment variable. This variable is required to serve your model. For convenience, use the same identifier as the container’s folder name where you attached your model.
Deploying servables in containers
You can design an API for your servable, but Tensorflow Serving abstracts away this step thanks to Docker. Once you deploy the container, you can make a request to the server where your container is located to perform some kind of computation. Within the body of the request you may attach some input (required to run the servable) and obtain some output in return.
In order to make the computation you need to specify the endpoint URL of the servable in your request. In the example shown above this endpoint URL is http://localhost:8501/v1/models/half_plus_two:predict. Now everything is ready to run our Tensorflow objects. We will start with the Keras model:
docker run -t --rm -p 8501:8501 -v "$(pwd)/mobilenet_v2_test:/models/mobilenet_v2_test" -e MODEL_NAME=mobilenet_v2_test tensorflow/serving &
When this command was executed, the current directory was tmp/. This is the folder where I’ve been saving all my models. This is what the terminal returns:
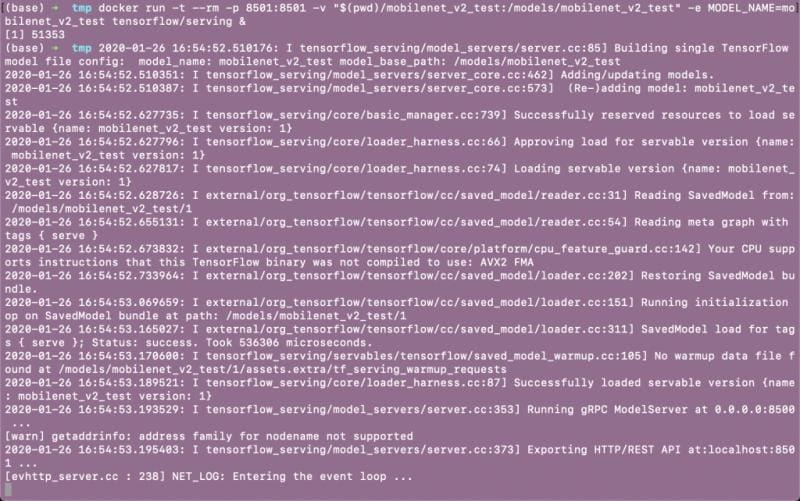
The model is up and ready to be used.
Make requests to servables
With curl library
Now that the container is up and running we can make requests by sending an image to be recognized. I’ll show you two ways to achieve that. First I made a little shell script (download it from here) that receives the path of an image file as an argument and makes the call itself with the library curl. Here I show you how we make the request and what is the image that the model is trying to classify.

And this is how we make the call with the API we built.

The second example involves the servable that adds 2 to every element of the vector. This is how the call is made after the container is up.

With requests library
The library requests allows you doing the same thing but using Python code
import json
import requests
import base64

data = {}
with open('../../Downloads/imagenes-osos-panda.jpg', mode='rb') as file:
    img = file.read()
data = {"inputs":[{"b64":base64.encodebytes(img).decode("utf-8")}]}

# Making the request
r = requests.post("http://localhost:8501/v1/models/mobilenet_v2_test:predict", data=json.dumps(data))
r.content
# And returns:
# b'{\n    "outputs": [\n        "giant panda"\n    ]\n}'
In this piece of code, you will notice there are some rules you have to follow when defining the JSON that is sent in your request, such as the naming of the keys and the presence of nested structures. This is explained more extensively in the Tensorflow documentation. Regarding images, they are binarized using the Base64 encoding before being sent to the servable.
And this covers everything I wanted to explain with Tensorflow Serving (for now). I hope this tutorial will spark your motivation for building machine learning services. This is only the tip of the iceberg. Good luck!
Bio: Guillermo Gomez builds machine learning-based products in the public infrastructure and services industry. His website where more tutorials can be found: http://thelongrun.blog
Original. Reposted with permission.
Related:
- Building a REST API with Tensorflow Serving (Part 1)
- Optimize Response Time of your Machine Learning API In Production
- Getting Started with TensorFlow 2