Cutting Down Implementation Time by Integrating Jupyter and KNIME
Are you a KNIME fan or a Jupyter fan? Well, here you don’t have to choose.
By Mahantesh Pattadkal, Data Scientist @ KNIME
Data scientists are known for creating their own bubble within the 3I structure — Implement, Integrate, and Innovate. I personally lean towards the last two Is: Integrate new technologies for constant experimentation and Innovate to attain remarkable results.
I have been working with Jupyter Notebook for the last 4–5 years and I feel very comfortable working with it. On the other hand, I share a lot of work projects with my teammate Paolo, who is an expert in building KNIME workflows. You’d think this could be a problem … it’s not!
KNIME Analytics Platform and Jupyter Notebook are both known for their visual appeal in solving data analytics problems (Fig. 1). Jupyter Notebook presents a simplified script interface for over 40 programming languages via a web browser, but it is in the end a coding platform mostly popular among Python users. KNIME Analytics Platform runs completely on a graphical user interface controlled by drag-and-drop operations and visual programming. It provides a quick understanding of the logic and structure of complex data analysis by representing it via a visual and transparent workflow. You can also write snippets of Python code in KNIME Analytics Platform; the Jupyter Notebook user experience simplifies this input and execution of code resulting in a UI optimized for coders. Now, imagine the plethora of possible applications one can build on the synergy of these two platforms.
In this article, we discuss two common life scenarios that require collaboration between Jupyter Notebook and KNIME Analytics Platform and show how simple this is.
Collaboration between Jupyter Notebook and KNIME Analytics Platform
In this section we describe two scenarios and how to:
- Integrate a Jupyter Notebook in a KNIME workflow (scenario 1)
- Integrate a KNIME workflow into Jupyter code (scenario 2)
In scenario 1, my teammate Paolo was in control of the project and, pressured by time, asked me for help in implementing a custom data transformation, which I did in Jupyter Notebook. Here, I will show how Paolo integrated my Jupyter script into his KNIME workflow.
In scenario 2, I was in charge of the project and, yet still pressured by time, I asked Paolo to help me with building a workflow to train a classification model, which he provided in KNIME Analytics Platform. Here I will show how I integrated Paolo’s workflow into my Python script from Jupyter Notebook.
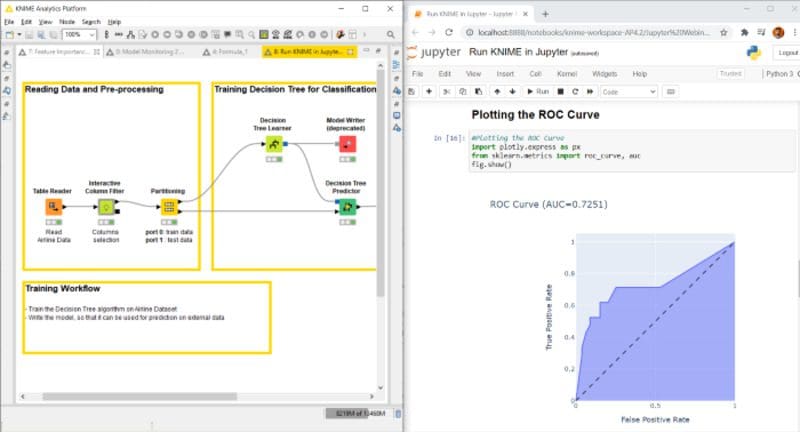
Fig. 1: Here we show the user interfaces of the two data science tools: on the left KNIME Analytics Platform and on the right Jupyter Notebook.
Integrating a Jupyter Notebook in a KNIME Workflow — Scenario 1
Flight delay prediction with machine learning
Paolo was requested to classify flights by their departure delay in the Airline dataset. Each row in the flight delay dataset describes a flight, through its origin, destination, scheduled departure time, and so on. Any flight with a departure delay > 15 minutes was labeled as “delayed”. The requested task was to train a machine learning model to classify whether a flight will be delayed at departure, considering all other suitable flight attributes as input features.
The steps taken to build a workflow to train and evaluate a machine learning model are usually the same: import the data, transform and clean the data, partition them into training set and test set, train the machine learning (ML) model of choice on the training set, apply the trained model to the test set, and score its performance with the scoring metric of choice. The Run Jupyter in KNIME workflow would then look more or less like the one in Fig. 2 (you can download it from the KNIME Hub).
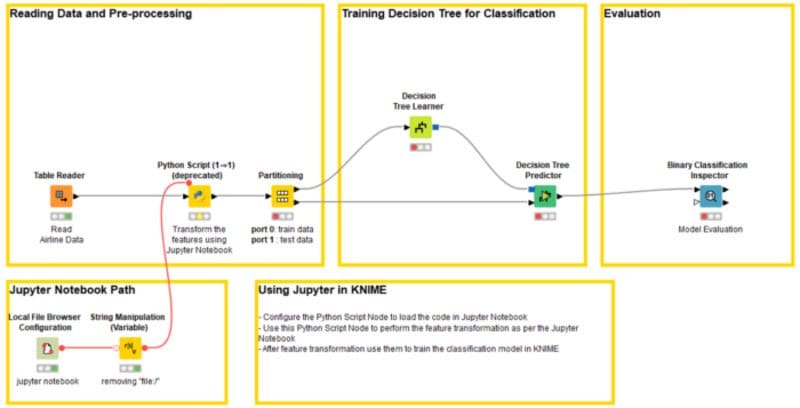
Fig. 2. The Run Jupyter in KNIME training workflow to train and evaluate a ML model to predict departure delays in flights.
The data cleaning and data transformation part is often time consuming, since it depends on the data domain as well. Paolo was pressured by time and asked me if I could implement that part.
Well, this seemed quite easy for me to do using Jupyter Notebook. Paolo could then import it in his workflow using a Python Script node. Let’s have a look at that step by step.
- Step 1. Write the Python code in Jupyter Notebook.
- Step 2. Set up the Python Environment in KNIME Analytics Platform
- Step 3. Execute the Jupyter Notebook code from the KNIME workflow.
Step 1. Write the Python code in Jupyter Notebook
I have created a Python function called Custom_Transformation in Jupyter Notebook(Fig. 3). The function implements some basic feature engineering and returns the original features set along with the transformed features.

Fig. 3. Python function for feature transformation.
Now, we need to import this code into Paolo’s KNIME workflow.
Step 2. Set up the Python environment in KNIME Analytics Platform
- In KNIME Analytics Platform, click File → Preferences → KNIME → Python
- In the Python preference page (Fig. 4a), create a new Conda environment
- Click New environment for Python 2 or Python 3 as per the installed Python version on your system.
- The New Conda environment dialog box opens (Fig. 4b). Now you have to:
- Enter the environment name in the field highlighted in yellow
- Click Create new environment
- Once the environment is created, click Apply and Close in the Preference page (Fig. 4a).
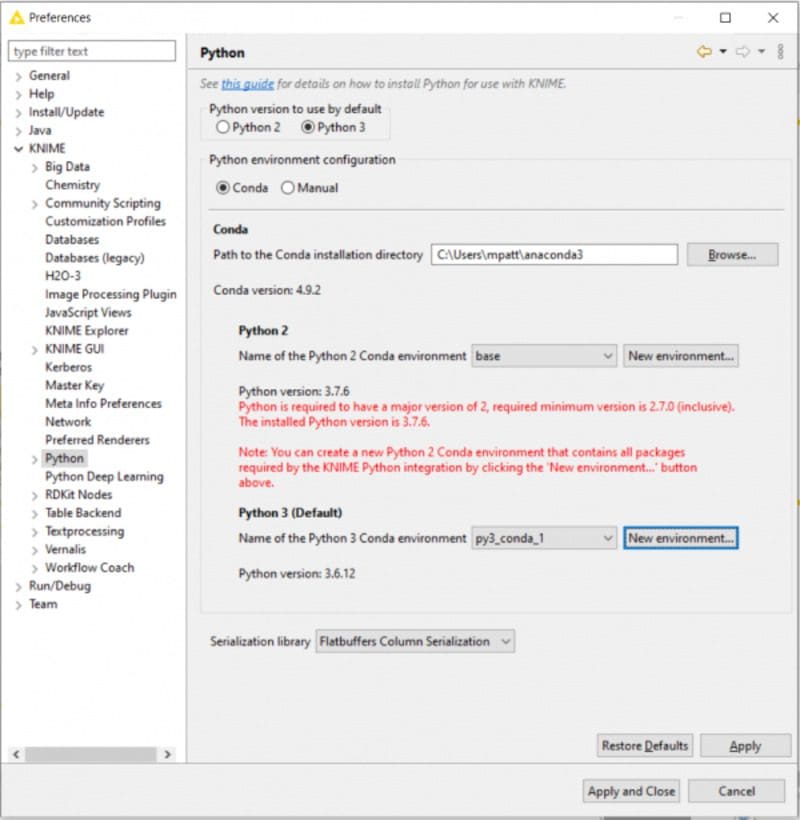
Fig. 4a. Python Preference window.
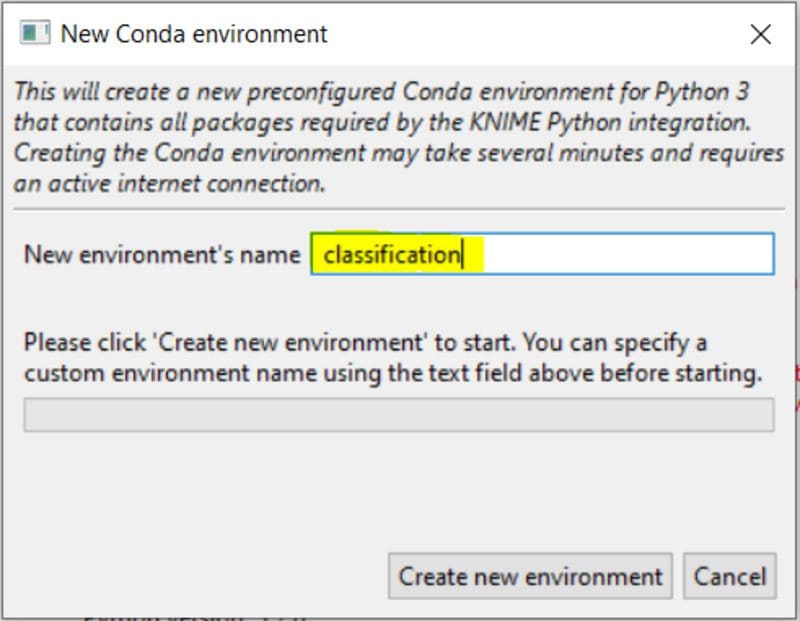
Fig. 4b. Dialog box for new Conda environment creation.
For a step-by-step guide of how to install the Python integration in KNIME and get it working, check my article How to Set Up the Python Extension.
Step 3. Execute the Jupyter Notebook code from a KNIME workflow
In the KNIME workflow in Fig. 2, we introduced a Python Script node (the second node from the left after the Table Reader node). This node loads and runs my code from Jupyter Notebook (Fig. 5).
The key instruction in the script is:
My_notebook = knime_jupyter.load_notebook(...)
This line uses the knimepy instruction
knime_jupyter.load_notebook
to locate the Jupyter Notebook Custom_Transformation, and to load the Jupyter script into the my_notebook variable.
The next line executes the function
Custom_Transformation
and returns the results into a pandas DataFrame named
output_table
Note. The code in Jupyter Notebook should always provide an output of type pandas DataFrame.
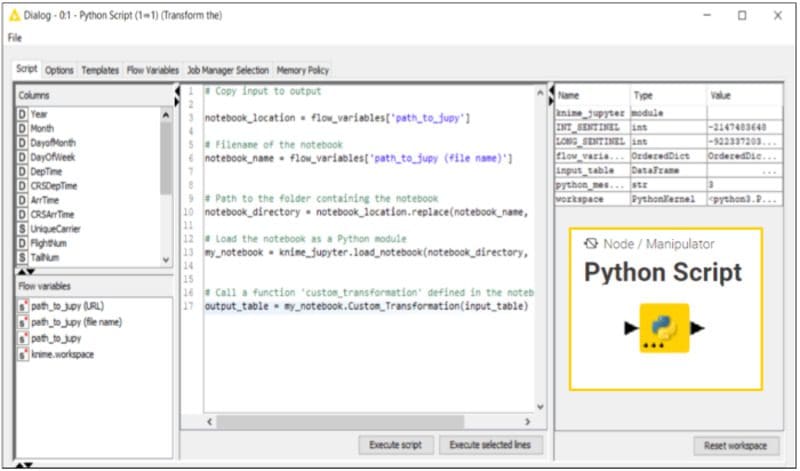
Fig. 5. Configuration dialog for the Python Script node.
The script to run the Jupyter Notebook inside the Python Script node is shown below:
#Copy input to output

notebook_location = flow_variables['path_to_jupy']

#Filename of the notebook
notebook_name = flow_variables['path_to_jupy (file name)']

#Path to the folder containing the notebook
notebook_directory = notebook_location.replace(notebook_name, "")

#Load the notebook as a Python module
my_notebook = knime_jupyter.load_notebook(notebook_directory, notebook_name)

#Call a function 'custom_transformation' defined in the notebook
output_table = my_notebook.Custom_Transformation(input_table)
After executing the Python Script node, at its output we find the transformed features added to the original features now ready to be passed to the next node in the KNIME workflow.
Integrating a KNIME Workflow into Jupyter Code — Scenario 2
Flight delay prediction with machine learning
I was asked to implement the deployment application that predicts flight departure delays using the model previously trained on the flight delay dataset. I want to develop this application using Jupyter Notebook. To save time, I would like to borrow and integrate a deployment workflow from Paolo’s work. That is, I would like to integrate a KNIME workflow into my Jupyter Notebook.
This is done in three easy steps, specular to the three steps used in scenario 1.
- Step 1. Build the KNIME workflow
- Step 2. Set up the KNIME environment in Jupyter Notebook
- Step 3. Execute the KNIME workflow from Jupyter Notebook
Step 1. Build the KNIME workflow
In our case Paolo already provided me with the KNIME workflow Run KNIME in Jupyter via the KNIME Hub. The workflow deploys the machine learning model to predict flight departure delays (Fig. 6).
Step 2. Set up the KNIME package in a Jupyter Notebook
In the Command/Anaconda Prompt, enter
pip install knime
This installs the latest knimepy package. This package enables Jupyter Notebook to read and run KNIME workflows.
Step 3. Execute the KNIME workflow from a Jupyter Notebook
This is what I need to write in my Jupyter Notebook (Fig. 7 and Fig. 8) in order to import and run the selected KNIME workflow.
- Import
knimepackage - Import the paths to the KNIME executable, to the workspace, and to the KNIME workflow
- The command
knime.Workflow(...)visualizes the workflow. I use it to double check that Jupyter is pointing to the intended workflow (Fig. 7) - This instruction
wf.data_table_inputs[0]=data_setpasses the external data stored as DataFrame from Jupyter to the KNIME workflow (Fig. 7). - The
wf.executecommand executes the KNIME workflow - After the workflow is executed, the results are stored by default in
wf.data_table_outputs[0](Fig. 8)
Note. Make sure that the workflow being executed from Jupyter is not concurrently open in KNIME. This stalls execution as the workflow is already open for editing in KNIME.
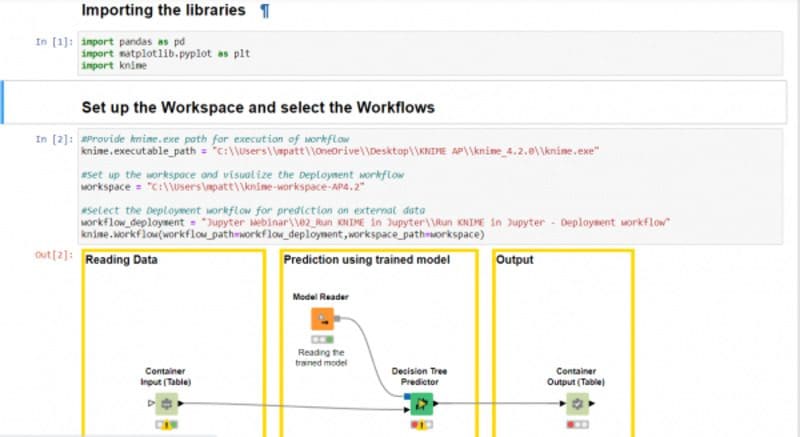
Fig. 6. Setting up the workspace in Jupyter Notebook and displaying the selected KNIME workflow Run KNIME in Jupyter.
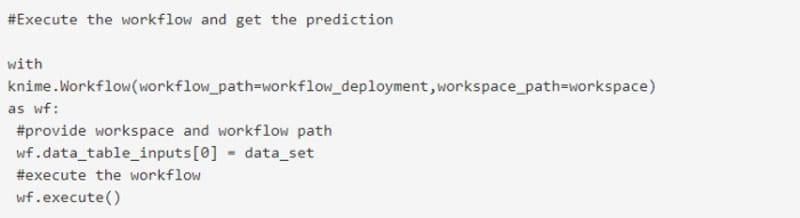
Fig. 7. Code for executing the workflow.
As of KNIME Analytics Platform 4.3, I can also call and execute KNIME workflows residing on a KNIME Server, rather than on my local client installation. This has three main advantages:
- Improved scalability: Execution on a KNIME Server can exploit more computational power from another machine on premise, from a server in the cloud, or even parallel computation of several KNIME Executors or via KNIME Edge.
- Greater accessibility: Anyone with credentials and an internet connection can use the shared KNIME workflow deployed on the KNIME Server from their Jupyter Notebook
- Better security and versioning: Combining Jupyter Notebook with KNIME Analytics Platform usually implies data scientists with different backgrounds collaborating in an organization where data access might be restricted. KNIME Server offers a safe and consistent way for sharing workflows, data and Jupyter Notebook edit after edit.
The only change to the previous script consists in the path to the KNIME workflow on the KNIME server and the required username and password to access it, as shown in Fig. 8. This script is also available on GitHub repository. Also, in this case, there isn’t the need to specify the knime executer path like before.
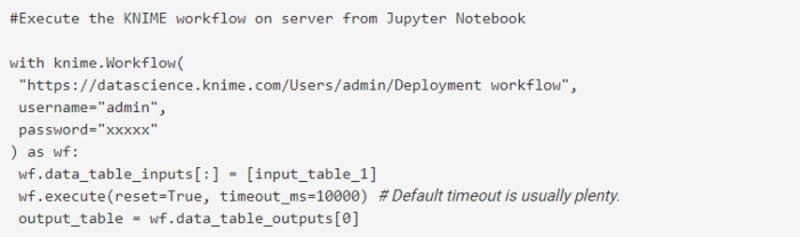
Fig. 8. Code snippet to execute workflow on KNIME Server from Jupyter Notebook.
Collaboration is key!
The fact that you don’t need to choose between Jupyter Notebook and KNIME Analytics Platform is an excellent feature to foster collaboration in a team. By mixing and matching Jupyter Notebook scripts and KNIME workflow snippets we efficiently produced a very advanced set of applications to train, apply, and deploy machine learning models for predictions.
Coupling this strategy with the KNIME Server enterprise features enables even greater collaboration among data scientists with different backgrounds and tools.
Collaboration is always a key factor in a data science lab and whether you are looking for an open source solution or an enterprise one, KNIME software can help you there with its flexibility in integrating Jupyter and many other tools.
References:
- Download the Run Jupyter in KNIME and Run KNIME in Jupyter workflows from the KNIME Hub here
- Read another blog post on KNIME and Jupyter by Greg Landrum
- Watch a recording of our webinar Enhancing Jupyter Notebook with visual workflows Webinar
Bio: Mahantesh Pattadkal is a data scientist at KNIME. The data science techniques he is interested in are machine learning, natural language processing, deep learning, predictive modeling and business analytics. He enjoys working with Python, SQL, Tensorflow/Keras, Pytorch, Excel, and R.
As first published in Low Code for Advanced Data Science.
Original. Reposted with permission.