Overcome Your Data Quality Issues with Great Expectations
Bad data costs organizations money, reputation, and time. Hence it is very important to monitor and validate data quality continuously.
Gartner, Inc. estimates that bad data costs organizations an average of 12.9 million USD yearly.
We deal with Petabytes of data daily, and data quality issues are common with such huge volumes of data. Bad data costs organizations money, reputation, and time. Hence it is very important to monitor and validate data quality continuously.
What is Bad data?
Bad data includes inaccurate information, missing data, incorrect information, non-conforming data, and duplicate data. Bad data will result in incorrect data analysis, resulting in bad decisions and ineffective strategies.
Experian data quality found that the average company loses 12% of its revenue due to insufficient data. Apart from money, companies also suffer a loss of wasted time.
Identifying the anomalies in data before processing will help organizations gain more valuable insights into their customer behavior and helps in reduced costs.
Great expectations library helps organizations to verify and assert such anomalies in the data with more than 200+ out-of-the-box rules readily available.
What are Great Expectations (GE)?
Great Expectations is an open-source Python library that helps us in validating data. Great expectations provide a set of methods or functions to help the data engineers quickly validate a given data set.
In this article, we will look into the steps involved in validating the data by the Great Expectations library.
How Great Expectations Work
GE is like unit tests for data. GE provides assertions called Expectations to apply some rules to the data under test. For example, the policy ID/number should not be empty for an insurance policy document. To set up and execute GE, you must follow the steps below. Though there are multiple ways to work with GE (using its CLI), I will explain the programmatic way of setting up things in this article. All the source code explained in this article is available in this GitHub repo.
Step 1: Set Up the Data Config
GE has a concept of stores. Stores are nothing but the physical location on the disk where it can store the expectations (rules/assertions), run details, checkpoint details, validation results, and data docs (static HTML versions of the validation results). Click here to learn more about stores.
GE supports various store backends. In this article, we use file store backend and defaults. GE supports other store backends like AWS (Amazon Web Services) S3, Azure Blobs, PostgreSQL, etc. Refer this to know more about backends. The code snippet below shows a very simple data config:
STORE_FOLDER = "/Users/saisyam/work/github/great-expectations-sample/ge_data"
#Setup data config
data_context_config = DataContextConfig(
    datasources = {},
    store_backend_defaults = FilesystemStoreBackendDefaults(root_directory=STORE_FOLDER)
)

context = BaseDataContext(project_config = data_context_config)
The above configuration uses the File store backend with defaults. GE will automatically create the necessary folders needed to run expectations. We will add data sources in our next step.
Step 2: Set Up Data Source Config
GE supports three types of data sources:
- Pandas
- Spark
- SQLAlchemy
Data source config tells GE to use a specific execution engine to process the provided data set. For example, if you configure your data source to use the Pandas execution engine, you need to provide a Pandas data frame with data to GE to run your expectations. Below is a sample for using Pandas as the data source:
datasource_config = {
    "name": "sales_datasource",
    "class_name": "Datasource",
    "module_name": "great_expectations.datasource",
    "execution_engine": {
        "module_name": "great_expectations.execution_engine",
        "class_name": "PandasExecutionEngine",
    },
    "data_connectors": {
        "default_runtime_data_connector_name": {
            "class_name": "RuntimeDataConnector",
            "module_name": "great_expectations.datasource.data_connector",
            "batch_identifiers": ["default_identifier_name"],
        },
    },
}
context.add_datasource(**datasource_config)
Please refer to this documentation for more information on data sources.
Step 3: Create an Expectation Suite and Add Expectations
This step is the crucial part. In this step, we will create a suite and add expectations to the suite. You can consider a suite as a group of expectations that will run as a batch. The expectations we create here are to validate a sample sales report. You can download the sales.csv file.
The code snippet below shows how to create a suite and add expectations. We will add two expectations to our suite.
# Create expectations suite and add expectations
suite = context.create_expectation_suite(expectation_suite_name="sales_suite", overwrite_existing=True)

expectation_config_1 = ExpectationConfiguration(
    expectation_type="expect_column_values_to_be_in_set",
    kwargs={
        "column": "product_group",
        "value_set": ["PG1", "PG2", "PG3", "PG4", "PG5", "PG6"]
    }
)
suite.add_expectation(expectation_configuration=expectation_config_1)

expectation_config_2 = ExpectationConfiguration(
    expectation_type="expect_column_values_to_be_unique",
    kwargs={
        "column": "id"
    }
)
suite.add_expectation(expectation_configuration=expectation_config_2)
context.save_expectation_suite(suite, "sales_suite")
The first expectation, “expect_column_values_to_be_in_set” checks whether the column (product_group) values are equal to any of the values in the given value_set. The second expectation checks whether the “id” column values are unique.
Once the expectations are added and saved, now we can run these expectations on a data set which we will see in step 4.
Step 4: Load and Validate the Data
In this step, we will load our CSV file into pandas.DataFrame and create a checkpoint to run the expectations we created above.
# load and validate data
df = pd.read_csv("./sales.csv")

batch_request = RuntimeBatchRequest(
    datasource_name="sales_datasource",
    data_connector_name="default_runtime_data_connector_name",
    data_asset_name="product_sales",
    runtime_parameters={"batch_data":df},
    batch_identifiers={"default_identifier_name":"default_identifier"}
)

checkpoint_config = {
    "name": "product_sales_checkpoint",
    "config_version": 1,
    "class_name":"SimpleCheckpoint",
    "expectation_suite_name": "sales_suite"
}
context.add_checkpoint(**checkpoint_config)
results = context.run_checkpoint(
    checkpoint_name="product_sales_checkpoint",
    validations=[
        {"batch_request": batch_request}
    ]
)
We create a batch request for our data, providing the data source name, which will tell GE to use a specific execution engine, in our case, Pandas. We create a checkpoint config and then validate our batch request against the checkpoint. You can add multiple batch requests if the expectations apply to the data in the batch in a single checkpoint. The `run_checkpoint` method returns the result in JSON format and can be used for further processing or analytics.
Results
Once we have run the expectations on our data set, GE creates a static HTML dashboard with the results for our checkpoint. The results contain the number of evaluated expectations, successful expectations, unsuccessful expectations, and success percentages. Any records that do not match the given expectations will be highlighted on the page. Below is a sample for successful execution:
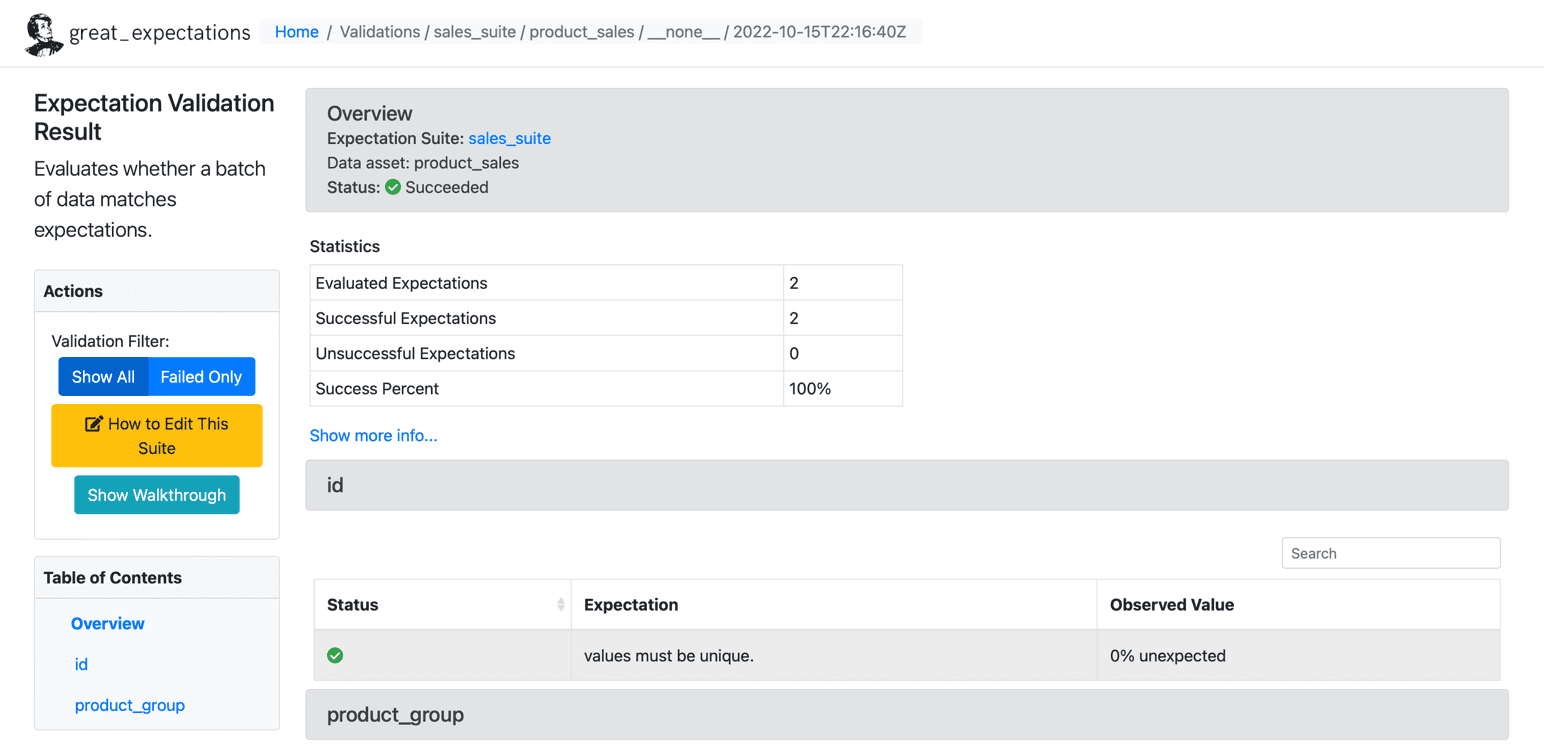
Source: Great Expectations
Below is a sample of the failed expectation:

Source: Great Expectations
Conclusion
We have set up GE in four steps and successfully ran expectations on a given dataset. GE has more advanced features like writing your custom expectations, which we will cover in future articles. Many organizations use GE extensively to customize their clients' requirements and write custom expectations.
Saisyam Dampuri comes with 18+ years of software development experience and is passionate about exploring new technologies and tools. He is currently working as a Sr. Cloud Architect at Anblicks, TX, US. While not coding, he will be busy with photography, cooking, and traveling.