GitHub Actions For Machine Learning Beginners
Learn how to automate machine learning training and evaluation using scikit-learn pipelines, GitHub Actions, and CML.
Image by Author
GitHub Actions is a powerful feature of the GitHub platform that allows for automating software development workflows, such as testing, building, and deploying code. This not only streamlines the development process but also makes it more reliable and efficient.
In this tutorial, we will explore how to use GitHub Actions for a beginner Machine Learning (ML) project. From setting up our ML project on GitHub to creating a GitHub Actions workflow that automates your ML tasks, we will cover everything you need to know.
What is GitHub Actions?
GitHub Actions is a powerful tool that provides a continuous integration and continuous delivery (CI/CD) pipeline for all GitHub repositories for free. It automates the entire software development workflow, from creating and testing to deploying code, all within the GitHub platform. You can use it to improve your development and deployment efficiency.
GitHub Actions key features
We will now learn about key components of workflow.
Workflows
Workflows are automated processes that you define in your GitHub repository. They are composed of one or more jobs and can be triggered by GitHub events such as a push, pull request, issue creation, or by workflows. Workflows are defined in a YML file within the .github/workflows directory of your repository. You can edit it and rerun the workflow right from the GitHub repository.
Jobs and Steps
Within a workflow, jobs define a set of steps that execute on the same runner. Each step in a job can run commands or actions, which are reusable pieces of code that can perform a specific task, such as formatting the code or training the model.
Events
Workflows can be triggered by various GitHub events, such as push, pull requests, forks, stars, releases, and more. You can also schedule workflows to run at specific times using cron syntax.
Runners
Runners are the virtual environments/machines where workflows are executed. GitHub provides hosted runners with Linux, Windows, and macOS environments, or you can host your own runner for more control over the environment.
Actions
Actions are reusable units of code that you can use as steps within your jobs. You can create your own actions or use actions shared by the GitHub community in the GitHub Marketplace.
GitHub Actions makes it straightforward for developers to automate their build, test, and deployment workflows directly within GitHub, helping to improve productivity and streamline the development process.
In this project, we will use two Actions:
- actions/checkout@v3: for checking out your repository so that workflow can access the file and data.
- iterative/setup-cml@v2: for displaying the model metrics and confusion matrix under the commit as a message.
Automating Machine Learning Workflow with GitHub Actions
We will work on a simple machine learning project using the Bank Churn dataset from Kaggle to train and evaluate a Random Forest Classifier.
Setting Up
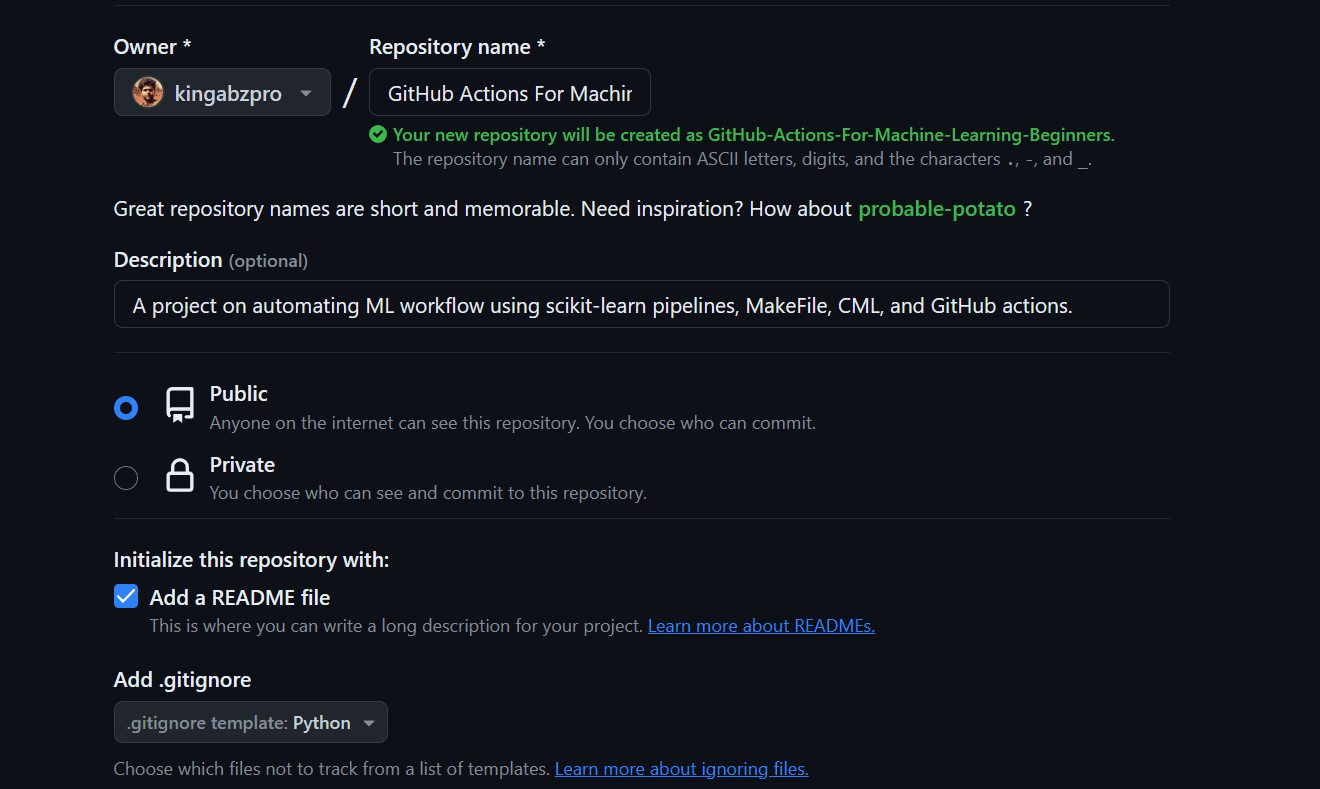
- We will create the GitHub repository by providing the name, and description, checking the readme file, and license.

- Go to the project director and clone the repository.
- Change the directory to the repository folder.
- Launch the code editor. In our case, it is VSCode.
$ git clone https://github.com/kingabzpro/GitHub-Actions-For-Machine-Learning-Beginners.git

$ cd .\GitHub-Actions-For-Machine-Learning-Beginners\

$ code .
- Please create a `requirements.txt` file and add all the necessary packages that are required to run the workflow successfully.
pandas
scikit-learn
numpy
matplotlib
skops
black
- Download the data from Kaggle using the link and extract it in the main folder.
- The dataset is big, so we have to install GitLFS into our repository and track the train CSV file.
$ git lfs install
$ git lfs track train.csv
Training and Evaluating Code
In this section, we will write the code that will train, evaluate, and save the model pipelines. The code is from my previous tutorial, Streamline Your Machine Learning Workflow with Scikit-learn Pipelines. If you want to know how the scikit-learn pipeline works, then you should read it.
- Create a `train.py` file and copy and paste the following code.
- The code uses ColumnTransformer and Pipeline for preprocessing the data and the Pipeline for feature selection and model training.
- After evaluating the model performance, both metrics and the confusion matrix are saved in the main folder. These metrics will be used later by the CML action.
- In the end, the scikit-learn final pipeline is saved for model inference.
import pandas as pd
from sklearn.compose import ColumnTransformer
from sklearn.ensemble import RandomForestClassifier
from sklearn.model_selection import train_test_split
from sklearn.feature_selection import SelectKBest, chi2
from sklearn.impute import SimpleImputer
from sklearn.pipeline import Pipeline
from sklearn.preprocessing import MinMaxScaler, OrdinalEncoder
from sklearn.metrics import accuracy_score, f1_score
import matplotlib.pyplot as plt
from sklearn.metrics import ConfusionMatrixDisplay, confusion_matrix
import skops.io as sio
# loading the data
bank_df = pd.read_csv("train.csv", index_col="id", nrows=1000)
bank_df = bank_df.drop(["CustomerId", "Surname"], axis=1)
bank_df = bank_df.sample(frac=1)
# Splitting data into training and testing sets
X = bank_df.drop(["Exited"], axis=1)
y = bank_df.Exited
X_train, X_test, y_train, y_test = train_test_split(
X, y, test_size=0.3, random_state=125
)
# Identify numerical and categorical columns
cat_col = [1, 2]
num_col = [0, 3, 4, 5, 6, 7, 8, 9]
# Transformers for numerical data
numerical_transformer = Pipeline(
steps=[("imputer", SimpleImputer(strategy="mean")), ("scaler", MinMaxScaler())]
)
# Transformers for categorical data
categorical_transformer = Pipeline(
steps=[
("imputer", SimpleImputer(strategy="most_frequent")),
("encoder", OrdinalEncoder()),
]
)
# Combine pipelines using ColumnTransformer
preproc_pipe = ColumnTransformer(
transformers=[
("num", numerical_transformer, num_col),
("cat", categorical_transformer, cat_col),
],
remainder="passthrough",
)
# Selecting the best features
KBest = SelectKBest(chi2, k="all")
# Random Forest Classifier
model = RandomForestClassifier(n_estimators=100, random_state=125)
# KBest and model pipeline
train_pipe = Pipeline(
steps=[
("KBest", KBest),
("RFmodel", model),
]
)
# Combining the preprocessing and training pipelines
complete_pipe = Pipeline(
steps=[
("preprocessor", preproc_pipe),
("train", train_pipe),
]
)
# running the complete pipeline
complete_pipe.fit(X_train, y_train)
## Model Evaluation
predictions = complete_pipe.predict(X_test)
accuracy = accuracy_score(y_test, predictions)
f1 = f1_score(y_test, predictions, average="macro")
print("Accuracy:", str(round(accuracy, 2) * 100) + "%", "F1:", round(f1, 2))
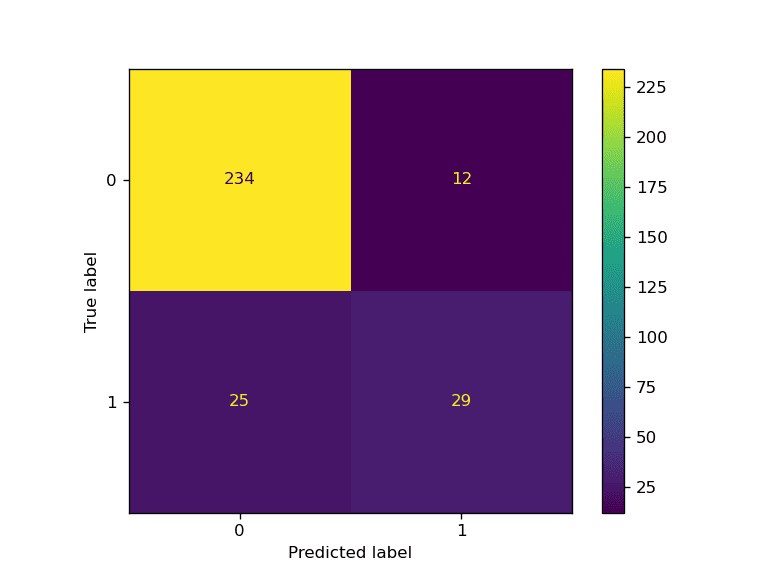
## Confusion Matrix Plot
predictions = complete_pipe.predict(X_test)
cm = confusion_matrix(y_test, predictions, labels=complete_pipe.classes_)
disp = ConfusionMatrixDisplay(confusion_matrix=cm, display_labels=complete_pipe.classes_)
disp.plot()
plt.savefig("model_results.png", dpi=120)
## Write metrics to file
with open("metrics.txt", "w") as outfile:
outfile.write(f"\nAccuracy = {round(accuracy, 2)}, F1 Score = {round(f1, 2)}\n\n")
# saving the pipeline
sio.dump(complete_pipe, "bank_pipeline.skops")
We got a good result.
$ python train.py
Accuracy: 88.0% F1: 0.77
You can learn more about the inner workings of the code mentioned above by reading "Streamline Your Machine Learning Workflow with Scikit-learn Pipelines"
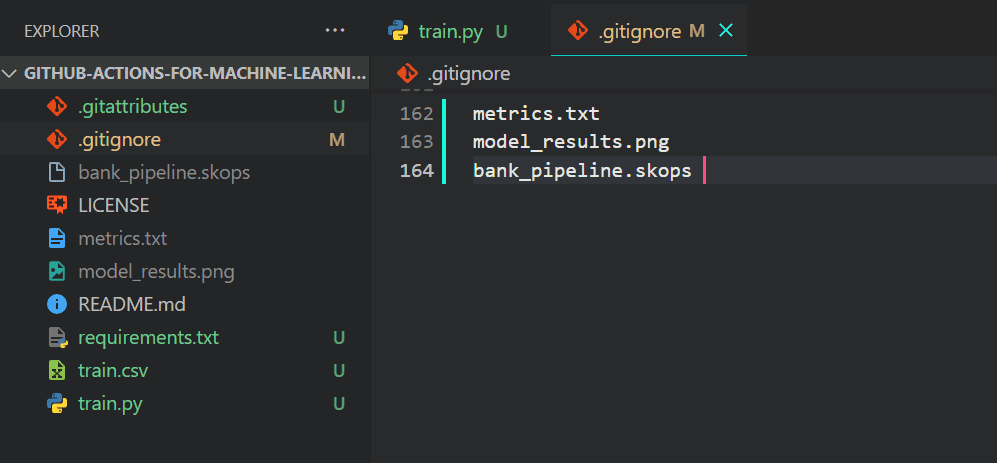
We don't want Git to push output files as they are always generated at the end of the code so we will be adding the to .gitignore file.
Just type `.gitignore` in the terminal to launch the file.
$ .gitignore
Add the following file names.
metrics.txt
model_results.png
bank_pipeline.skops
This is how it should look like on your VSCode.
We will now stage the changes, create a commit, and push the changes to the GitHub main branch.
git add .
git commit -m "new changes"
git push origin main
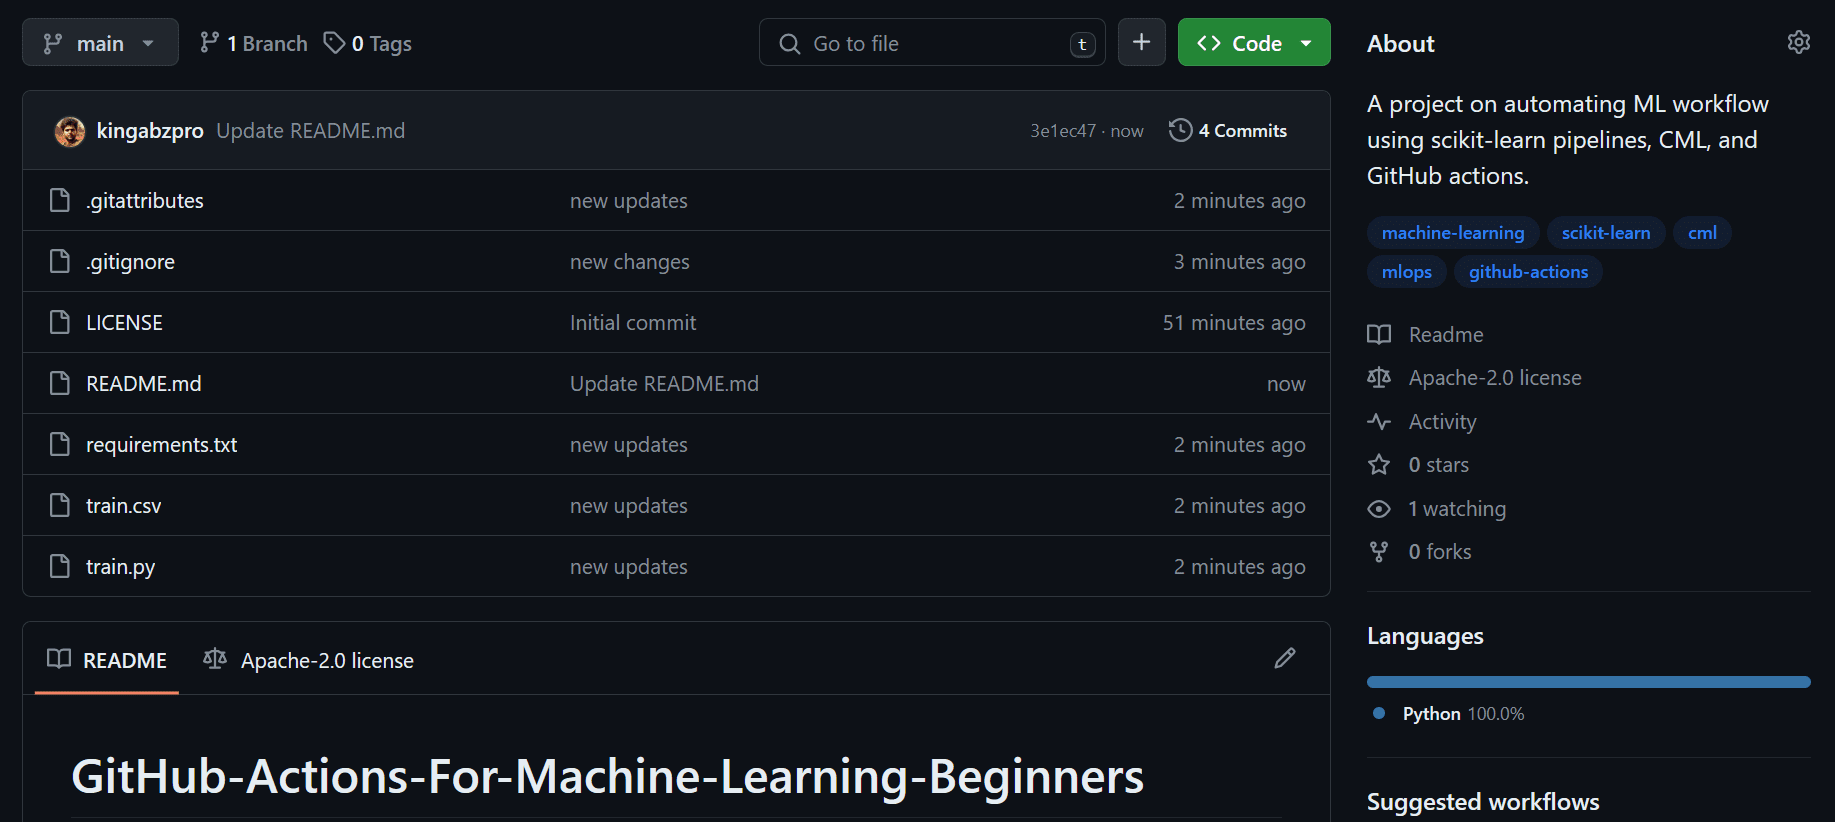
This is how your GitHub repository should look like.
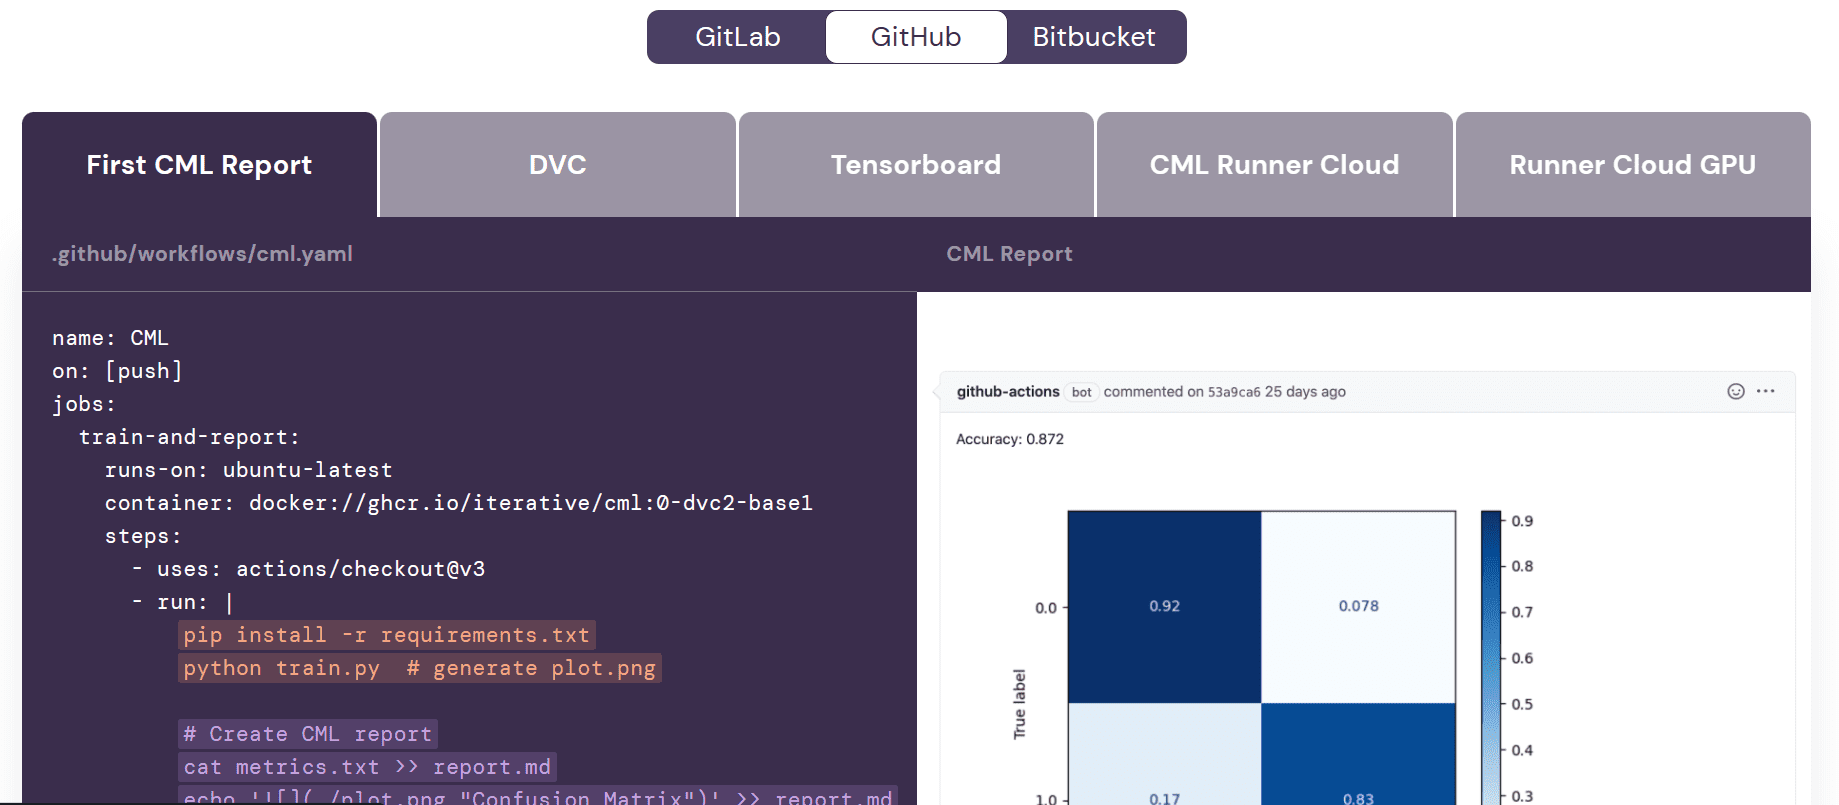
CML
Before we begin working on the workflow, it's important to understand the purpose of Continuous Machine Learning (CML) actions. CML functions are used in the workflow to automate the process of generating a model evaluation report. What does this mean? Well, when we push changes to GitHub, a report will be automatically generated under the commit. This report will include performance metrics and a confusion matrix, and we will also receive an email with all this information.
GitHub Actions
It's time for the main part. We will develop a machine learning workflow for training and evaluating our model. This workflow will be activated whenever we push our code to the main branch or when someone submits a pull request to the main branch.
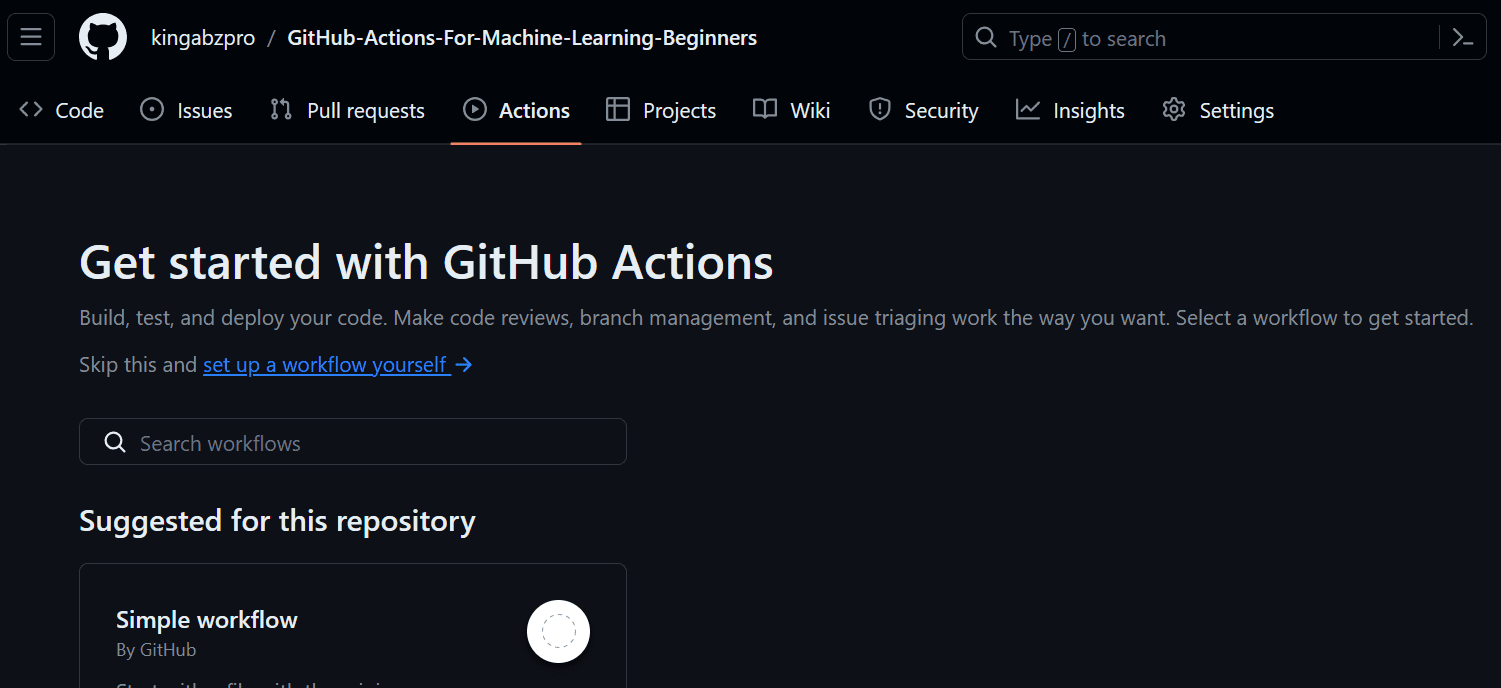
To create our first workflow, navigate to the “Actions” tab on the repository and click on the blue text “set up a workflow yourself.” It will create a YML file in the .github/workflows directory and provide us with the interactive code editor for adding the code.
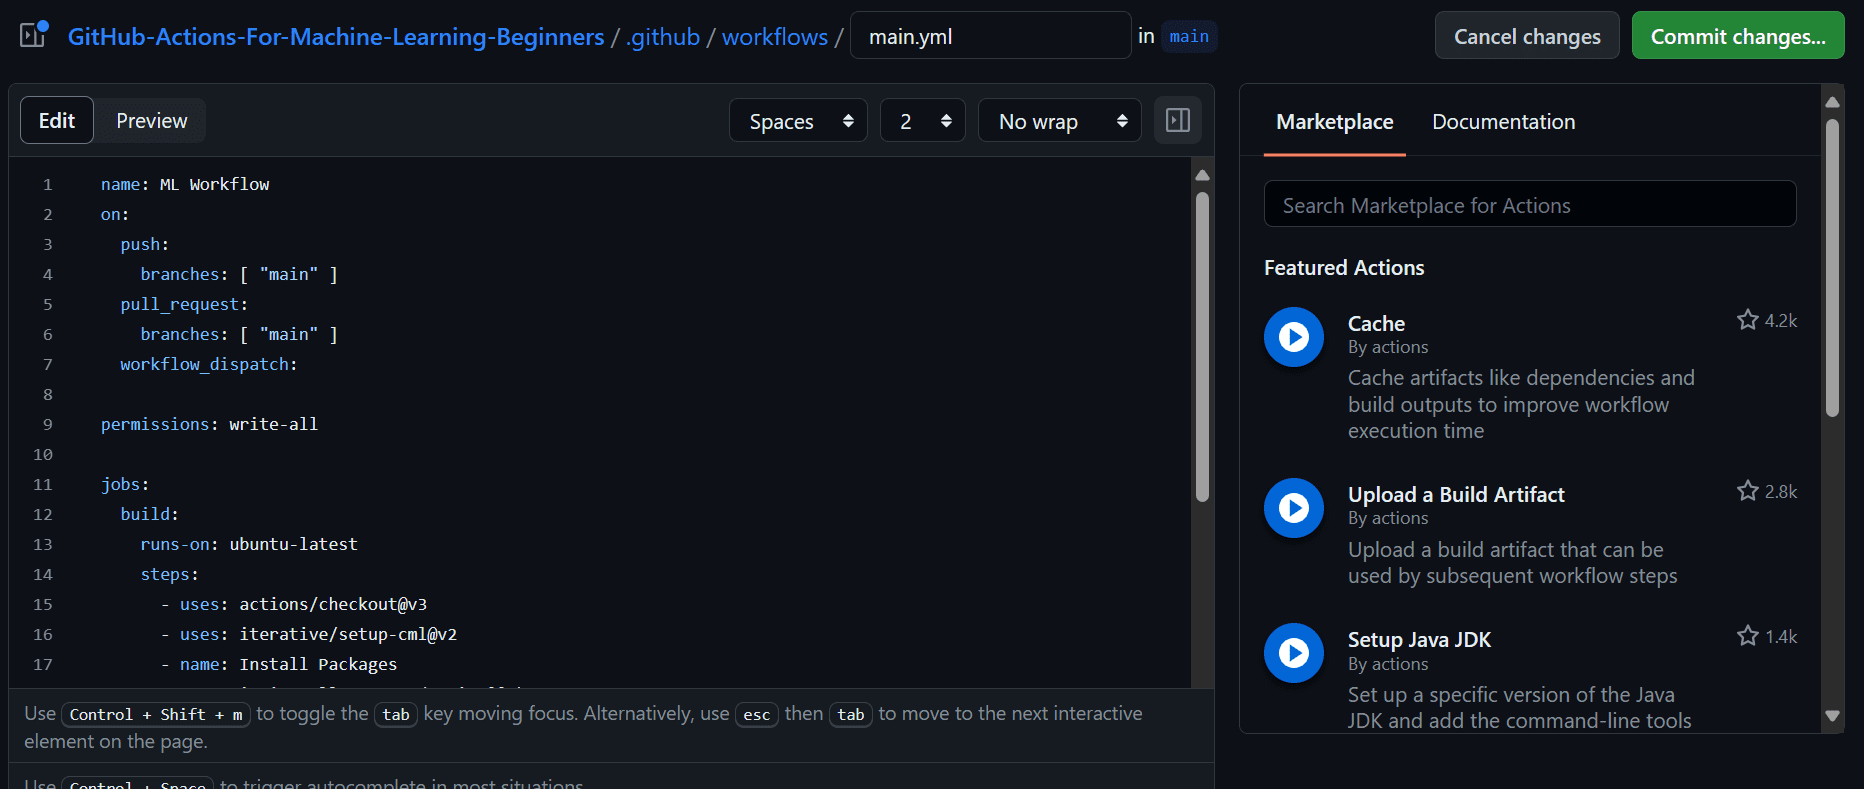
Add the following code to the workflow file. In this code, we are:
- Naming our workflow.
- Setting the triggers on push and pull request using `on` keyworks.
- Providing the actions with written permission so that the CML action can create the message under the commit.
- Use Ubuntu Linux runner.
- Use `actions/checkout@v3` action to access all the repository files, including the dataset.
- Using `iterative/setup-cml@v2` action to install the CML package.
- Create the run for installing all of the Python packages.
- Create the run for formatting the Python files.
- Create the run for training and evaluating the model.
- Create the run with GITHUB_TOKEN for moving the model metrics and confusion matrix plot to report.md file. Then, use the CML command to create the report under the commit comment.
name: ML Workflow
on:
push:
branches: [ "main" ]
pull_request:
branches: [ "main" ]
workflow_dispatch:
permissions: write-all
jobs:
build:
runs-on: ubuntu-latest
steps:
- uses: actions/checkout@v3
with:
lfs: true
- uses: iterative/setup-cml@v2
- name: Install Packages
run: pip install --upgrade pip && pip install -r requirements.txt
- name: Format
run: black *.py
- name: Train
run: python train.py
- name: Evaluation
env:
REPO_TOKEN: ${{ secrets.GITHUB_TOKEN }}
run: |
echo "## Model Metrics" > report.md
cat metrics.txt >> report.md
echo '## Confusion Matrix Plot' >> report.md
echo '' >> report.md
cml comment create report.md
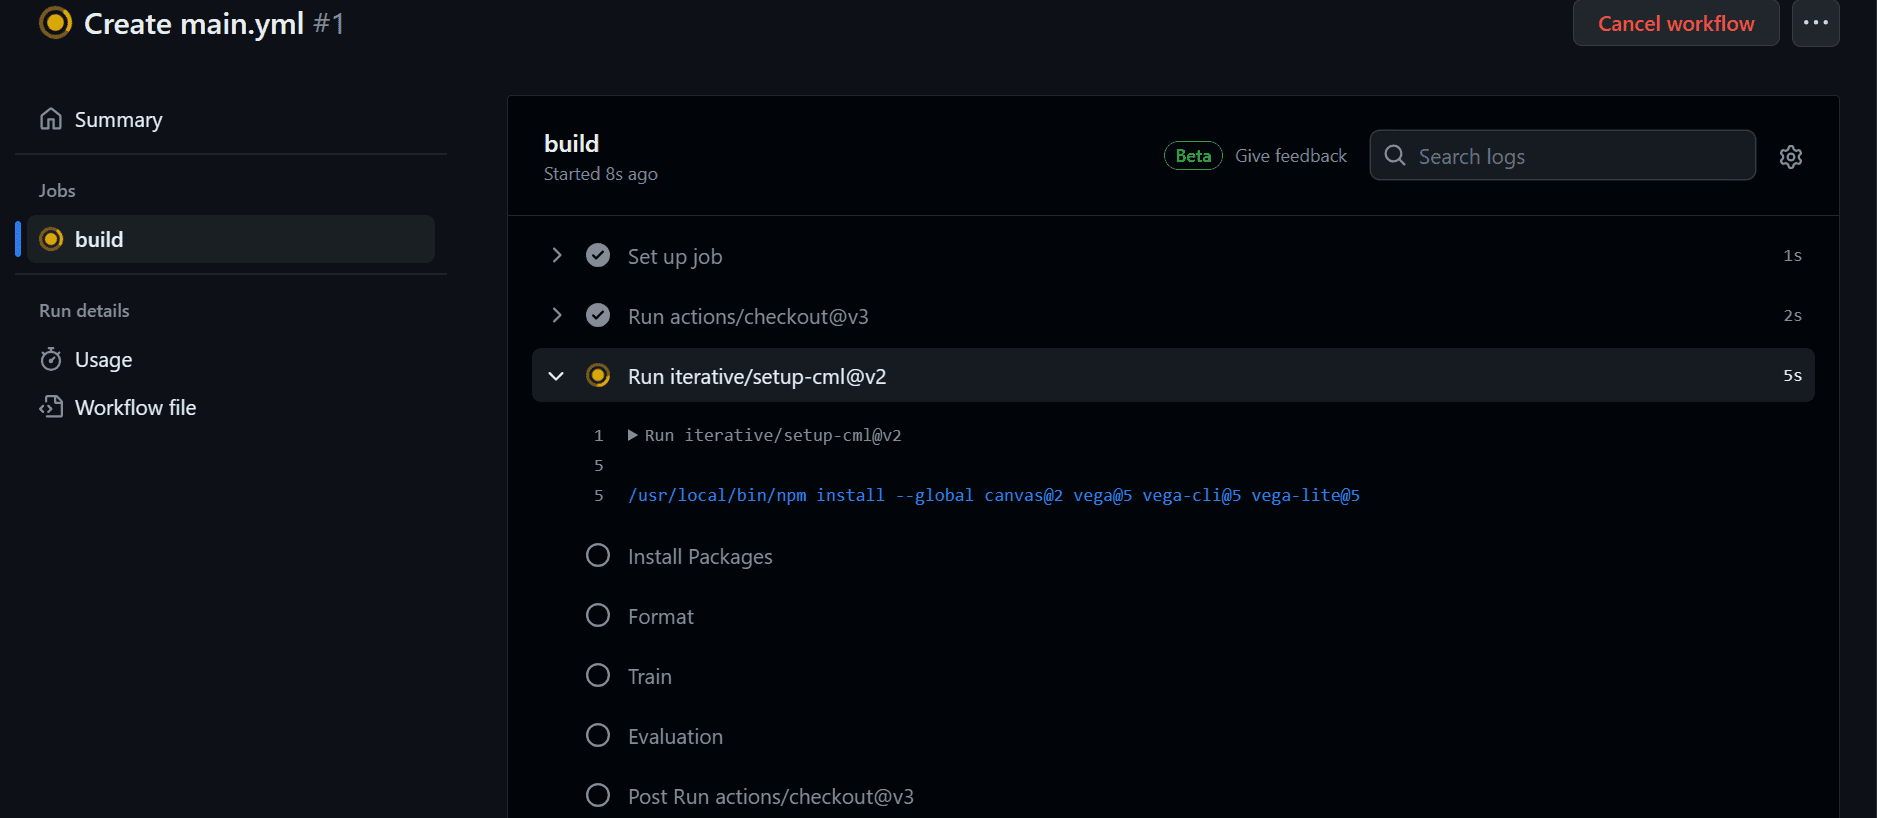
This is how it should look on your GitHub workflow.
After committing the changes. The workflow will start executing the command sequentially.
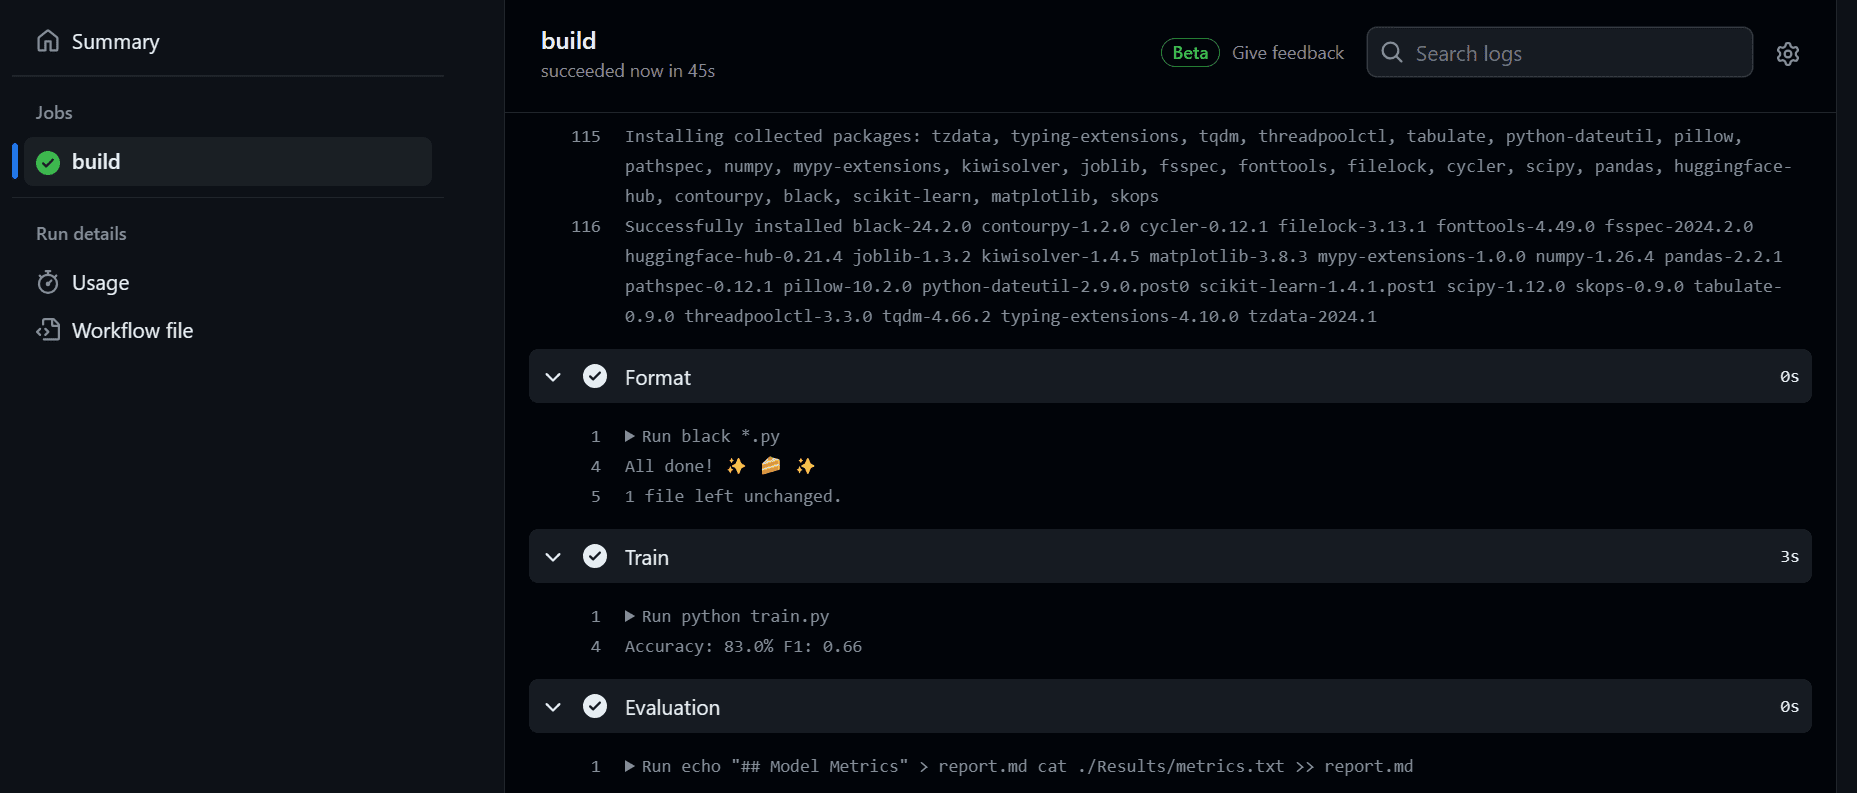
After completing the workflow, we can view the logs by clicking on the recent workflow in the "Actions" tab, opening the build, and reviewing each task's logs.
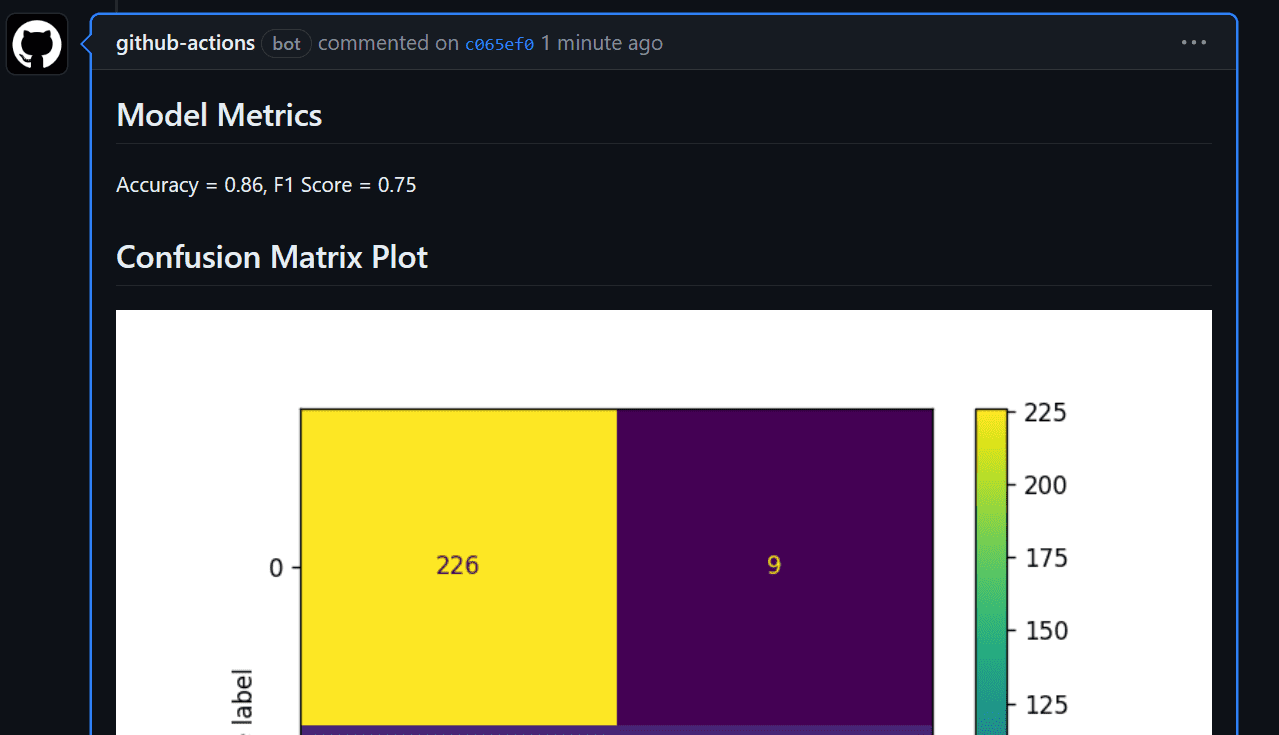
We can now view the model evaluation under the commit messages section. We can access it by clicking on the commit link: fixed location in workflow · kingabzpro/GitHub-Actions-For-Machine-Learning-Beginners@44c74fa
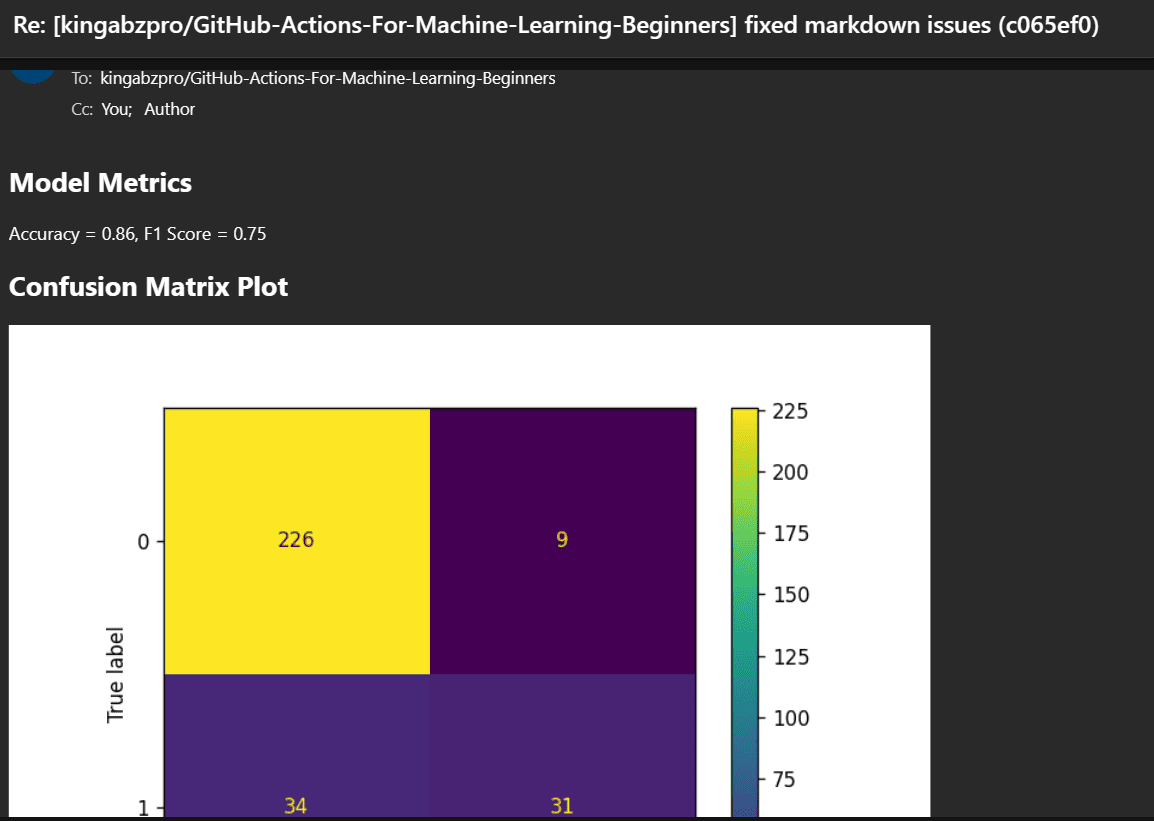
You will also receive an email from GitHub
The code source is available on my GitHub repository: kingabzpro/GitHub-Actions-For-Machine-Learning-Beginners. You can clone it and try it yourself.
Final Thoughts
Machine learning operation (MLOps) is a vast field that requires knowledge of various tools and platforms to successfully build and deploy models in production. To get started with MLOps, it is recommended to follow a comprehensive tutorial, "A Beginner's Guide to CI/CD for Machine Learning". It will provide you with a solid foundation to effectively implement MLOps techniques.
In this tutorial, we covered what GitHub Actions are and how they can be used to automate your machine learning workflow. We also learned about CML Actions and how to write scripts in YML format to run jobs successfully. If you're still confused about where to start, I suggest taking a look at The Only Free Course You Need To Become a MLOps Engineer.
Abid Ali Awan (@1abidaliawan) is a certified data scientist professional who loves building machine learning models. Currently, he is focusing on content creation and writing technical blogs on machine learning and data science technologies. Abid holds a Master's degree in technology management and a bachelor's degree in telecommunication engineering. His vision is to build an AI product using a graph neural network for students struggling with mental illness.