Kaggle Kernels Guide for Beginners: A Step by Step Tutorial
This is an attempt to hold the hands of a complete beginner and walk them through the world of Kaggle Kernels — for them to get started.
By Abdul Majed Raja, Analyst at Cisco
Sometime back, I wrote an article titled “Show off your Data Science skills with Kaggle Kernels” and then later realized that even though the article made a good claim on how Kaggle Kernels could be a powerful portfolio for a Data scientist, it did nothing about how a complete beginner can get started with Kaggle Kernels.
This is an attempt to hold the hands of a complete beginner and walk them through the world of Kaggle Kernels — for them to get started.
Register on Kaggle — https://www.kaggle.com/
If you don’t have a Kaggle Account account, the first step is to register on Kaggle. You can either use your Google Account or Facebook Account to create your new Kaggle account and log in. If none of the above, you can enter your email id and your preferred password and create your new account.

Logging in into Kaggle
If you have an account already or you just created one, Click the sign inbutton on the top-right corner of the page to initiate the login process. Again, you’ll be given an option to login with Google / Facebook / Yahoo or the last one, with the user name password that you entered while creating your account.

Kaggle Dashboard
After you login, You’ll be taken to the Kaggle Dashboard. (It’s just the welcome page, I don’t know what else to call, so called it a Dashboard).

This is how your landing page appears immediately after you login (if you had logged in from https://www.kaggle.com/). It has many components, few of them:
- A feed of Kaggle Kernels that are recently updated or recommended to you by Kaggle
- Profile summary (first of right sidebar)
- Job Ad (right sidebar)
- Your competitions (right sidebar — after scrolling down)
- Your Kernels (right sidebar — after scrolling down)
Where we are heading next is the top Kernels button in the navigation bar.
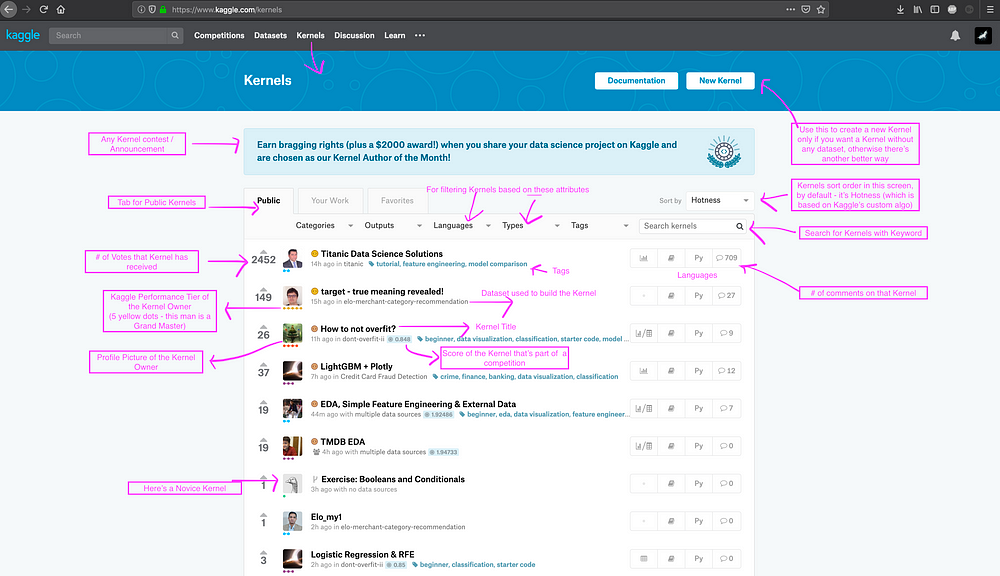
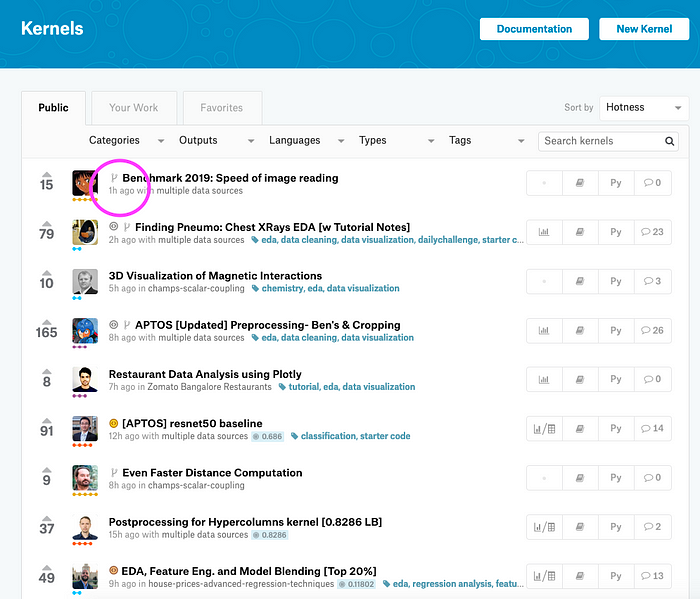
Kaggle Kernels List (Hottest):
Once we click the top Kernels button from any place of the Kaggle Journey, we’ll land on this screen.
This is the screen where everyone tries to see their Kernel because this is like the Front Page of Kernels which means your Kernel has more likelihood of getting a lot more visibility if it ends up here. The default sort order in the Kernels page is Hotness which is based on Kaggle’s secret sauce Algorithm to keep showing relevant Kernels but it also has got other options (to sort) like New, Most Votes and so on. Kaggle also uses this page to advertise if there’s any Kernel Contest happening / going to happen.
While we are here, A Kernel Contest is a Kaggle Competition which doesn’t fall under the Competition tier because of the nature of the contest where the output is a Kaggle Kernel and more often focused on Storytelling. Data Science for Good is one such series of Kernel contests where the Data Scientist / Kaggler is expected to help in a Social Problem (for good) using Data Science. For understanding more of it, You should check out the Kernels of Kernel Grandmaster Shivam Bansal who’s made a habit of winning them so many times.
Kaggle Kernels — New / Creation:
Now, that we’ve understood the meta of Kaggle Kernels, we can jump right into creation of New Kernels. There are two primary ways a Kaggle Kernel can be created:
- From the Kaggle Kernels (front page) using New Kernel Button
- From a Dataset Page using New Kernel Button
Method #1: From the Kaggle Kernels (front page) using New Kernel Button
As you can see in the above screenshot, Clicking the New Kernel button from the Kernels page would enable you create a new Kernel. This method is good if you are trying to practice something of your own or you’re planning to input your own dataset. This method isn’t advisable (in my opinion), if you want to create a Kernel for a dataset that’s already existing on Kaggle.
Method #2: From a Dataset Page using New Kernel Button
This is one of the most popularly used method (at least by me) for creating new Kernels. You can open the dataset page of the dataset of your interest (like the one in the screenshot below) and then click New Kernel button in there. The advantage with this method is that unlike the Method #1, in this method #2 the Kaggle Dataset from which the Kernel is created comes attached with the Kernel (by default) thus making this boring process of inputting a dataset to your kernel easier, faster and straightforward.

Kaggle Kernels — Kernel Type:
Irrespective of Method #1 or #2, Once you click the New Kernel, you’ll be presented with this modal screen to select the type of Kaggle Kernel you’d like to create.

Broadly it’s two categories — 1. Script vs 2. Notebook.
As we all know about a Notebook (cell-based layout), It’s just what a Jupyter Notebook is and the Script is what you’d code on probably — Pycharm or Sublime Text or RStudio. Additionally for R users, the script is the Kernel type for RMarkdown — the beautiful way to programmatically generate a report from R.
To summarize the types of Kernels:
- Script
* Python
* R
* RMarkdown - Notebook
* Python
* R
Kaggle Kernels — Kernel Language:
This second level of Kernel Language selection happens only after the first level of Kernel Type Selection.
As in the above GIF of a Kaggle Kernel of Type Script, The language of the Kernel can be changed by going into Settings and then selecting desired Language — R / Py / RMarkdown. The same settings also provide option to make your Kernel Sharing Public (which by default is Private unless made Public). Private Kernels are usually used if you’re working on your university assignment or self-learning where you didn’t want to reveal the code. Private Kernels are also used by Kagglers who participate in competition to leverage Kaggle’s computation power but not reveal their code / approach.
Notebook Kernel:
Similar to the above GIF, where Kernel Type Script is selected, You can also select Notebook to create a Notebook Kernel.
RMarkdown Kernel — (Kernel Type: Script > RMarkdown)
RMarkdown uses a combination of R and Markdown in generating Analytical Reports with interactive visualizations embedded on it. While this is the most simplistic way of explaining what’s RMarkdown, its uses and potential grow much farther and beyond the definition.
Fortunately, Kaggle Kernel Script supports Rmarkdown which means it can help create Interactive documentation and much more that wouldn’t be possible in a Notebook-based scenario. Here’s a full-fledged Interactive Dashboard built on Kaggle Kernel by Saba Tavoosi, that illustrates the potential of Kaggle Kernels not just for building Machine Learning models but also for interactive storytelling at its best form. Checkout this course, If you’re interested in learning how to build dashboards with flexdashboard.

Copy and Edit (formerly, Forking)
Similar to the Fork option in Github, If you would like to take an existing Kaggle Kernel and use it in your own space — to modify or give your own touch — you’d need to use the top right blue button Copy and Edit . In fact, In a lot of Machine Learning competitions on Kaggle Competitions track, many high scoring public kernels are usually forks of forks forks where one Kaggler would improve upon the model that was already built by some other Kaggler and made them available as a Public Kernel.
Public / Private Kernel
As we saw above in another section, Access setting of a Kaggle Kernel can be either Public or Private. A Public Kernel (as obviously the name suggests) is available and visible for everyone (including Kagglers and Non-Kagglers). A Private Kernel is available for only the owner (one who created it) and those with whom the owner shared the Kernel with. A Public Kernel can be also built on Private Dataset. Let’s say, It’s a Machine Learning competition and you’ve done some feature engineering with some 3rd Party data and you wouldn’t want to reveal the data during the period of the competition. This is a typical scenario where Kagglers usually keep their dataset private, yet make the Kernel a Public one so others can see their approach and learn from it.
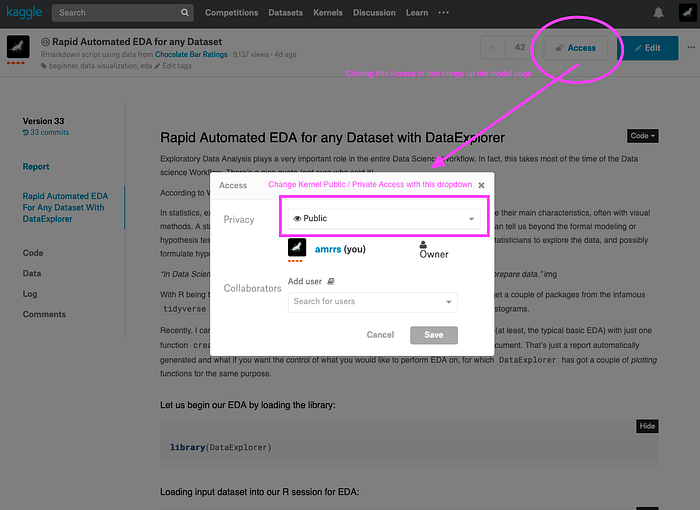
The screenshot above illustrates how an existing Kernel’s access setting could be changed to either Private or Public. All newly created Kernels are Private by default (at this time of writing) and the owner then changes it Public if required.
TL;DR — How to create a New Kaggle Kernel
If everything above seemed a bit too heavy to grasp at the first glance, this is the section to help you with creating your first Kaggle Kernel.

Steps:
- Login to Kaggle using your Credentials
- Go to any Public Kaggle Dataset
- Click New Kernel on the top right (blue-colored button)
- Select Notebook/Script of your interest
- If Python is your language of choice leave it as it’s, If R, then go to the Settings at the right side and click to expand the items where you can see Python next to the Language which you can click to change to R
- Go to the Editor section / Pane (left-side) of the screen and Start writing your beautiful code (the above GIF also illustrates how you can use the dataset from where you created the Kernel)
- Once your code is complete, click Commit on the top right (blue-colored button)
- If your Kernel execution is successful (without any errors), Make your Kernel Public (either by editing the Kernel Settings > Sharing (Public)or by opening the Kernel again and clicking the Access button on the top)
- At this stage, your first Kaggle Kernel must be ready for being shared with your friends across your network!
Check out this Kaggle Video for assistance.
The END
For a lot of Kagglers, Competition Track has been their fun ride but for me, Kaggle Kernels Track has been my thing which gives us the enormous potential of completing a full-stack data science journey from Data Prep to Data Visualization — Machine Learning Modelling to Storytelling. Hope you’d like it too. Good Luck on your Kaggle Kernel Journey.
Check out my Kaggle Kernels at My Kaggle Profile and share your feedback with me at My Linkedin Profile. The videos/GIFs/screenshots used in this tutorial is available on my github.
Bio: AbdulMajedRaja is an Analyst at Cisco.
Original. Reposted with permission.
Related:
- Show off your Data Science skills with Kaggle Kernels
- How to Make Stunning 3D Plots for Better Storytelling
- Building a Daily Bitcoin Price Tracker with Coindeskr and Shiny in R