 Prefect: How to Write and Schedule Your First ETL Pipeline with Python
 Prefect: How to Write and Schedule Your First ETL Pipeline with Python
Workflow management systems made easy — both locally and in the cloud.
By Dario Radečić, Consultant at NEOS

Photo by Helena Lopes from Pexels
Prefect is a Python-based workflow management system based on a simple premise — Your code probably works, but sometimes it doesn’t (source). No one thinks about workflow systems when everything works as expected. But when things go south, Prefect will guarantee your code fails successfully.
As a workflow management system, Prefect makes it easy to add logging, retries, dynamic mapping, caching, failure notifications, and more to your data pipelines. It is invisible when you don’t need it — when everything works as expected, and visible when you do. Something like insurance.
While Prefect isn’t the only available workflow management system for Python users, it is undoubtedly the most proficient one. Alternatives such as Apache Airflow usually work well, but introduce a lot of headaches when working on big projects. You can read a detailed comparison between Prefect and Airflow here.
This article covers the basics of the library, such as tasks, flows, parameters, failures, and schedules, and also explains how to set up the environment both locally and in the cloud. We’ll use Saturn Cloud for that part, as it makes the configuration effortless. It is a cloud platform made by data scientists, so most of the heavy lifting is done for you.
Saturn Cloud can handle Prefect workflows without breaking a sweat. It is also a cutting-edge solution for anything from dashboards to distributed machine learning, deep learning, and GPU training.
Today you’ll learn how to:
- Install Prefect locally
- Write a simple ETL pipeline with Python
- Use Prefect to declare tasks, flows, parameters, schedules and handle failures
- Run Prefect in Saturn Cloud
How to Install Prefect Locally
We’ll install the Prefect library inside a virtual environment. The following commands will create and activate the environment named prefect_env through Anaconda, based on Python 3.8:
conda create — name prefect_env python=3.8
conda activate prefect_env
You’ll have to enter y a couple of times to instruct Anaconda to proceed, but that’s the case with every installation. Library-wise, we’ll need Pandas for data manipulation, Requests for downloading the data, and of course, Prefect for workflow management:
conda install requests pandas
conda install -c conda-forge prefect
We now have everything needed to start writing Python code. Let’s do that next.
Writing an ETL Pipeline With Python
We’ll use Prefect to complete a relatively simple task today — run an ETL pipeline. This pipeline will download the data from a dummy API, transform it, and save it as a CSV. The JSON Placeholder website will serve as our dummy API. Among other things, it contains fake data for ten users:
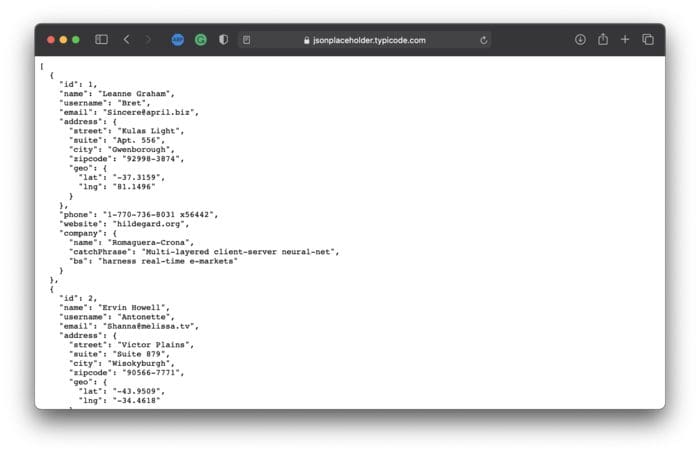
Image 1 — Fake user data (source: https://jsonplaceholder.typicode.com/users) (image by author)
Let’s start by creating a Python file — I’ve named mine 01_etl_pipeline.py. Also, make sure to have a folder where extracted and transformed data will be saved. I’ve called it data, and it’s located right where the Python scripts are.
Any ETL pipeline needs three functions implemented — for extracting, transforming, and loading the data. Here’s what these functions will do in our case:
extract(url: str) -> dict— makes a GET request to theurlparameter. Tests to see if some data was returned — in that case, it is returned as a dictionary. Otherwise, an exception is raised.transform(data: dict) -> pd.DataFrame— transforms the data so only specific attributes are kept: ID, name, username, email, address, phone number, and company. Returns the transformed data as a Pandas DataFrame.load(data: pd.DataFrame, path: str) -> None— saves the previously transformeddatato a CSV file atpath. We’ll also append a timestamp to the file name, so the files don’t get overwritten.
After function declaration, all three are called when the Python script is executed. Here’s the complete code snippet:
You can now run the script by executing the following from the Terminal:
python 01_etl_pipeline.py
You shouldn’t see any output if everything ran correctly. However, you should see CSV file(s) in the data folder (I’ve run the file twice):
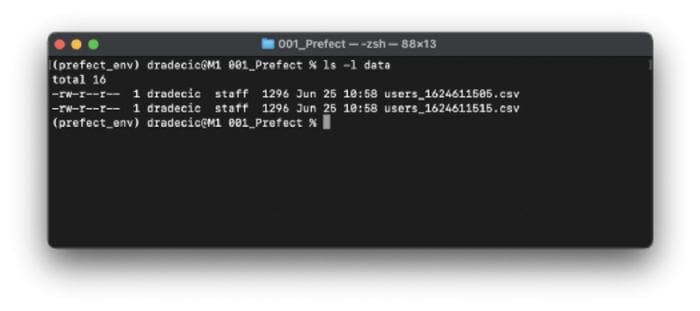
Image 2 — List of CSV files in the data folder after running the ETL pipeline twice (image by author)
As you can see, the ETL pipeline runs and finishes without any errors. But what if you want to run the pipeline at a schedule? That’s where Prefect comes in.
Exploring the Basics of Prefect
In this section, you’ll learn the basics of Prefect tasks, flows, parameters, schedules, and much more.
Prefect Tasks
Let’s start with the most simple one — tasks. It’s basically a single step of your workflow. To follow along, create a new Python file called 02_task_conversion.py. Copy everything from 01_etl_pipeline.py, and you’re ready to go.
To convert a Python function to a Prefect Task, you first need to make the necessary import — from prefect import task, and decorate any function of interest. Here’s an example:
@task
def my_function():
    pass
That’s all you have to do! Here’s the updated version of our ETL pipeline:
Let’s run it and see what happens:
python 02_task_conversion.py
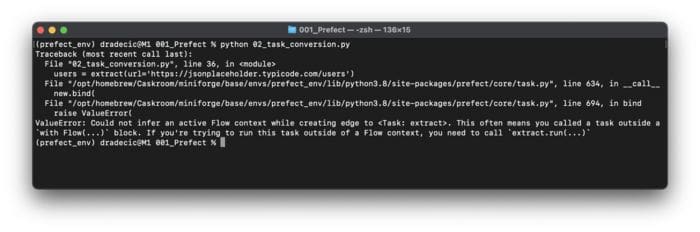
Image 3 — Function to Task conversion with Prefect (image by author)
It looks like something is wrong. That’s because Prefect Task can’t be run without the Prefect Flow. Let’s implement it next.
Prefect Flow
Copy everything from 02_task_conversion.py to a new file — 03_flow.py. You’ll need to import Flow from the prefect library before declaring it.
To declare a Flow, we’ll write another Python function — prefect_flow(). It won’t accept any parameters and won’t be decorated with anything. Inside the function, we’ll use Python’s context manager to create a flow. The flow should contain the same three lines that were previously inside the if __name__ == ‘__main__” code block.
In the mentioned block, we’ll now have to run the flow with the corresponding run() function.
Here’s the complete code for this file:
Let’s run it and see what happens:
python 03_flow.py

Image 4 — Running the Prefect Flow for the first time (image by author)
Now that’s something! Not only is the ETL pipeline executed, but we also get detailed information about when every task started and finished. I’ve run the file twice, so two new CSV files should get saved to the data folder. Let’s verify if that’s the case:

Image 5 — CSV files generated by the Prefect Flow (image by author)
And that’s how you can run a simple ETL pipeline with Prefect. It doesn’t have many benefits over a pure Python implementation yet, but we’ll change that quickly.
Prefect Parameters
Hardcoding parameter values is never a good idea. That’s where Prefect Parameters come in. To start, copy everything from 03_flow.py to a new file — 04_parameters.py. You’ll need to import the Parameter class from the prefect package.
You can use this class inside the flow context manager. Here are the arguments you’ll find helpful:
name— name of the parameter, will be used later upon running the flow.required— a boolean value, specifies if the parameter is required for the flow to execute.default— specifies the default value for the parameter.
We’ll declare a parameter for the API URL — param_url = Parameter(name=’p_url’, required=True).
To assign values to the parameters, you’ll need to specify the parameters dictionary as an argument to the run() function. Parameter names and values should be written as key-value pairs.
Here’s the complete code for this file:
Let’s run the file and see what happens:
python 04_parameters.py
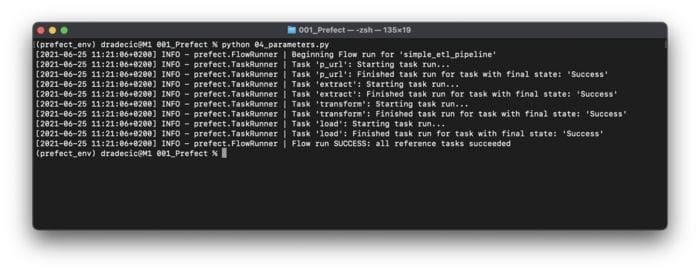
Image 6 — Running the Prefect Flow containing Parameters (image by author)
I’ve run the file twice, so two new CSV files should appear in the data folder. Let’s verify if that’s true:
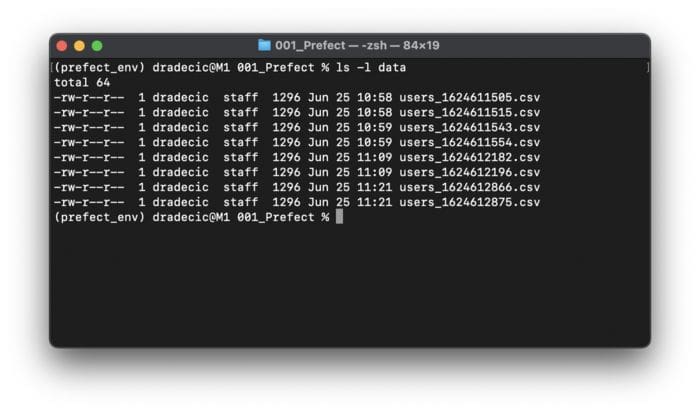
Image 7 — CSV files generated by Prefect Flow containing Parameters (image by author)
And there you have it — parameter value specification at one place. It makes it easy to make changes down the road and also to manage more complex workflows.
Up next, we’ll explore a feature of Prefect that makes it particularly useful — schedules.
Prefect Schedules
We’ll explore two ways to schedule tasks today — Interval schedule and Cron schedule. The second one might sound familiar, as Cron is a well-known method of scheduling tasks on Unix.
We’ll begin with the Interval Scheduler. To start, copy everything from 04_intervals.py to 05_interval_scheduler.py. You’ll have to import IntervalScheduler from prefect.schedules.
Then, we’ll make an instance of the imported class right before the prefect_flow() function declaration and instruct it to run every ten seconds. That can be done by setting the value of the interval parameter.
To connect a scheduler to the workflow, you’ll have to specify the value for the schedule parameter when initializing the Flow class with the context manager.
The whole script file should look like this:
Let’s run the file and see what happens:
python 05_interval_scheduler.py
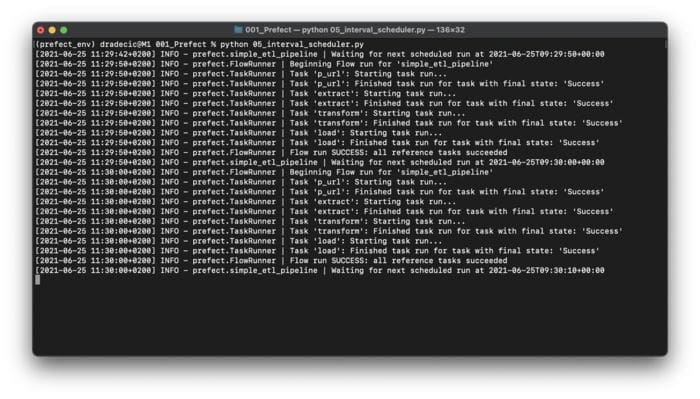
Image 8 — Using Interval Schedule (image by author)
As you can see, the entire ETL pipeline ran two times. Prefect will report to the Terminal when the next execution will occur.
Now, let’s explore the Cron Scheduler. Copy everything from 05_interval_scheduler.py to 06_cron_scheduler.py. This time you’ll import CronSchedule instead of IntervalSchedule.
Upon class initialization, you’ll specify a cron pattern to the cron parameter. Five star symbols will ensure the workflow runs every minute. That’s the lowest possible interval with Cron.
The rest of the file remains identical. Here’s the code:
Let’s run the file:
python 06_cron_scheduler.py
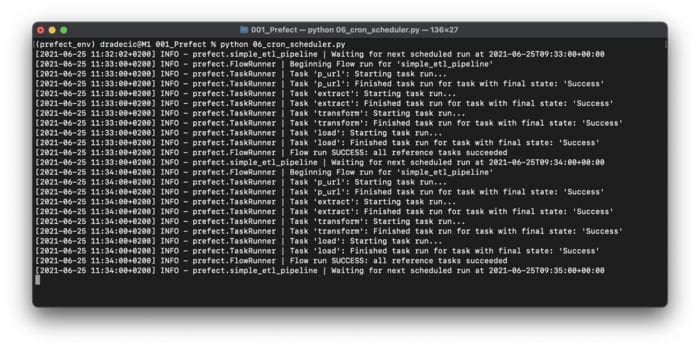
Image 9 — Using Cron Schedule (image by author)
As you can see, the ETL pipeline was run twice every full minute, as specified by the Cron pattern. For the final part of this section, we’ll explore how to handle failure — and explain why you should always prepare for it.
Prefect Failures
Sooner or later, an unexpected error will happen in your workflow. Prefect provides a ridiculously easy way to retry the execution of a task. To start, copy everything from 04_parameters.py to a new file — 07_failures.py.
The extract() function could fail for different network reasons. For example, maybe the API isn’t available at the moment but will be in a couple of seconds. These things happen in a production environment and shouldn’t crash your application altogether.
To avoid unwanted crashes, we can extend our task decorator a bit. It can accept different parameters, and today we’ll use max_retries and retry_delay. Both are self-explanatory, so I won’t bother with further explanation.
The only problem is — our workflow won’t fail as is. But it will if we place a non-existing URL as a parameter value inside flow.run(). Here’s the code:
Let’s run the file:
python 07_failures.py

Image 10 — Preventing failures with Prefect (image by author)
The task failed, but the workflow didn’t crash. Of course, it will crash after ten retries, but you can always change the parameter specification.
And that does it for working with Prefect locally. Next, let’s move our code to the cloud and explore the changes.
Running Prefect in Saturn Cloud
Let’s get our hands dirty right away. To start, sign up for a free version of a Prefect Cloud account. The registration process is straightforward and requires no further explanation. Once registered, create a project. I’ve named mine SaturnCloudDemo.
Before going over to Saturn Cloud, you’ll have to create an API key in Prefect that will connect the two. You’ll find the API Key option under settings. As you can see, I’ve named mine SaturnDemoKey:
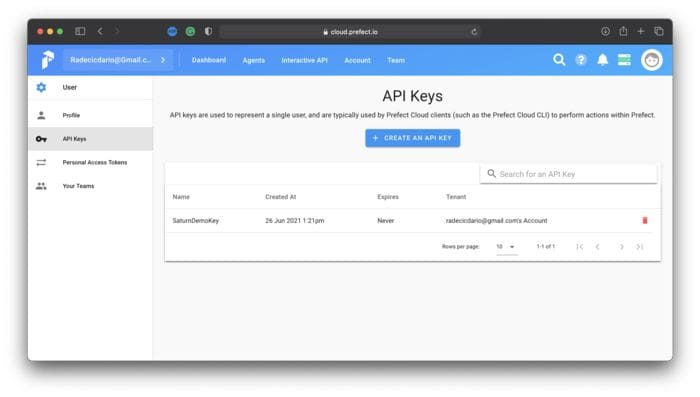
Image 11 — Prefect Cloud API key creation (image by author)
You now have everything needed, so go over to Saturn Cloud and create a free account. Once on the dashboard, you’ll see multiple options for project creation. Select the Prefect option, like the one you can see below:
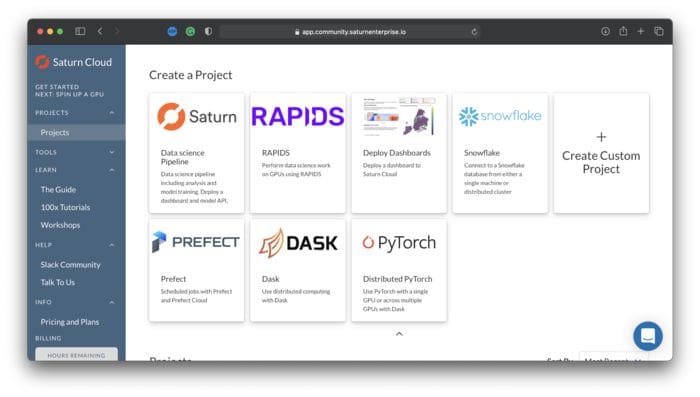
Image 12 — Creating a Prefect project in Saturn Cloud (image by author)
Saturn Cloud will now automatically do all the heavy lifting for you, and a couple of minutes later, you’ll be able to open a JupyterLab instance by clicking on the button:
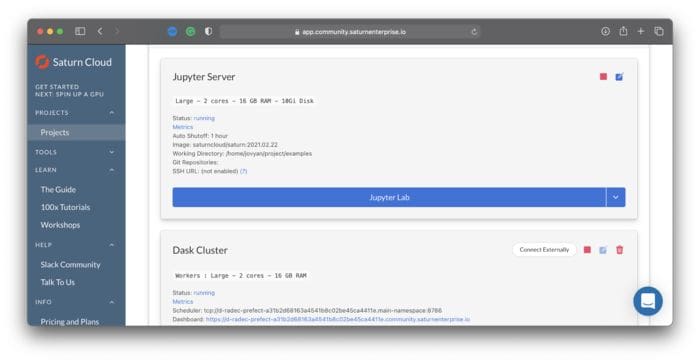
Image 13 — Opening JupyterLab in Saturn Cloud (image by author)
You’ll have access to two notebooks — the second one shows a quick demonstration of using Prefect in Saturn Cloud. Here’s how it looks:
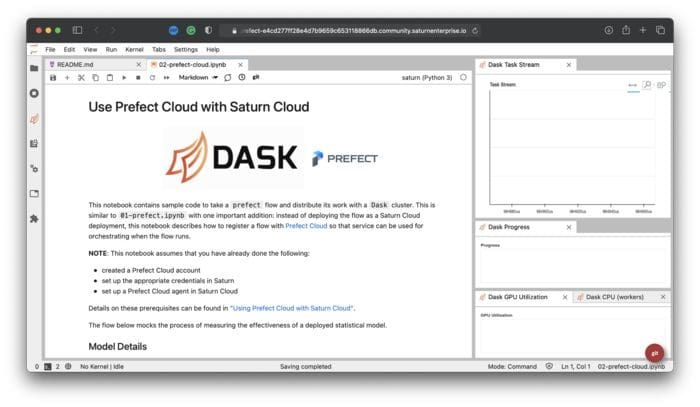
Image 14 — Prefect Cloud notebook in Saturn Cloud (image by author)
You’ll need to change only two things for a notebook to work. First, change the project name to the name of your project in Prefect Cloud. Second, replace <your_api_key_here> with an API key generated a couple of minutes ago. If you did everything correctly, you should see the following message:
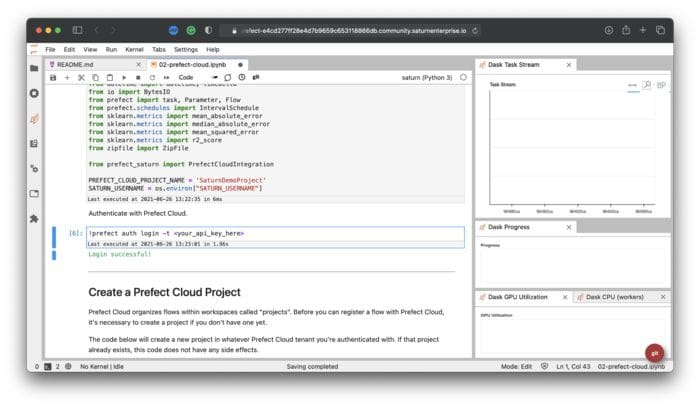
Image 15 — Login successful message in Saturn Cloud (image by author)
To test, run every cell that follows in the notebook. Then go over to the Prefect Cloud dashboard and open up your project. It won’t be empty as it was a couple of minutes ago:

Image 16 — Successful Prefect task scheduling (image by author)
And that’s all you have to do! Feel free to copy/paste our ETL pipeline and verify that it works. That’s where Saturn Cloud shines — you can copy/paste the code from the local machine with minimal changes, as everything tedious is configured automatically.
Let’s wrap things up in the next section.
Final Thoughts
And there you have it — the basics of Prefect explained, both locally and on the cloud. I hope you can see the value of workflow management systems for production applications even if you knew nothing about the topic before reading this article.
For more advanced guides, i.e., configuring logging and Slack notifications, please refer to the official documentation. The provided examples are more than enough to get you started.
Stay Connected
- Follow me on Medium for more stories like this
- Sign up for my newsletter
- Connect on LinkedIn
Bio: Dario Radečić is a consultant at NEOS.
Original. Reposted with permission.
Related:
- Development & Testing of ETL Pipelines for AWS Locally
- What’s ETL?
- dbt for Data Transformation – Hands-on Tutorial