Fine Tuning LLAMAv2 with QLora on Google Colab for Free
Learn how to fine-tune one of the most influential open-source models for free on Google Colab.

Generated using ideogram.ai with the prompt: “A photo of LLAMA with the banner written “QLora” on it., 3d render, wildlife photography”
It was a dream to fine-tune a 7B model on a single GPU for free on Google Colab until recently. On 23 May 2023, Tim Dettmers and his team submitted a revolutionary paper[1] on fine-tuning Quantized Large Language Models.
A Quantized model is a model that has its weights in a data type that is lower than the data type on which it was trained. For example, if you train a model in a 32-bit floating point, and then convert those weights to a lower data type such as 16/8/4 bit floating point such that there is minimal to no effect on the performance of the model.
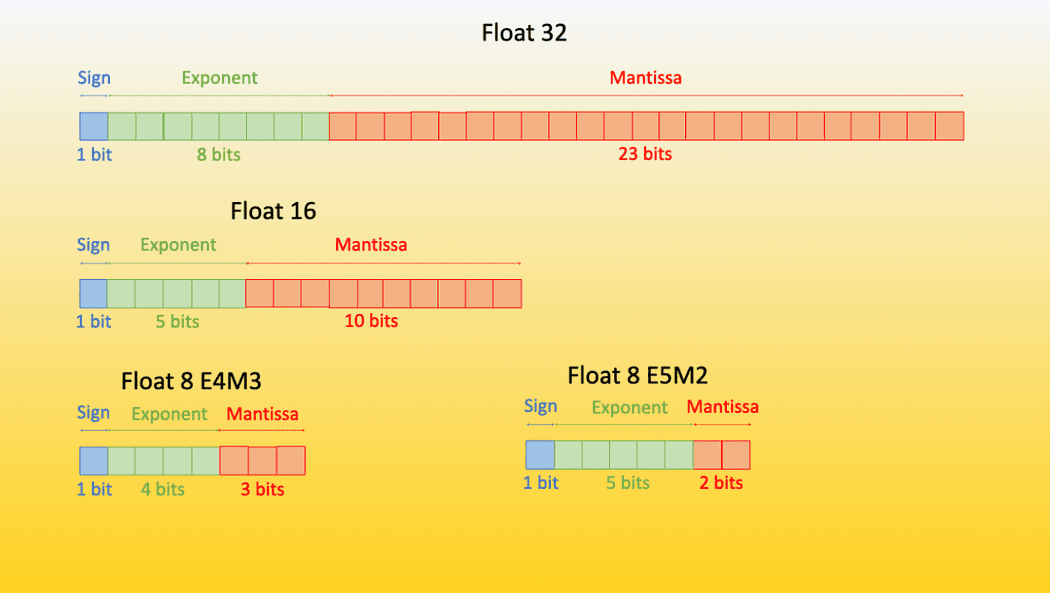
Source [2]
We are not going to talk much about the theory of quantization here, You can refer to the excellent blog post by Hugging-Face[2][3] and an excellent YouTube video[4] by Tim Dettmers himself to understand the underlying theory.
In short, it can be said that QLora means:
Fine-Tuning a Quantized Large Language models using Low Rank Adaptation Matrices (LoRA)[5]
Let’s jump straight into the code:
Data Preparation
It is important to understand that the large language models are designed to take instructions, this was first introduced in the 2021 ACL paper[6]. The idea is simple, we give a language model an instruction, and it follows the instruction and performs that task. So the dataset that we want to fine-tune our model should be in the instruct format, if not we can convert it.
One of the common formats is the instruct format. We will be using the Alpaca Prompt Template[7] which is
Below is an instruction that describes a task, paired with an input that provides further context. Write a response that appropriately completes the request.

### Instruction:
{instruction}

### Input:
{input}

### Response:
{response}
We will be using the SNLI dataset which is a dataset that has 2 sentences and the relationship between them whether they are contradiction, entailment of each other, or neutral. We will be using it to generate contradiction for a sentence using LLAMAv2. We can load this dataset simply using pandas.
import pandas as pd

df = pd.read_csv('snli_1.0_train_matched.csv')
df['gold_label'].value_counts().plot(kind='barh')
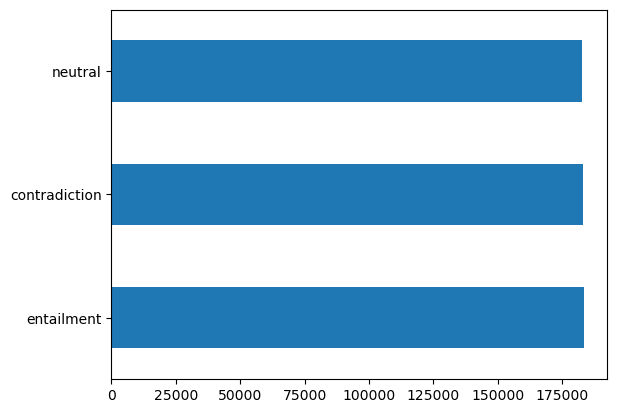
Labels Distribution
We can see a few random contradiction examples here.
df[df['gold_label'] == 'contradiction'].sample(10)[['sentence1', 'sentence2']]
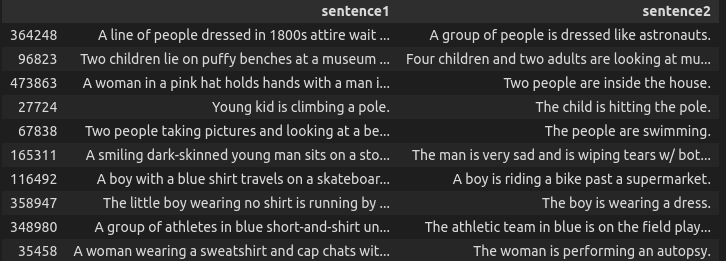
Contradiction Examples from SNLI
Now we can create a small function that takes only the contradictory sentences and converts the dataset instruct format.
def convert_to_format(row):
    sentence1 = row['sentence1']
    sentence2 = row['sentence2']ccccc
    prompt = """Below is an instruction that describes a task paired with input that provides further context. Write a response that appropriately completes the request."""
    instruction = """Given the following sentence, your job is to generate the negation for it in the json format"""
    input = str(sentence1)
    response = f"""```json
{{'orignal_sentence': '{sentence1}', 'generated_negation': '{sentence2}'}}
```
"""
    if len(input.strip()) == 0:  #  prompt + 2 new lines + ###instruction + new line + input + new line + ###response
        text = prompt + "\n\n### Instruction:\n" + instruction + "\n### Response:\n" + response
    else:
        text = prompt + "\n\n### Instruction:\n" + instruction + "\n### Input:\n" + input + "\n" + "\n### Response:\n" + response

    # we need 4 columns for auto train, instruction, input, output, text
    return pd.Series([instruction, input, response, text])

new_df = df[df['gold_label'] == 'contradiction'][['sentence1', 'sentence2']].apply(convert_to_format, axis=1)
new_df.columns = ['instruction', 'input', 'output', 'text']

new_df.to_csv('snli_instruct.csv', index=False)
Here is an example of the sample data point:
"Below is an instruction that describes a task paired with input that provides further context. Write a response that appropriately completes the request.

### Instruction:
Given the following sentence, your job is to generate the negation for it in the json format
### Input:
A couple playing with a little boy on the beach.

### Response:
```json
{'orignal_sentence': 'A couple playing with a little boy on the beach.', 'generated_negation': 'A couple watch a little girl play by herself on the beach.'}
```
Now we have our dataset in the correct format, let’s start with fine-tuning. Before starting it, let’s install the necessary packages. We will be using accelerate, peft (Parameter efficient Fine Tuning), combined with Hugging Face Bits and bytes and transformers.
!pip install -q accelerate==0.21.0 peft==0.4.0 bitsandbytes==0.40.2 transformers==4.31.0 trl==0.4.7
import os
import torch
from datasets import load_dataset
from transformers import (
    AutoModelForCausalLM,
    AutoTokenizer,
    BitsAndBytesConfig,
    HfArgumentParser,
    TrainingArguments,
    pipeline,
    logging,
)
from peft import LoraConfig, PeftModel
from trl import SFTTrainer
You can upload the formatted dataset to the drive and load it in the Colab.
from google.colab import drive
import pandas as pd

drive.mount('/content/drive')

df = pd.read_csv('/content/drive/MyDrive/snli_instruct.csv')
You can convert it to the Hugging Face dataset format easily using from_pandas method, this will be helpful in training the model.
from datasets import Dataset

dataset = Dataset.from_pandas(df)
We will be using the already quantized LLamav2 model which is provided by abhishek/llama-2–7b-hf-small-shards. Let’s define some hyperparameters and variables here:
# The model that you want to train from the Hugging Face hub
model_name = "abhishek/llama-2-7b-hf-small-shards"

# Fine-tuned model name
new_model = "llama-2-contradictor"

################################################################################
# QLoRA parameters
################################################################################

# LoRA attention dimension
lora_r = 64

# Alpha parameter for LoRA scaling
lora_alpha = 16

# Dropout probability for LoRA layers
lora_dropout = 0.1

################################################################################
# bitsandbytes parameters
################################################################################

# Activate 4-bit precision base model loading
use_4bit = True

# Compute dtype for 4-bit base models
bnb_4bit_compute_dtype = "float16"

# Quantization type (fp4 or nf4)
bnb_4bit_quant_type = "nf4"

# Activate nested quantization for 4-bit base models (double quantization)
use_nested_quant = False

################################################################################
# TrainingArguments parameters
################################################################################

# Output directory where the model predictions and checkpoints will be stored
output_dir = "./results"

# Number of training epochs
num_train_epochs = 1

# Enable fp16/bf16 training (set bf16 to True with an A100)
fp16 = False
bf16 = False

# Batch size per GPU for training
per_device_train_batch_size = 4

# Batch size per GPU for evaluation
per_device_eval_batch_size = 4

# Number of update steps to accumulate the gradients for
gradient_accumulation_steps = 1

# Enable gradient checkpointing
gradient_checkpointing = True

# Maximum gradient normal (gradient clipping)
max_grad_norm = 0.3

# Initial learning rate (AdamW optimizer)
learning_rate = 1e-5

# Weight decay to apply to all layers except bias/LayerNorm weights
weight_decay = 0.001

# Optimizer to use
optim = "paged_adamw_32bit"

# Learning rate schedule
lr_scheduler_type = "cosine"

# Number of training steps (overrides num_train_epochs)
max_steps = -1

# Ratio of steps for a linear warmup (from 0 to learning rate)
warmup_ratio = 0.03

# Group sequences into batches with same length
# Saves memory and speeds up training considerably
group_by_length = True

# Save checkpoint every X updates steps
save_steps = 0

# Log every X updates steps
logging_steps = 100

################################################################################
# SFT parameters
################################################################################

# Maximum sequence length to use
max_seq_length = None

# Pack multiple short examples in the same input sequence to increase efficiency
packing = False

# Load the entire model on the GPU 0
device_map = {"": 0}
Most of these are pretty straightforward hyper-parameters having these default values. You can always refer to the documentation for more details.
We can now simply use BitsAndBytesConfig class to create the config for 4-bit fine-tuning.
compute_dtype = getattr(torch, bnb_4bit_compute_dtype)

bnb_config = BitsAndBytesConfig(
    load_in_4bit=use_4bit,
    bnb_4bit_quant_type=bnb_4bit_quant_type,
    bnb_4bit_compute_dtype=compute_dtype,
    bnb_4bit_use_double_quant=use_nested_quant,
)
Now we can load the base model with 4 bit BitsAndBytesConfig and tokenizer for Fine-Tuning.
tokenizer = AutoTokenizer.from_pretrained(model_name, trust_remote_code=True)
tokenizer.pad_token = tokenizer.eos_token
tokenizer.padding_side = "right"

model = AutoModelForCausalLM.from_pretrained(
    model_name,
    quantization_config=bnb_config,
    device_map=device_map
)
model.config.use_cache = False
model.config.pretraining_tp = 1
We can now create the LoRA config and set the training parameters.
# Load LoRA configuration
peft_config = LoraConfig(
    lora_alpha=lora_alpha,
    lora_dropout=lora_dropout,
    r=lora_r,
    bias="none",
    task_type="CAUSAL_LM",
)

# Set training parameters
training_arguments = TrainingArguments(
    output_dir=output_dir,
    num_train_epochs=num_train_epochs,
    per_device_train_batch_size=per_device_train_batch_size,
    gradient_accumulation_steps=gradient_accumulation_steps,
    optim=optim,
    save_steps=save_steps,
    logging_steps=logging_steps,
    learning_rate=learning_rate,
    weight_decay=weight_decay,
    fp16=fp16,
    bf16=bf16,
    max_grad_norm=max_grad_norm,
    max_steps=max_steps,
    warmup_ratio=warmup_ratio,
    group_by_length=group_by_length,
    lr_scheduler_type=lr_scheduler_type,
    report_to="tensorboard"
)
Now we can simply use SFTTrainer which is provided by trl from HuggingFace to start the training.
# Set supervised fine-tuning parameters
trainer = SFTTrainer(
    model=model,
    train_dataset=dataset,
    peft_config=peft_config,
    dataset_text_field="text",  # this is the text column in dataset
    max_seq_length=max_seq_length,
    tokenizer=tokenizer,
    args=training_arguments,
    packing=packing,
)

# Train model
trainer.train()

# Save trained model
trainer.model.save_pretrained(new_model)
This will start the training for the number of epochs you have set above. Once the model is trained, make sure to save it in the drive so that you can load it again (as you have to restart the session in the colab). You can store the model in the drive via zip and mv command.
!zip -r llama-contradictor.zip results llama-contradictor
!mv llama-contradictor.zip /content/drive/MyDrive
Now when you restart the Colab session, you can move it back to your session again.
!unzip /content/drive/MyDrive/llama-contradictor.zip -d .
You need to load the base model again and merge it with the fine-tuned LoRA matrices. This can be done using merge_and_unload() function.
tokenizer = AutoTokenizer.from_pretrained(model_name, trust_remote_code=True)
tokenizer.pad_token = tokenizer.eos_token
tokenizer.padding_side = "right"

base_model = AutoModelForCausalLM.from_pretrained(
    "abhishek/llama-2-7b-hf-small-shards",
    low_cpu_mem_usage=True,
    return_dict=True,
    torch_dtype=torch.float16,
    device_map={"": 0},
)

model = PeftModel.from_pretrained(base_model, '/content/llama-contradictor')
model = model.merge_and_unload()
pipe = pipeline(task="text-generation", model=model, tokenizer=tokenizer, max_length=200)
Inference
You can test your model by simply passing in the inputs in the same prompt template that we have defined above.
prompt_template = """### Instruction:
Given the following sentence, your job is to generate the negation for it in the json format
### Input:
{}

### Response:
"""

sentence = "The weather forecast predicts a sunny day with a high temperature around 30 degrees Celsius, perfect for a day at the beach with friends and family."

input_sentence = prompt_template.format(sentence.strip())

result = pipe(input_sentence)
print(result)
Output
### Instruction:
Given the following sentence, your job is to generate the negation for it in the json format
### Input:
The weather forecast predicts a sunny day with a high temperature around 30 degrees Celsius, perfect for a day at the beach with friends and family.

### Response:
```json
{
  "sentence": "The weather forecast predicts a sunny day with a high temperature around 30 degrees Celsius, perfect for a day at the beach with friends and family.",
  "negation": "The weather forecast predicts a rainy day with a low temperature around 10 degrees Celsius, not ideal for a day at the beach with friends and family."
}
```
Filter Useful Output
There will be many times when the model will keep on predicting even after the response is generated due to the token limit. In this case, you need to add a post-processing function that filters the JSON part which is what we need. This can be done using a simple Regex.
import re
import json

def format_results(s):
  pattern = r'```json\n(.*?)\n```'

  # Find all occurrences of JSON objects in the string
  json_matches = re.findall(pattern, s, re.DOTALL)
  if not json_matches:
    # try to find 2nd pattern
    pattern = r'\{.*?"sentence":.*?"negation":.*?\}'
    json_matches = re.findall(pattern, s)

  # Return the first JSON object found, or None if no match is found
  return json.loads(json_matches[0]) if json_matches else None
This will give you the required output instead of the model repeating random output tokens.
Summary
In this blog, you learned the basics of QLora, fine-tuning a LLama v2 model on Colab using QLora, Instruction Tuning, and a sample template from the Alpaca dataset that can be used to instruct tune a model further.
References
[1]: QLoRA: Efficient Finetuning of Quantized LLMs, 23 May 2023, Tim Dettmers et al.
[2]: https://huggingface.co/blog/hf-bitsandbytes-integration
[3]: https://huggingface.co/blog/4bit-transformers-bitsandbytes
[4]: https://www.youtube.com/watch?v=y9PHWGOa8HA
[5]: https://arxiv.org/abs/2106.09685
[6]: https://aclanthology.org/2022.acl-long.244/
[7]: https://crfm.stanford.edu/2023/03/13/alpaca.html
[8]: Colab Notebook by @maximelabonne https://colab.research.google.com/drive/1PEQyJO1-f6j0S_XJ8DV50NkpzasXkrzd?usp=sharing
Ahmad Anis is a passionate Machine Learning Engineer and Researcher currently working at redbuffer.ai. Beyond his day job, Ahmad actively engages with the Machine Learning community. He serves as a regional lead for Cohere for AI, a nonprofit dedicated to open science, and is an AWS Community Builder. Ahmad is an active contributor at Stackoverflow, where he has 2300+ points. He has contributed to many famous open-source projects, including Shap-E by OpenAI.