Mistral 7B-V0.2: Fine-Tuning Mistral’s New Open-Source LLM with Hugging Face
Access Mistral’s latest open-source model and fine-tune it on a custom dataset.
Image by Author
Mistral AI, one of the world’s leading AI research companies, has recently released the base model for Mistral 7B v0.2.
This open-source language model was unveiled during the company’s hackathon event on March 23, 2024.
The Mistral 7B models have 7.3 billion parameters, making them extremely powerful. They outperform Llama 2 13B and Llama 1 34B on almost all benchmarks. The latest V0.2 model introduces a 32k context window among other advancements, enhancing its ability to process and generate text.
Additionally, the version that was recently announced is the base model of the instruction-tuned variant, “Mistral-7B-Instruct-V0.2,” which was released earlier last year.
In this tutorial, I will show you how to access and fine-tune this language model on Hugging Face.
Understanding Hugging Face’s AutoTrain Feature
We will be fine-tuning the Mistral 7B-v0.2 base model using Hugging Face’s AutoTrain functionality.
Hugging Face is renowned for democratizing access to machine learning models, allowing everyday users to develop advanced AI solutions.
AutoTrain, a feature of Hugging Face, automates the process of model training, making it accessible and efficient.
It helps users select the best parameters and training techniques when fine-tuning models, which is a task that can otherwise be daunting and time-consuming.
Fine-Tuning the Mistral-7B Model with AutoTrain
Here are 5 steps to fine-tuning your Mistral-7B model:
1. Setting up the environment
You must first create an account with Hugging Face, and then create a model repository.
To achieve this, simply follow the steps provided in this link and come back to this tutorial.
We will be training the model in Python. When it comes to selecting a notebook environment for training, you can use Kaggle Notebooks or Google Colab, both of which provide free access to GPUs.
If the training process takes too long, you might want to switch to a cloud platform like AWS Sagemaker or Azure ML.
Finally, perform the following pip installs before you start coding along to this tutorial:
!pip install -U autotrain-advanced
!pip install datasets transformers
2. Preparing your dataset
In this tutorial, we will be using the Alpaca dataset on Hugging Face, which looks like this:
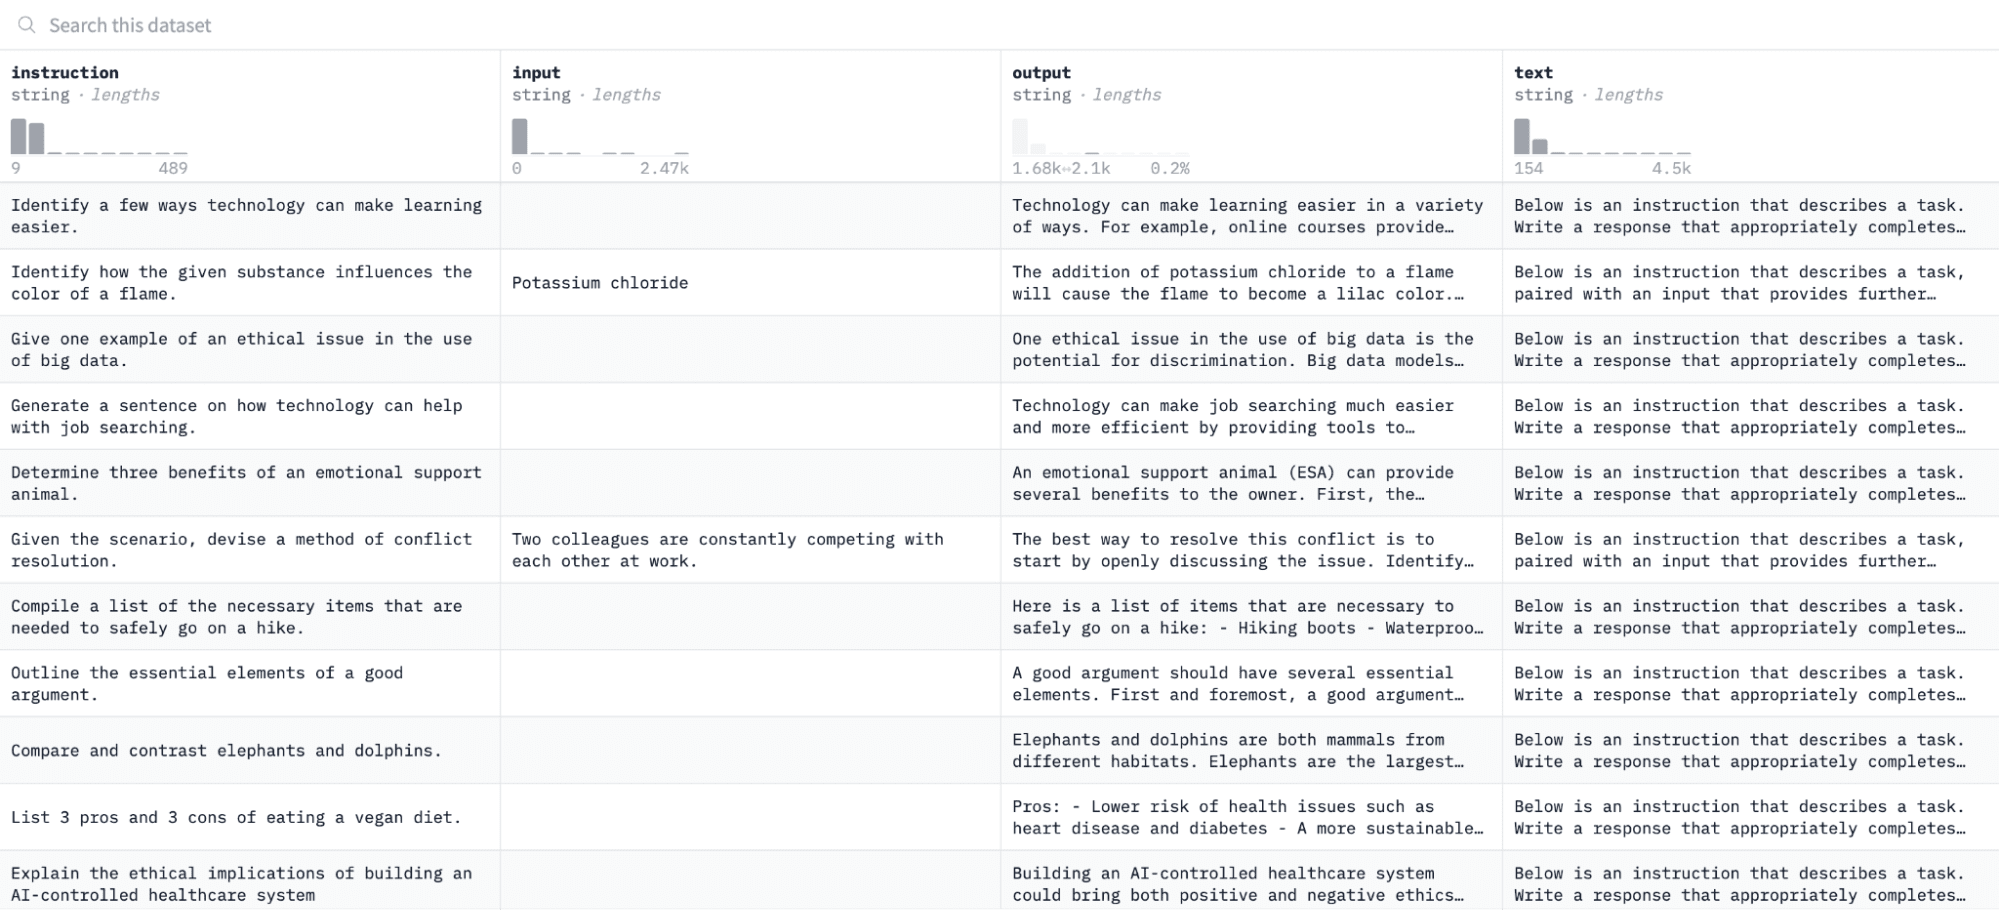
We will fine-tune the model on pairs of instructions and outputs and assess its ability to respond to the given instruction in the evaluation process.
To access and prepare this dataset, run the following lines of code:
import pandas as pd
from datasets import load_dataset

# Load and preprocess dataset
def preprocess_dataset(dataset_name, split_ratio='train[:10%]', input_col='input', output_col='output'):
   dataset = load_dataset(dataset_name, split=split_ratio)
   df = pd.DataFrame(dataset)
   chat_df = df[df[input_col] == ''].reset_index(drop=True)
   return chat_df

# Formatting according to AutoTrain requirements
def format_interaction(row):
   formatted_text = f"[Begin] {row['instruction']} [End] {row['output']} [Close]"
   return formatted_text

# Process and save the dataset
if __name__ == "__main__":
   dataset_name = "tatsu-lab/alpaca"
   processed_data = preprocess_dataset(dataset_name)
   processed_data['formatted_text'] = processed_data.apply(format_interaction, axis=1)

   save_path = 'formatted_data/training_dataset'
   os.makedirs(save_path, exist_ok=True)
   file_path = os.path.join(save_path, 'formatted_train.csv')
   processed_data[['formatted_text']].to_csv(file_path, index=False)
   print("Dataset formatted and saved.")
The first function will load the Alpaca dataset using the “datasets” library and clean it to ensure that we aren’t including any empty instructions. The second function structures your data in a format that AutoTrain can understand.
After running the above code, the dataset will be loaded, formatted, and saved in the specified path. When you open your formatted dataset, you should see a single column labeled “formatted_text.”
3. Setting up your training environment
Now that you’ve successfully prepared the dataset, let’s proceed to set up your model training environment.
To do this, you must define the following parameters:
project_name = 'mistralai'
model_name = 'alpindale/Mistral-7B-v0.2-hf'
push_to_hub = True
hf_token = 'your_token_here'
repo_id = 'your_repo_here.'
Here is a breakdown of the above specifications:
- You can specify any project_name. This is where all your project and training files will be stored.
- The model_name parameter is the model you’d like to fine-tune. In this case, I’ve specified a path to the Mistral-7B v0.2 base model on Hugging Face.
- The hf_token variable must be set to your Hugging Face token, which can be obtained by navigating to this link.
- Your repo_id must be set to the Hugging Face model repository that you created in the first step of this tutorial. For example, my repository ID is NatasshaS/Model2.
4. Configuring model parameters
Before fine-tuning our model, we must define the training parameters, which control aspects of model behavior such as training duration and regularization.
These parameters influence key aspects like how long the model trains, how it learns from the data, and how it avoids overfitting.
You can set the following parameters for your model:
use_fp16 = True
use_peft = True
use_int4 = True
learning_rate = 1e-4
num_epochs = 3
batch_size = 4
block_size = 512
warmup_ratio = 0.05
weight_decay = 0.005
lora_r = 8
lora_alpha = 16
lora_dropout = 0.01
5. Setting environment variables
Let’s now prepare our training environment by setting some environment variables.
This step ensures that the AutoTrain feature uses the desired settings to fine-tune the model, such as our project name and training preferences:
os.environ["PROJECT_NAME"] = project_name
os.environ["MODEL_NAME"] = model_name
os.environ["LEARNING_RATE"] = str(learning_rate)
os.environ["NUM_EPOCHS"] = str(num_epochs)
os.environ["BATCH_SIZE"] = str(batch_size)
os.environ["BLOCK_SIZE"] = str(block_size)
os.environ["WARMUP_RATIO"] = str(warmup_ratio)
os.environ["WEIGHT_DECAY"] = str(weight_decay)
os.environ["USE_FP16"] = str(use_fp16)
os.environ["LORA_R"] = str(lora_r)
os.environ["LORA_ALPHA"] = str(lora_alpha)
os.environ["LORA_DROPOUT"] = str(lora_dropout)
6. Initiate model training
Finally, let’s start training the model using the autotrain command. This step involves specifying your model, dataset, and training configurations, as displayed below:
!autotrain llm \
 --train \
 --model "${MODEL_NAME}" \
 --project-name "${PROJECT_NAME}" \
 --data-path "formatted_data/training_dataset/" \
 --text-column "formatted_text" \
 --lr "${LEARNING_RATE}" \
 --batch-size "${BATCH_SIZE}" \
 --epochs "${NUM_EPOCHS}" \
 --block-size "${BLOCK_SIZE}" \
 --warmup-ratio "${WARMUP_RATIO}" \
 --lora-r "${LORA_R}" \
 --lora-alpha "${LORA_ALPHA}" \
 --lora-dropout "${LORA_DROPOUT}" \
 --weight-decay "${WEIGHT_DECAY}" \
 $( [[ "$USE_FP16" == "True" ]] && echo "--mixed-precision fp16" ) \
 $( [[ "$USE_PEFT" == "True" ]] && echo "--use-peft" ) \
 $( [[ "$USE_INT4" == "True" ]] && echo "--quantization int4" ) \
 $( [[ "$PUSH_TO_HUB" == "True" ]] && echo "--push-to-hub --token ${HF_TOKEN} --repo-id ${REPO_ID}" )
Make sure to change the data-path to where your training dataset is located.
7. Evaluating the model
Once your model has finished training, you should see a folder appear in your directory with the same title as your project name.
In my case, this folder is titled “mistralai,” as seen in the image below:
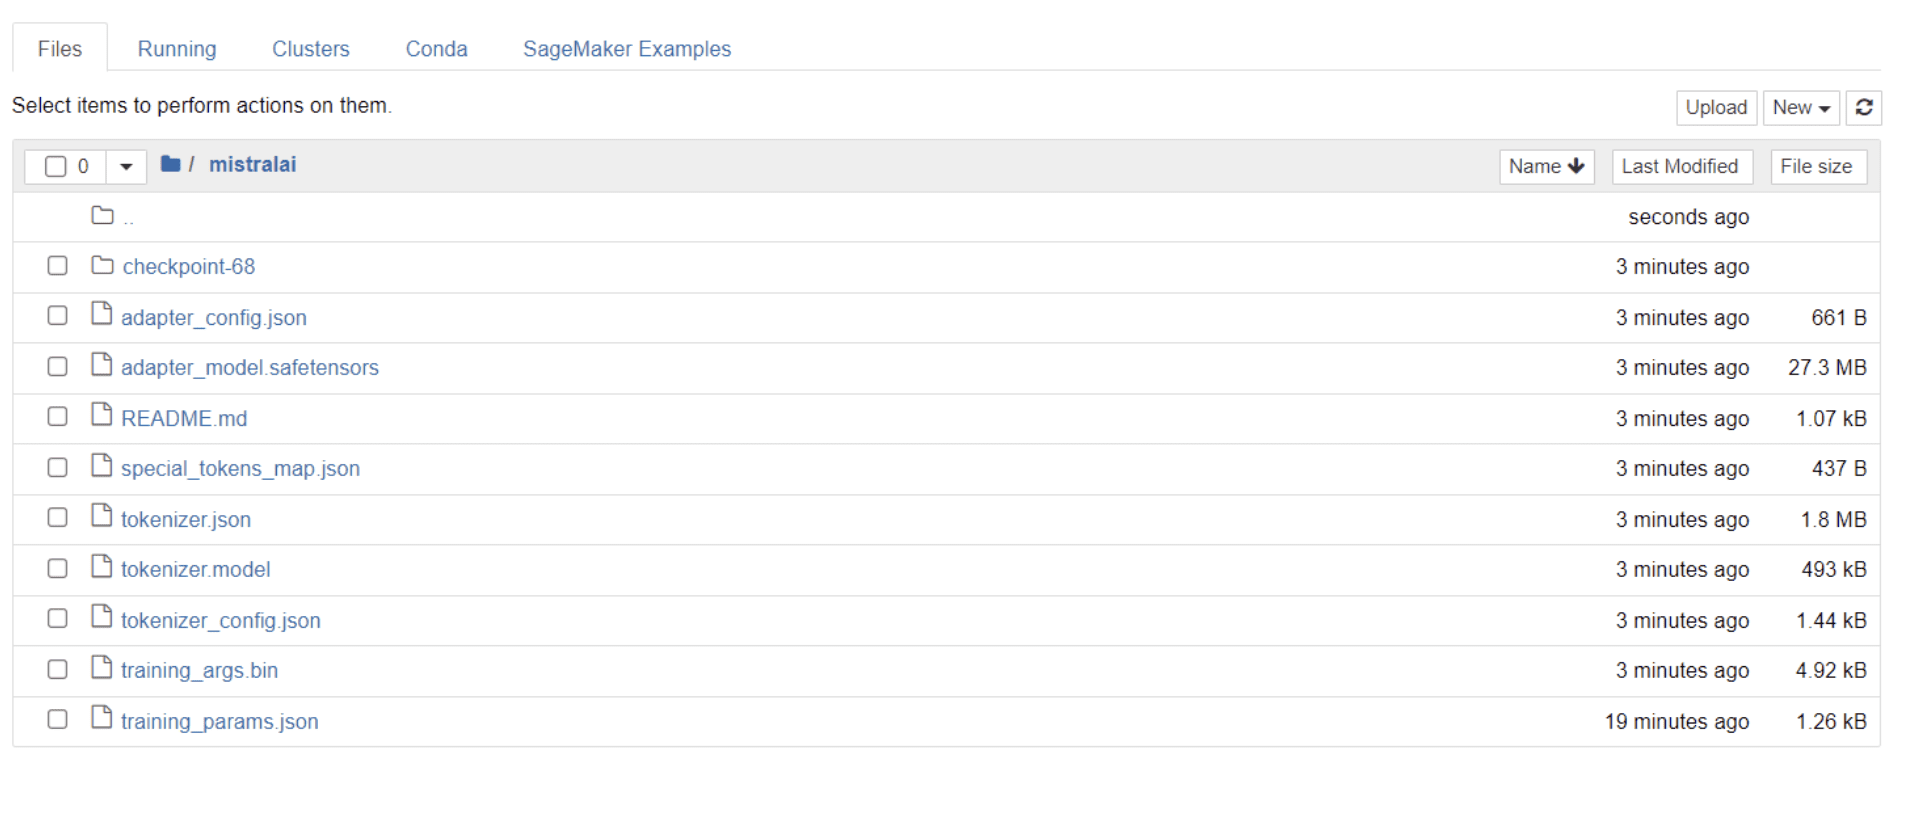
Within this folder, you can find files that encompass your model weights, hyperparameters, and architecture details.
Let’s now check whether this fine-tuned model is able to respond accurately to a question in our dataset. To achieve this, we first need to run the following lines of code to generate 5 sample inputs and outputs from our dataset:
# Print out 5 sample inputs and outputs from our dataset
for i, example in enumerate(dataset):
   if i >= 5:
       break
   print(f"Instruction: {example['instruction']}")
   print(f"Output: {example['output']}\n---")
You should see a response that looks like this, showcasing 5 sample data points:
Instruction: Give three tips for staying healthy.
Output: 1.Eat a balanced diet and make sure to include plenty of fruits and vegetables.
2. Exercise regularly to keep your body active and strong.
3. Get enough sleep and maintain a consistent sleep schedule.
---
Instruction: What are the three primary colors?
Output: The three primary colors are red, blue, and yellow.
---
Instruction: Describe the structure of an atom.
Output: An atom is made up of a nucleus, which contains protons and neutrons, surrounded by electrons that travel in orbits around the nucleus. The protons and neutrons have a positive charge, while the electrons have a negative charge, resulting in an overall neutral atom. The number of each particle determines the atomic number and the type of atom.
---
Instruction: How can we reduce air pollution?
Output: There are a number of ways to reduce air pollution, such as shifting to renewable energy sources, encouraging the use of public transportation, prohibiting the burning of fossil fuels, implementing policies to reduce emissions from industrial sources, and implementing vehicle emissions standards. Additionally, individuals can do their part to reduce air pollution by reducing car use, avoiding burning materials such as wood, and changing to energy efficient appliances.
---
Instruction: Describe a time when you had to make a difficult decision.
Output: I had to make a difficult decision when I was working as a project manager at a construction company. I was in charge of a project that needed to be completed by a certain date in order to meet the client's expectations. However, due to unexpected delays, we were not able to meet the deadline and so I had to make a difficult decision. I decided to extend the deadline, but I had to stretch the team's resources even further and increase the budget. Although it was a risky decision, I ultimately decided to go ahead with it to ensure that the project was completed on time and that the client's expectations were met. The project was eventually successfully completed and this was seen as a testament to my leadership and decision-making abilities.
We are going to type one of the above instructions into the model and check if it generates accurate output. Here is a function to provide an instruction to the model and get a response from it:
# Function to provide an instruction
def ask(model, tokenizer, question, max_length=128):
   inputs = tokenizer.encode(question, return_tensors='pt')
   outputs = model.generate(inputs, max_length=max_length, num_return_sequences=1)
   answer = tokenizer.decode(outputs[0], skip_special_tokens=True)
   return answer
Finally, enter a question into this function as displayed below:
question = "Describe a time when you had to make a difficult decision."
answer = ask(model, tokenizer, question)
print(answer)
Your model should generate a response that is identical to its corresponding output in the training dataset, as displayed below:
Describe a time when you had to make a difficult decision.

What did you do? How did it turn out?

[/INST] I remember a time when I had to make a difficult decision about
my career. I had been working in the same job for several years and had
grown tired of it. I knew that I needed to make a change, but I was unsure of what to do. I weighed my options carefully and eventually decided to take a leap of faith and start my own business. It was a risky move, but it paid off in the end. I am now the owner of a successful business and
Please note that the response may seem incomplete or cut off because of the number of tokens we’ve specified. Feel free to adjust the “max_length” value to allow for a more extended response.
Fine-Tuning Mistral-7B V0.2 - Next Steps
If you’ve come this far, congratulations!
You have successfully fine-tuned a state-of-the-art language model, leveraging the power of Mistral 7B v-0.2 alongside Hugging Face’s capabilities.
But the journey doesn’t end here.
As a next step, I recommend experimenting with different datasets or tweaking certain training parameters to optimize model performance. Fine-tuning models on a larger scale will enhance their utility, so try experimenting with bigger datasets or varying formats, such as PDFs and text files.
Such experience becomes invaluable when working with real-world data in organizations, which is often messy and unstructured.
Natassha Selvaraj is a self-taught data scientist with a passion for writing. Natassha writes on everything data science-related, a true master of all data topics. You can connect with her on LinkedIn or check out her YouTube channel.