I Vibe Coded a Tool to That Analyzes Customer Sentiment and Topics From Call Recordings
Build an AI customer sentiment analyzer for call recordings using Whisper, BERTopic & Streamlit with this open-source step-by-step guide with code.
Image by Author
# Introduction
Every day, customer service centers record thousands of conversations. Hidden in those audio files are goldmines of information. Are customers satisfied? What problems do they mention most often? How do emotions shift during a call?
Manually analyzing these recordings is challenging. However, with modern artificial intelligence (AI), we can automatically transcribe calls, detect emotions, and extract recurring topics — all offline and with open-source tools.
In this article, I will walk you through a complete customer sentiment analyzer project. You will learn how to:
- Transcribing audio files to text using Whisper
- Detecting sentiment (positive, negative, neutral) and emotions (frustration, satisfaction, urgency)
- Extracting topics automatically using BERTopic
- Displaying results in an interactive dashboard
The best part is that everything runs locally. Your sensitive customer data never leaves your machine.
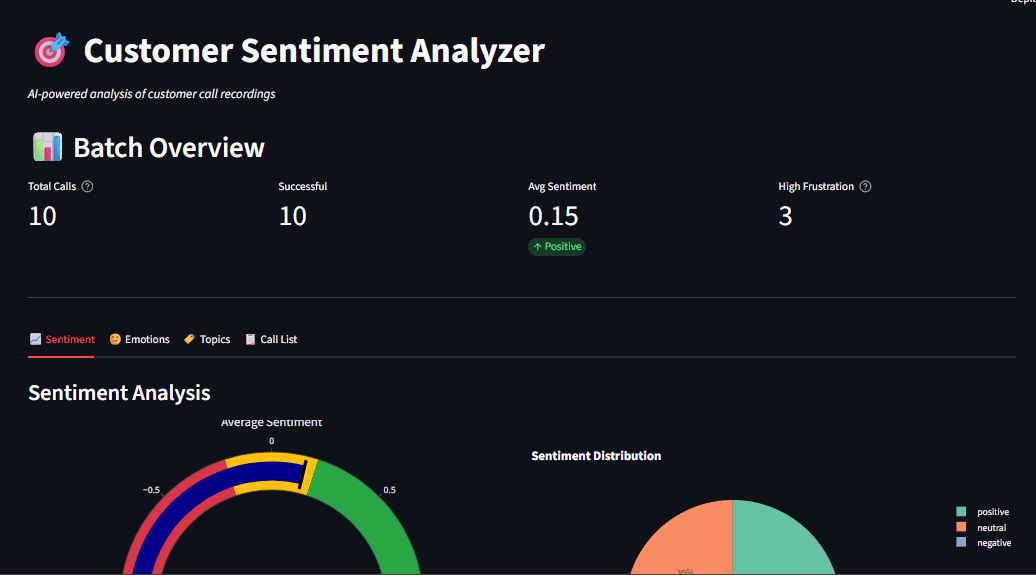
Fig 1: Dashboard overview showing sentiment gauge, emotion radar, and topic distribution
# Understanding Why Local AI Matters for Customer Data
Cloud-based AI services like OpenAI's API are powerful, but they come with concerns such as privacy issues, where customer calls often contain personal information; high cost, where you pay per-API-call pricing, which adds up quickly for high volumes; and dependency on internet rate limits. By running locally, it is easier to meet data residency requirements.
This local AI speech-to-text tutorial keeps everything on your hardware. Models download once and run offline forever.
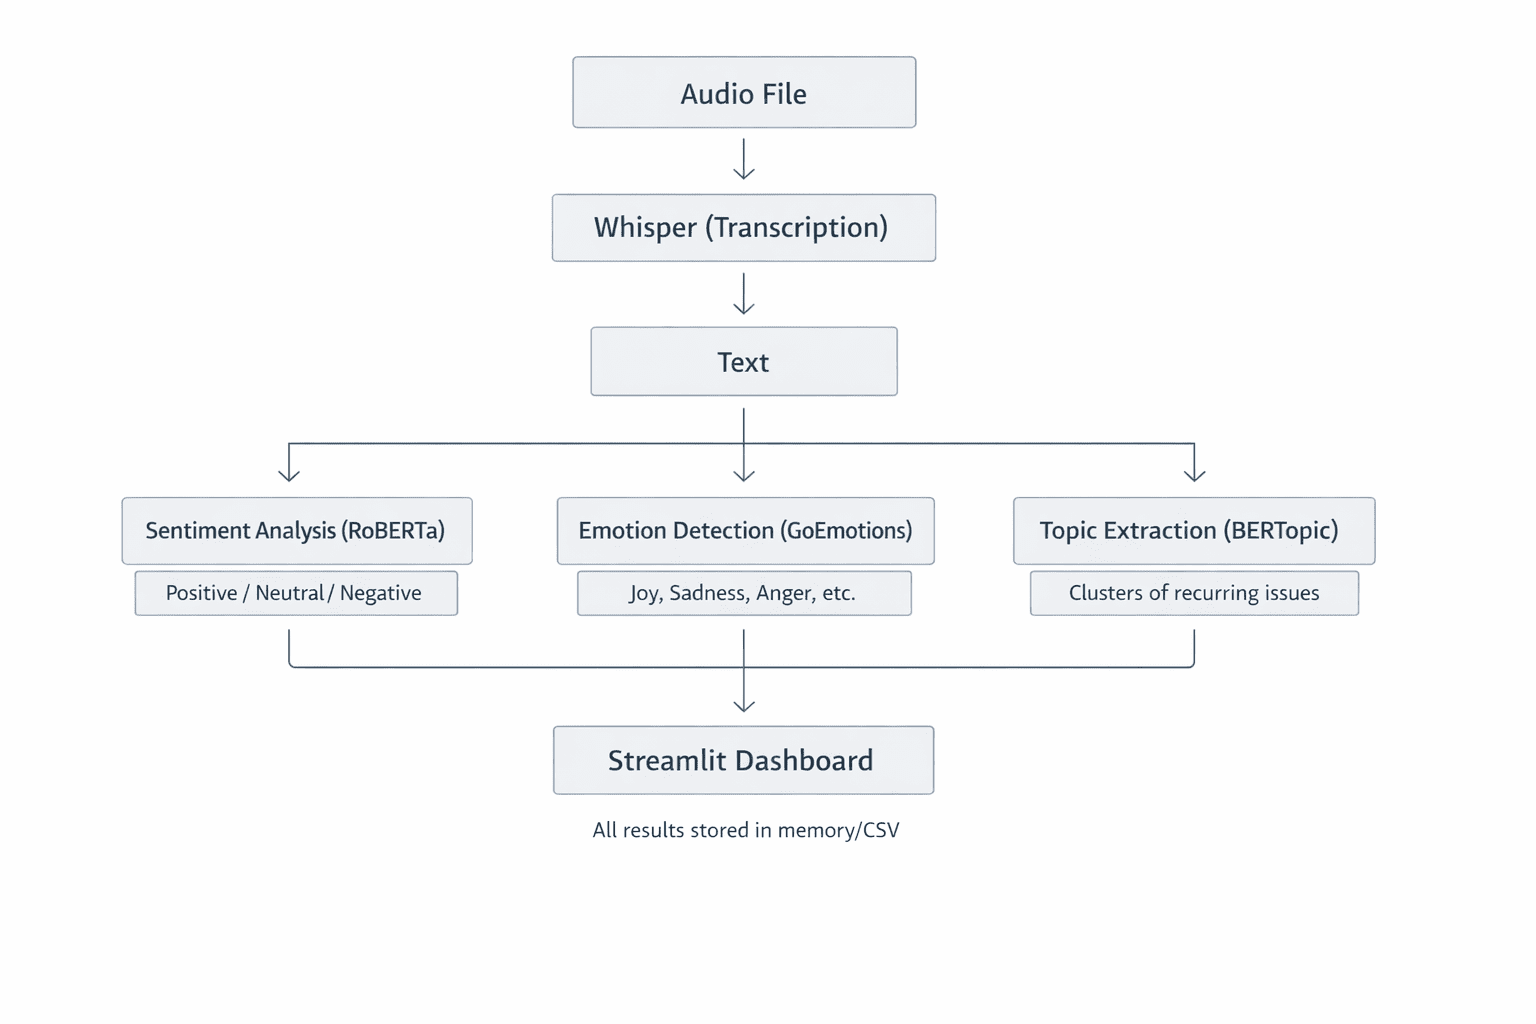
Fig 2: System Architecture Overview showing how each component handles one task well. This modular design makes the system easy to understand, test, and extend
// Prerequisites
Before starting, make sure you have the following:
- Python 3.9+ is installed on your machine.
- You should have FFmpeg installed for audio processing.
- You should have basic familiarity with Python and machine learning concepts.
- You need about 2GB of disk space for AI models.
// Setting Up Your Project
Clone the repository and set up your environment:
git clone https://github.com/zenUnicorn/Customer-Sentiment-analyzer.git
Create a virtual environment:
python -m venv venv
Activate (Windows):
.\venv\Scripts\Activate
Activate (Mac/Linux):
source venv/bin/activate
Install dependencies:
pip install -r requirements.txt
The first run downloads AI models (~1.5GB total). After that, everything works offline.
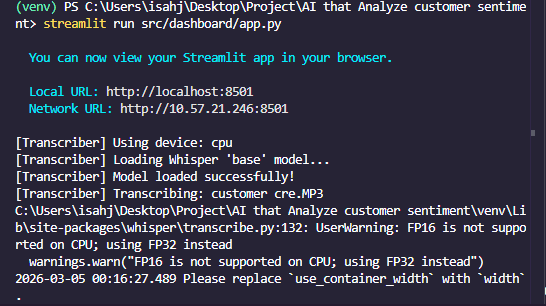
Fig 3: Terminal showing successful installation
# Transcribing Audio with Whisper
In the customer sentiment analyzer, the first step is to turn spoken words from call recordings into text. This is done by Whisper, an automatic speech recognition (ASR) system developed by OpenAI. Let's look into how it works, why it's a great choice, and how we use it in the project.
Whisper is a Transformer-based encoder-decoder model trained on 680,000 hours of multilingual audio. When you feed it an audio file, it:
- Resamples the audio to 16kHz mono
- Generates a mel spectrogram — a visual representation of frequencies over time — which serves as a photo of the sound
- Splits the spectrogram into 30-second windows
- Passes each window through an encoder that creates hidden representations
- Translates these representations into text tokens, one word (or sub-word) at a time
Think of the mel spectrogram as how machines "see" sound. The x-axis represents time, the y-axis represents frequency, and color intensity shows volume. The result is a highly accurate transcript, even with background noise or accents.
Code Implementation
Here's the core transcription logic:
import whisper

class AudioTranscriber:
    def __init__(self, model_size="base"):
        self.model = whisper.load_model(model_size)

    def transcribe_audio(self, audio_path):
        result = self.model.transcribe(
            str(audio_path),
            word_timestamps=True,
            condition_on_previous_text=True
        )
        return {
            "text": result["text"],
            "segments": result["segments"],
            "language": result["language"]
        }
The model_size parameter controls accuracy vs. speed.
| Model | Parameters | Speed | Best For |
|---|---|---|---|
| tiny | 39M | Fastest | Quick testing |
| base | 74M | Fast | Development |
| small | 244M | Medium | Production |
| large | 1550M | Slow | Maximum accuracy |
For most use cases, base or small offers the best balance.
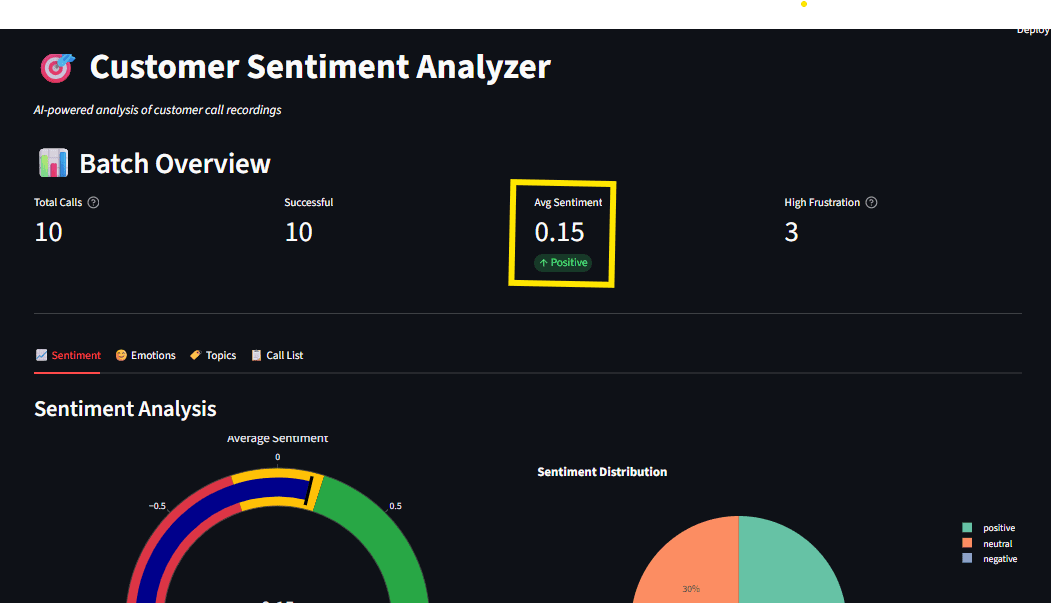
Fig 4: Transcription output showing timestamped segments
# Analyzing Sentiment with Transformers
With text extracted, we analyze sentiment using Hugging Face Transformers. We use CardiffNLP's RoBERTa model, trained on social media text, which is perfect for conversational customer calls.
// Comparing Sentiment and Emotion
Sentiment analysis classifies text as positive, neutral, or negative. We use a fine-tuned RoBERTa model because it understands context better than simple keyword matching.
The transcript is tokenized and passed through a Transformer. The final layer uses a softmax activation, which outputs probabilities that sum to 1. For example, if positive is 0.85, neutral is 0.10, and negative is 0.05, then overall sentiment is positive.
- Sentiment: Overall polarity (positive, negative, or neutral) answering the question: "Is this good or bad?"
- Emotion: Specific feelings (anger, joy, fear) answering the question: "What exactly are they feeling?"
We detect both for complete insight.
// Code Implementation for Sentiment Analysis
from transformers import AutoModelForSequenceClassification, AutoTokenizer
import torch.nn.functional as F

class SentimentAnalyzer:
    def __init__(self):
        model_name = "cardiffnlp/twitter-roberta-base-sentiment-latest"
        self.tokenizer = AutoTokenizer.from_pretrained(model_name)
        self.model = AutoModelForSequenceClassification.from_pretrained(model_name)

    def analyze(self, text):
        inputs = self.tokenizer(text, return_tensors="pt", truncation=True)
        outputs = self.model(**inputs)
        probabilities = F.softmax(outputs.logits, dim=1)

        labels = ["negative", "neutral", "positive"]
        scores = {label: float(prob) for label, prob in zip(labels, probabilities[0])}

        return {
            "label": max(scores, key=scores.get),
            "scores": scores,
            "compound": scores["positive"] - scores["negative"]
        }
The compound score ranges from -1 (very negative) to +1 (very positive), making it easy to track sentiment trends over time.
// Why Avoid Simple Lexicon Methods?
Traditional approaches like VADER count positive and negative words. However, they often miss context:
- "This is not good." Lexicon sees "good" as positive.
- A transformer understands negation ("not") as negative.
Transformers understand relationships between words, making them far more accurate for real-world text.
# Extracting Topics with BERTopic
Knowing sentiment is useful, but what are customers talking about? BERTopic automatically discovers themes in text without you having to pre-define them.
// How BERTopic Works
- Embeddings: Convert each transcript into a vector using Sentence Transformers
- Dimensional Reduction: UMAP compresses these vectors into a low-dimensional space
- Clustering: HDBSCAN groups similar transcripts together
- Topic Representation: For each cluster, extract the most relevant words using c-TF-IDF
The result is a set of topics like "billing issues," "technical support," or "product feedback." Unlike older methods like Latent Dirichlet Allocation (LDA), BERTopic understands semantic meaning. "Shipping delay" and "late delivery" cluster together because they share the same meaning.
Code Implementation
From topics.py:
from bertopic import BERTopic

class TopicExtractor:
    def __init__(self):
        self.model = BERTopic(
            embedding_model="all-MiniLM-L6-v2",
            min_topic_size=2,
            verbose=True
        )

    def extract_topics(self, documents):
        topics, probabilities = self.model.fit_transform(documents)

        topic_info = self.model.get_topic_info()
        topic_keywords = {
            topic_id: self.model.get_topic(topic_id)[:5]
            for topic_id in set(topics) if topic_id != -1
        }

        return {
            "assignments": topics,
            "keywords": topic_keywords,
            "distribution": topic_info
        }
Note: Topic extraction requires multiple documents (at least 5-10) to find meaningful patterns. Single calls are analyzed using the fitted model.
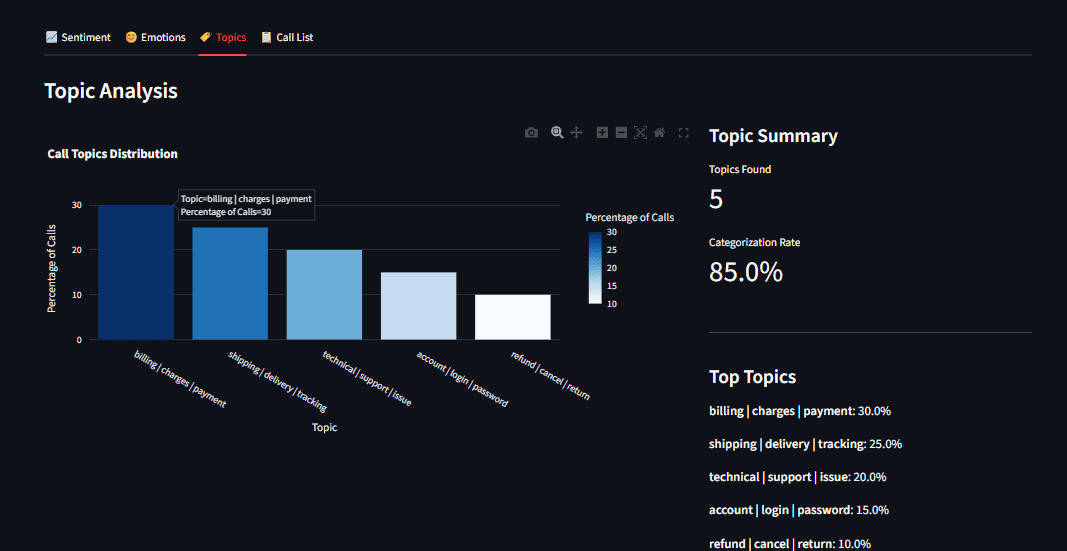
Fig 5: Topic distribution bar chart showing billing, shipping, and technical support categories
# Building an Interactive Dashboard with Streamlit
Raw data is hard to process. We built a Streamlit dashboard (app.py) that lets business users explore results. Streamlit turns Python scripts into web applications with minimal code. Our dashboard provides:
- Upload interface for audio files
- Real-time processing with progress indicators
- Interactive visualizations using Plotly
- Drill-down capability to explore individual calls
// Code Implementation for Dashboard Structure
import streamlit as st

def main():
    st.title("Customer Sentiment Analyzer")

    uploaded_files = st.file_uploader(
        "Upload Audio Files",
        type=["mp3", "wav"],
        accept_multiple_files=True
    )

    if uploaded_files and st.button("Analyze"):
        with st.spinner("Processing..."):
            results = pipeline.process_batch(uploaded_files)

        # Display results
        col1, col2 = st.columns(2)
        with col1:
            st.plotly_chart(create_sentiment_gauge(results))
        with col2:
            st.plotly_chart(create_emotion_radar(results))
Streamlit's caching @st.cache_resource ensures models load once and persist across interactions, which is critical for a responsive user experience.
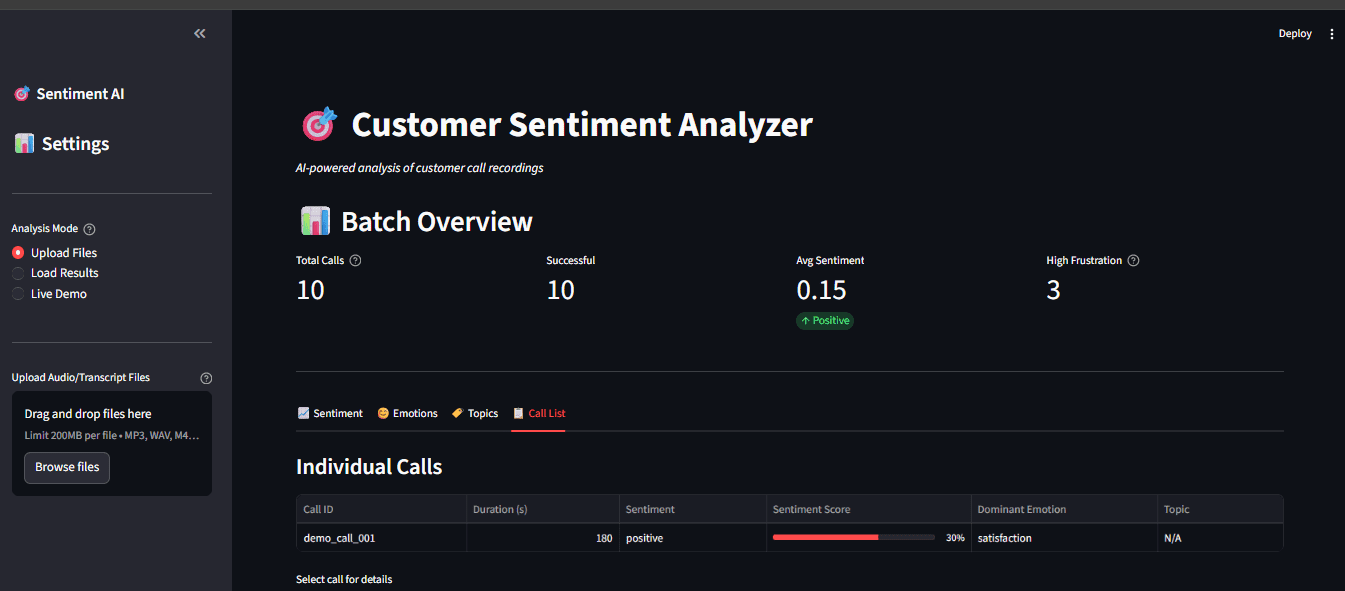
Fig 7: Full dashboard with sidebar options and multiple visualization tabs
// Key Features
- Upload audio (or use sample transcripts for testing)
- View transcript with sentiment highlights
- Emotion timeline (if call is long enough)
- Topic visualization using Plotly interactive charts
// Caching for Performance
Streamlit re-runs the script on every interaction. To avoid reprocessing heavy models, we use @st.cache_resource:
@st.cache_resource
def load_models():
    return CallProcessor()

processor = load_models()
// Real-Time Processing
When a user uploads a file, we show a spinner while processing, then immediately display results:
if uploaded_file:
    with st.spinner("Transcribing and analyzing..."):
        result = processor.process_file(uploaded_file)
    st.success("Done!")
    st.write(result["text"])
    st.metric("Sentiment", result["sentiment"]["label"])
# Reviewing Practical Lessons
Audio Processing: From Waveform to Text
Whisper's magic is in its mel spectrogram conversion. Human hearing is logarithmic, meaning we are better at recognizing low frequencies than high ones. The mel scale mimics this, so the model "hears" more like a human. The spectrogram is essentially a 2D image (time vs. frequency), which the Transformer encoder processes similarly to how it would process an image patch. This is why Whisper handles noisy audio well; it sees the whole picture.
// Transformer Outputs: Softmax vs. Sigmoid
- Softmax (sentiment): Forces probabilities to sum to 1. This is ideal for mutually exclusive classes, as a sentence usually isn't both positive and negative.
- Sigmoid (emotions): Treats each class independently. A sentence can be joyful and surprised at the same time. Sigmoid allows for this overlap.
Choosing the right activation is critical for your problem domain.
// Communicating Insights with Visualization
A good dashboard does more than show numbers; it tells a story. Plotly charts are interactive; users can hover to see details, zoom into time ranges, and click legends to toggle data series. This transforms raw analytics into actionable insights.
// Running the Application
To run the application, follow the steps from the beginning of this article. Test the sentiment and emotion analysis without audio files:
python main.py --demo
This runs sample text through the natural language processing (NLP) models and displays results in the terminal.
Analyze a single recording:
python main.py --audio path/to/call.mp3
Batch process a directory:
python main.py --batch data/audio/
For the full interactive experience:
python main.py --dashboard
Open http://localhost:8501 in your browser.
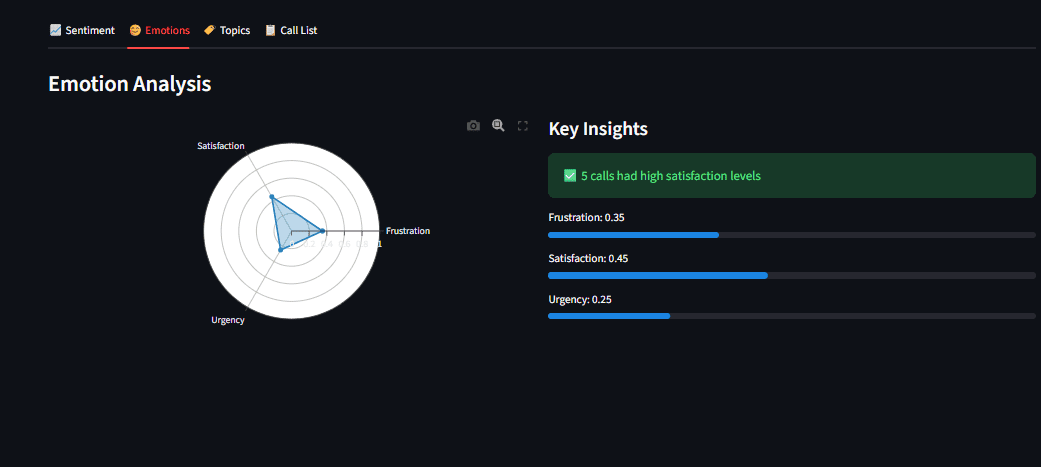
Fig 8: Terminal output showing successful analysis with sentiment scores
# Conclusion
We have built a complete, offline-capable system that transcribes customer calls, analyzes sentiment and emotions, and extracts recurring topics — all with open-source tools. This is a production-ready foundation for:
- Customer support teams identifying pain points
- Product managers gathering feedback at scale
- Quality assurance monitoring agent performance
The best part? Everything runs locally, respecting user privacy and eliminating API costs.
The complete code is available on GitHub: An-AI-that-Analyze-customer-sentiment. Clone the repository, follow this local AI speech-to-text tutorial, and start extracting insights from your customer calls today.
Shittu Olumide is a software engineer and technical writer passionate about leveraging cutting-edge technologies to craft compelling narratives, with a keen eye for detail and a knack for simplifying complex concepts. You can also find Shittu on Twitter.