Create Your Own Computer Vision Sandbox
This post covers a wide array of computer vision tasks, from automated data collection to CNN model building.
By Waun Broderick, CTO, Co-Founder @ Gyroscopic

Difficulty Level: Junior ( ★ ☆ ☆ ☆ ☆)
Recommended Prerequisites:
- Working knowledge of Python
- Basic knowledge of CNNs
Development Outcomes:
- A Web Scraper
- An Automated Data Augmentation Tool
- A Smart CNN Ingestion pipeline
- CNN Model Trainer
Together we will be creating a CNN sandbox that can collect images, augment data, and easily alter architectures for quick and nimble pivoting for a variety of projects.
The process was written for someone with very little CNN building experience, so will abstract away higher-level details for the benefit of being able to get a macro view on some of the fundamental components. As well several non-essential steps have been added in order to visualize outputs and provide transparency to the process.
Each of these steps were written to be directly transitioned to create a model entirely of your choice, containing any amount of classifications; dogs vs cats, country flags, hotdogs vs not hotdogs. However accuracy will vary greatly dependent on the amount of classes and similarity between them.
WaunBroderick/Search-Identify
Permalink Dismiss GitHub is home to over 40 million developers working together to host and review code, manage…
Data Collection
Entering the initial stages of building your CNN it is possible that you may not have a data-set to begin working with, that’s alright! In development, it is a widely adopted mantra that if it is a manual and monotonous process we can usually automate the task away! So Instead of scrolling through endless pages of images, we will start our journey by building a sub-program to do that for us.
However rest assured we are not creating nested problems where they did not exist before, rather, we are ensuring that we can create small segments that can be used throughout this walk through, and in other projects in your future.
To begin this process we will need a Microsoft Azure API Key (Application Programming Interface Key) which allows us to utilize the capability of their services to make this process easier. By heading to the Bing Image Search page you can sign up for a FREE TRIAL where you will be given an API key that will allow you to scrape images.
Download the following python script;
WaunBroderick/MSB_ImageScraper
You can’t perform that action at this time. You signed in with another tab or window. You signed out in another tab or…
Open the bing_image_scraper.py file on your computer and alter the following lines (~L19–21) with your API Key, desired limits, and save it.
# for results (maximum of 50 per request)
API_KEY = "{{API KEY}}"
MAX_RESULTS = 250
GROUP_SIZE = 50
After call the file from the cmd/terminal and pass the parameter arguments for the output directory and search term.
python ./bing_image_scraper.py --query "{{TERM}}" --output {{DIR}}
Repeat this process finding all the necessary images categories you would like for your CNN model. The code following these steps will be dependent on each folder having the name of a category and all images in their respective folders.
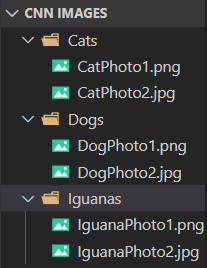
It is recommended that you try your best to keep the number of photos in each category somewhat similar to avoid your model favoring one category over another.
It’s best to skim over the images scraped, and remove the ones that don’t fit the search criteria. Due to its lack of strict specifications the web image scraper can often pick up images not directly related to your search topic, and if not monitored, and ultimately ‘garbage in, garbage out’.

Data Augmentation
You should now have a series of directories all containing their respective image categories. It is important that we ensure that when we are building our models that our data-sets are large enough to feed the model sufficient category information. There are many things that determine what the size of your sample data should be; number of features, classifiers, image characteristics, etc. For the sake of this tutorial however we will be multiplying our data-set by a magnitude of your choice, and not diving too deeply into that matter in this tutorial.
Data augmentation is a step that can be utilized in your computer vision pipeline to add a few degrees of noise, or variability to and otherwise homogeneous data-set, like; reflections, rotations, fuzzing, or distorting. This step allows you to not only increase your data-set but also give your CNN the opportunity to learn from a greater variation in data.
For this step, we will be utilizing the Keras, and Tensorflow libraries (See GitHub page for all library imports). Begin with creating a list of operations and assigning directory where we will instruct to perform on a complete full list can be found here.
#A sereis of operations that were selected to apply to images to create a greater amount of image variation
datagen = ImageDataGenerator(
        rotation_range=40,
        width_shift_range=0.2,
        height_shift_range=0.2,
        rescale=1./255,
        shear_range=0.2,
        zoom_range=0.2,
        horizontal_flip=True,
        fill_mode='nearest')#root directory for data augmentation
rootdir = '/xxx/data/'
We then write the instructions on how we expect our program to traverse through the file structure we’ve created.
#Move through the designated root directory and traverse through the individual files inside
for subdir, dirs, files in os.walk(rootdir):
    print("working in " +subdir)
    #Iterate over only the compatible image files
    for file in files:
        if file.endswith(".jpg") or file.endswith(".jpeg") or file.endswith(".png"):
            #Loading the image
            img = load_img(subdir + "/" + file)
            #The Numpy array responsible for shape adhearance
            x = img_to_array(img)
            x = x.reshape((1,) + x.shape)            # the .flow() command below generates batches of randomly transformed images
            # and saves the results to the `preview/` directory
            i = 0
            for batch in datagen.flow(x, batch_size=1,
                                      save_to_dir= subdir + "/", save_prefix='DA', save_format='jpg'):
                i += 1
                #Set to desired iterations
                if i > 3:
                    #Setting bound to break loop so to avoid indefinite run
                    break
After running the script your folders should now contain the original scrapped images, and new images with the different transformation you selected.
We can use this directory folder structure and function that will split categories on these folders, and link the respective images to those labels with ease.
#The number of class labels == total number of categories which == length of the folders in .dir
data=load_files(dataDir, load_content= False)
total_categories=len(data.category_names)# input image dimensions
img_rows, img_cols = 64, 64
dataDir= '{{INPUT YOUR TOP LEVEL IMAGE DIR}}'#The function responsible for connecting the image data with the categories created
def build_data(data):
    X = []
    y = []
    #Operations to assign the categories to data structures
    encoder = LabelBinarizer()
    encoded_dict=dict()
    hotcoded_label = encoder.fit_transform(data.category_names)
    #Matching the category target names to the labels
    for i in range(len(data.category_names)):
        encoded_dict[data.category_names[i]]=hotcoded_label[i]
    for country in os.listdir(dataDir):
        label=encoded_dict[country]
        #labeling the images
        for each_flag in os.listdir(dataDir+'/'+country):
            actual_path = os.path.join(dataDir,country,each_flag)
            img_data = cv2.imread(actual_path)
            img_data = cv2.resize(img_data, (img_rows, img_cols))
            X.append(np.array(img_data))
            y.append(label)
    #Creating a test and training set split with space for declaed variables
    X_train, X_test, y_train, y_test = train_test_split(X, y, test_size=0.1, random_state=36)
    X_train = np.asarray(X_train)
    X_test = np.asarray(X_test)
    y_train = np.asarray(y_train)
    y_test = np.asarray(y_test)#returns the training and testing set
    return [X_train, X_test, y_train, y_test]
Model Building
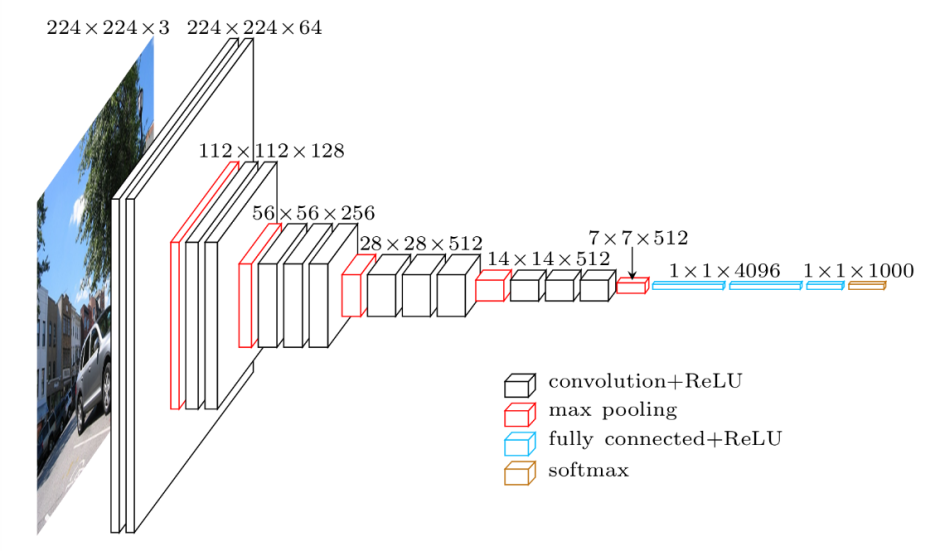
We then create the architecture of the CNN in it’s sequential pooling and convolutional layers. The variables size filters, layer structure, regularizers or core layers can also be added and altered to fit your project requirements. An altered version of the VGG-16 Net Architecture was used as a base for this project, though can be changed to whatever architecture you choose, or create.
#epochs = number of passes through entire training set
epochs = 100def create_model(input_shape,classes):
    #Takes the specifications of the image inputted
    img_input = Input(shape=input_shape)
    #The following is an architecture structuring
    x = Conv2D(64, (3, 3), activation='relu', padding='same', name='block1_conv1')(img_input)x = MaxPooling2D((2, 2), strides=(2, 2), name='block1_pool')(x)
    x = Conv2D(128, (3, 3), activation='relu', padding='same', name='block2_conv1')(x)

    x = MaxPooling2D((2, 2), strides=(2, 2), name='block2_pool')(x)
    x = Conv2D(256, (3, 3), activation='relu', padding='same', name='block3_conv1')(x)

    x = MaxPooling2D((2, 2), strides=(2, 2), name='block3_pool')(x)
    x = Conv2D(64, (3, 3), activation='relu', padding='same', name='block4_conv1')(x)

    x = MaxPooling2D((2, 2), strides=(2, 2), name='block4_pool')(x)
    x = Conv2D(128, (3, 3), activation='relu', padding='same', name='block5_conv1')(x)

    x = MaxPooling2D((2, 2), strides=(2, 2), name='block5_pool')(x)

    x = Flatten(name='flatten')(x)
    x = Dense(512, activation='relu', name='fc1')(x)
    x = Dropout(0.2)(x)
    x = Dense(256, activation='relu', name='fc2')(x)
    x = Dropout(0.2)(x)
    x = Dense(classes, activation='softmax', name='final_output')(x)model = Model(img_input, x, name='flag')
    return model
We then fit the pieces we’ve built thus far together and feed our testing and training set data into the CNN architecture. In this example, the Adams adaptive Learning Rate algorithm, and the categorical cross entropy loss function were used. In your own projects, you should give thought to each of your choices in place of either of these.
def train_model(x_train, x_test, y_train, y_test):
    input_shape=(img_rows,img_cols,3)
    model=create_model(input_shape,total_countries)
    adams=optimizers.Adam(lr=1e-4)
    model.compile(loss=’categorical_crossentropy’,
                optimizer= adams,
                metrics=[‘accuracy’])
    model.fit(x = x_train, y = y_train, epochs=epochs)
    score = model.evaluate(x_test, y_test, verbose=1)
    print(‘Test loss:’, score[0])
    print(‘Test accuracy:’, score[1])
    model.save(‘flagFinder.model’)
    return model
Congratulations! You have successfully made your first CNN Model and Data collection pipeline!

The following is an example of applying the model built to a new set of images to test its accuracy. An additional step that prints the outcomes to a text file was also added for ease of viewing.
def flag_identify(positiveDir):    #An array to keep the list of countries built from the data ingestion step
    countries = []    #iterate through the ingestion stage names and append them to a list for ease of labeling
    for i in range(len(datas.target_names)):
        i += 1
        countries.append(datas.target_names[i-1])    #Another data preperation step for image ingestion for prediction identification
    def prepare(filepath):
        IMG_SIZE = 64
        img_array = cv2.imread(filepath)
        new_array = cv2.resize(img_array, (IMG_SIZE, IMG_SIZE))
        return new_array.reshape(-1, IMG_SIZE, IMG_SIZE, 3)    #Load in the previously built model
    model = tf.keras.models.load_model("flagFinder.model")    #Traverses through the given directory containing test images
    for filename in os.listdir(positiveDir):
        #Accpets various photo formats that were processed previous
        if filename.endswith(".jpg") or filename.endswith(".jpeg") or filename.endswith(".png"):
            prediction = model.predict([prepare(positiveDir + filename)])
            topCountry = int(np.argmax(prediction, axis=1))
            secondCountry = int(np.argmax(prediction, axis=1)-1)
            #Writes predictions to a set directory for ease of view
            with open("/xxx/flags.txt", "a") as myfile:
                #Generic sentence for output both the filename and the TOP PREDICTION (can be adjusted for other predictions)
                myfile.write("A flag was found in photo: " + filename + ", It is most likely to from the Nation: " + countries[topCountry] +", or ," + countries[secondCountry] +"\n" )
You can now sequentially call these pieces of your program to facilitate different parts of the pipeline. In the associated GitHub example there is an additional object detection segment that is fit between the augmentation and CNN Model building, to exhibit how the system can be built out in a modular manner.
def build_flag_identifier():
    x_train, x_test, y_train, y_test = build_data(datas)
    train_model(x_train, x_test, y_train, y_test)def main():
    build_flag_identifier()
    flag_identify({{DIR}})if __name__ == "__main__":
    main()
If you are using this code skeleton as a launchpad for future projects, make sure you study the variability of technical decisions made throughout the walkthrough. Each step has been simplified though, the deliberation and decisions made for each algorithm and architecture will largely affect your accuracy and overall project success. CNNs are not a one size fits all, and should be built to the specifications of each project and data set it is being applied to.
Happy Coding!
Bio: Waun Broderick is CTO & Co-Founder at Gyroscopic. He is a passionate app developer, naval warfare officer, and community builder.
Original. Reposted with permission.
Related:
- How to Convert an RGB Image to Grayscale
- How to Convert a Picture to Numbers
- Google Open Sources MobileNetV3 with New Ideas to Improve Mobile Computer Vision Models