5 Google Colaboratory Tips
Are you looking for some tips for using Google Colab for your projects? This article presents five you may find useful.
As a computation platform for study and practice, especially for machine learning and data science, Google Colab is tough to beat. The no setup required, easy to use, stable notebook environment — when paired with its seamless cloud access from multiple devices — is a fair trade-off for some understood reduction in speed, reliability, and configurability in many non-critical circumstances. For me, the worry free portable shared access between my notebook, workstation, and Chromebook was key for study and testing, and Colab fills this void extraordinarily well and extraordinarily easily.
We previously presented the following Google Colab tips & tricks:
3 Essential Google Colaboratory Tips & Tricks
- Using a Free GPU Runtime
- Installing Libraries
- Uploading and Using Data Files
3 More Google Colab Environment Management Tips
- Download a file to local computer
- Access your Google Drive filesystem
- Use custom libraries and modules stored in Google Drive
And now, here are 5 additional tips and tricks for getting the most out of your Colab adventures.
1. Use a Tensor Processing Unit (TPU) runtime
You already know that you can use a GPU runtime for free with Colab. But did you know you can also use Tensor Processing Units (TPUs)?
What is a TPU?
Cloud TPU is the custom-designed machine learning ASIC that powers Google products like Translate, Photos, Search, Assistant, and Gmail.
In the processing unit pecking order, from lowest to highest, it goes CPU → GPU → TPU. Designed by Google, these ASICs are meant for one purpose and one purpose only:
Cloud TPU resources accelerate the performance of linear algebra computation, which is used heavily in machine learning applications. TPUs minimize the time-to-accuracy when you train large, complex neural network models. Models that previously took weeks to train on other hardware platforms can converge in hours on TPUs.
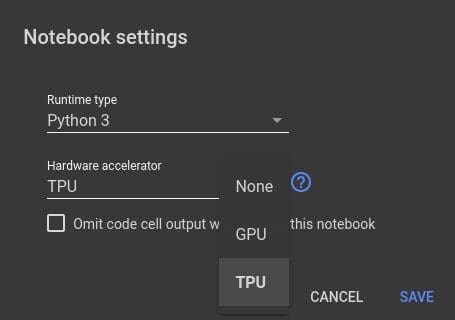
To test out a TPU, and see how they may affect the execution speeds of your tensor-processing code, select Runtime → Change Runtime Type, and then select TPU from the Accelerator type drop down menu. You will have to restart the notebook's runtime environment once you do so, but selecting "Yes" from an immediate prompt will take care of it for you.
2. Use the file explorer GUI
You can use inline code to upload files to and download files from your local drive to and from Colab. However, the file explorer GUI on the left side of the Colab editor can be used to do the same using point and click. You can use this same menu for mounting your Google Drive to seamlessly access all of the files within.
The image below shows where to click to enable visibility of the menu, where the options of Upload and Mount Drive can both be seen.

3. Open Jupyter notebooks in Colab
If you want to open an existing Colab notebook within Colab, no explanation is necessary. But what if you want to open a Jupyter notebook that resides on your computer or lives elsewhere on the interwebs? Well, that's also easy, actually.
Clicking File → Open Notebook opens the same notebook selection window presented upon starting up Colab. However, if you don't usually pay much attention to the ribbon along the top you might miss the options for opening a notebook from a GitHub repo or uploading from your local drive. Here's what the GitHub tab looks like:
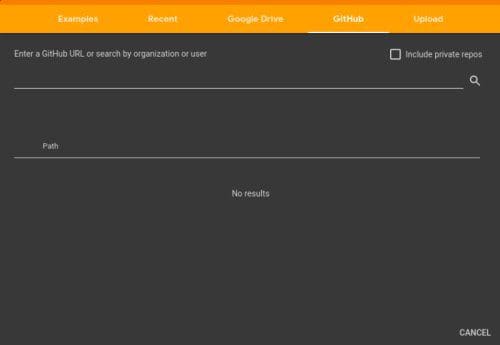
Fill in the repo and path (or use the search function) and away you go. The Upload tab is even easier to use: just point and click.
4. Work with files directly on your computer
Do you have data files, trained parameter weights, custom libraries, or other files you want to use, but don't want the hassle of manually uploading them to Colab? Would you prefer to work with the files locally?
Google Drive sync can help here. The process is different for each operating system, but the basic idea is to set up syncing between your Google Drive account and your local computer, select which local folders you want to synchronize with Google Drive, and then work directly in those folders on your computer and they will immediately be synchronized to Google Drive upon making changes to files within.
In the case of Chrome OS this setup and configuration is especially trivial, for those of us working at least part time in that environment.
5. Email alerts when training complete
This is a handy trick that comes to us by way of Rohit Midha. This isn't so much a Colab or machine learning or data science tip, but it can be useful for us nonetheless.
If you have a lengthy training job running on Colab, why bother monitoring it when you can simply send yourself an email when it's finished? This code, credit again to Rohit Midha, can be placed after your training loop, and can send you a message once training has completed. You can likely envision some more creative ways to configure what types of emails are sent for failed tasks, completed tasks, etc, or checkpoint emails for different points along your machine learning pipeline, perhaps.
The code snippet uses the smtplib library which is included by default in your Colab environment. Just fill in the email addresses and passwords (use the same for both in order to send a message to yourself, for example) as well as the message and away you go.
import smtplib

server = smtplib.SMTP('smtp.gmail.com', 587)
server.starttls()
server.login("sender_gmail_here@gmail.com", "your_password_here")

msg = "your message to email goes here"
server.sendmail("sender_gmail_here@gmail.com", "receiver_gmail_here@gmail.com", msg)
server.quit()
And there are 5 additional Google Colab tip and tricks. The next time we will look at effectively using code snippets in Google Colab, and how they can automate environment setup and configuration, as well as simplify other common and repetitive code tasks.
Related:
- 3 More Google Colab Environment Management Tips
- 3 Essential Google Colaboratory Tips & Tricks
- How to Optimize Your Jupyter Notebook