How to Deploy a Flask API in Kubernetes and Connect it with Other Micro-services
A hands-on tutorial on how to implement your micro-service architecture using the powerful container orchestration tool Kubernetes.
By Rik Kraan, Vantage AI
Kubernetes is a powerful container orchestration tool that automates deployment and management of containers. If you have a simple lightweight application that exists of one service, don’t bother using Kubernetes. Kubernetes’ benefits emerge if your application has a micro-service architecture with several components working together. It is a ‘open-source system for automating deployment, scaling and management of containerized applications and comes with several benefits including:
- Easy (auto-)scaling based on demand
- Ways to make your application fault tolerant by distributing workloads in a way that it will remain functional in case of partial failure
- Automated health-checks and self-healing processes
- Taking care of the communication between your micro-services and balancing incoming traffic evenly over all your resources
Starting with Kubernetes may seem daunting at first, but if you grasp the main concepts of it and play around with the excellent tutorials on the official website, you can get started fairly easily.
In this blog I will:
- Provide a quick overview of the main concepts of Kubernetes
- Demonstrate how to start your own local cluster
- Deploy a MySQL database on your cluster
- Set up an Flask app that functions as REST API to communicate with the database

Kubernetes basics
In this section I will cover the basics of Kubernetes without too many details; feel free to dive deeper by reading the official documentation.
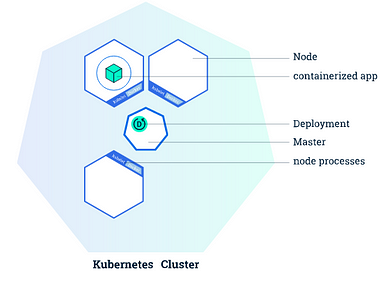
A Kubernetes cluster consists of a master and one or more worker nodes. This architecture is one of the main features of Kubernetes. As you will see, your micro-services are distributed over different nodes so they will remain healthy if one of the worker nodes fails. The master is responsible for managing the cluster and exposes the API via which you can communicate with your cluster. By default, worker nodes come with a few components including some pre-installed software that enables running containers of popular container services as Docker and containerd.
Three main concepts are essential to deploy your own applications on a Kubernetes cluster: Deployments, Pods and Services.
- A Deployment is a set of instructions provided to the master on how to create and update your application. With these instructions the master will schedule and run your application on individual worker nodes. The deployment is continuously monitored by the master. If one of the instances of your applications goes down (e.g. if a worker node goes down), it will be automatically replaced by a new instance.
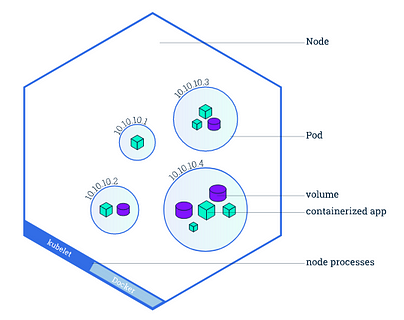
- A Pod is the atomic unit within the Kubernetes platform. It represents a group of one or more containers and some shared resources for those containers (shared storage, a unique cluster IP address etc.). If you create a deployment, this deployment will create pods with containers inside them. Each pod is bound to a worker node. It is essential to understand that a worker node can have multiple pods, and all these pods will be rebuild on a different available worker node if the current worker node fails.
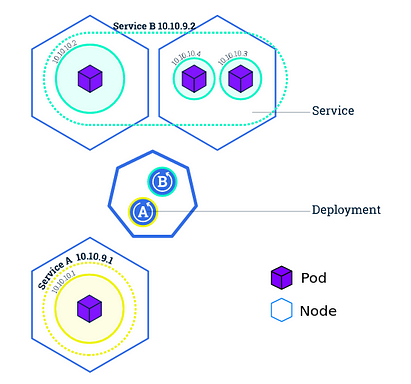
- A service basically defines a logical set of pods and defines a policy on how to access them. This is necessary as pods can go down and be restarted (e.g. if a worker node is deleted or crashes). A service routes traffic across a set of pods and allow pods to die and replicate without impacting your application. When defining a service, you can specify the type of the service. By default Kubernetes creates a ClusterIP service, which makes your service only accessible from inside the cluster. You may want to expose some of your services (e.g. frontends) to the outside world. In this case you can create a LoadBalancer service, which creates an external load balancer and assigns a fixed external IP to it, so it can be accessed from outside the cluster (for example in your browser).
Getting started with your own cluster
If you want to get your cluster to work quickly: all the code in this blog (and an explanatory Readme) can be found here. The application we will build consists of two micro-services:
- a MySQL database
- a Flask app that implements an API to access and perform CRUD (create, read, update delete) operations on the database.
Prerequisites: Have
kubectlandminikubeinstalled (https://kubernetes.io/docs/tasks/tools/). And make sure your Docker CLI uses the Docker deamon in your cluster via the commandeval $(minikube docker-env). No worries: if you restart your terminal you will automatically use your own Docker daemon again. Finally start your local cluster via the commandminikube start.
First things first: when setting up a MySQL database we need to take into account two things. 1) To access the database we need some credentials configured and 2) we will need a persistent volume for the database so we will not lose all our data if the nodes will accidentally be taken down.
Creating secrets
Kubernetes has it’s own method of dealing with your sensitive information by configuring Kubernetes Secrets. This can be done with a simple YAML file. These secrets can be accessed by any pod in your cluster by specifying environment variables (which we will see later on). Secrets should be specified as base64-encoded strings. So first we have to get the encoded version of your password via your terminal: echo -n <super-secret-passwod> | base64. Copy the output and embed it in the following secrets.yml file at the db_root_password field. The metadata.name field is important as we have to specify this in a later stage, so be sure to remember it
You can now add the secrets to your cluster via your terminal: kubectl apply -f secrets.yml . And see if it worked by checking the secrets via kubectl get secrets.
Persistent volume
A persistent volume is a storage resource with a lifecycle independent of a Pod. This means that the storage will persist if a pod goes down. As Kubernetes has the permission to restart pods at any time, it is a good practice to set your database storage to a persistent volume. A persistent volume can be a directory on your local filesystem, but also a storage service of a cloud provider (for example AWS Elastic Block Storage or Azure Disk). The type of the persistent volume can be specified when creating the persistent volume. For this tutorial you will use a hostPath type, which will create a volume on your minikube node. However, make sure to use another type (see the documentation) in a production environment as your data will be lost if you delete your minikube node when using a hostPath type.
Making your application use a persistent volume exists of two parts:
- Specifying the actual storage type, location, size and properties of the volume.
- Specify a persistent volume claim that requests a specific size and access modes of the persistent volume for your deployments.
Create a persistent-volume.yml file and specify the size (in this example 2GB), access modes and the path the files will be stored. The spec.persistentVolumeReclaimPolicy specifies what should be done if the persistent volume claim is deleted. In the case of a stateful application like the MySQL database, you want to retain the data if the claim is deleted, so you can manually retrieve or backup the data. The default reclaim policy is inherited from the type of persistent volume, so it is good practice to always specify it in the yml file.
Again you can add the storage via kubectl apply -f persistent-volume.yml . And see if the details of your created resources via kubectl describe pv mysql-pv-volume and kubectl describe pvc mysql-pv-claim. As you made a hostPath type persistent volume, you can find the data by logging into the minikube node minikube ssh and navigate to the spcified path (/mnt/data).
Deploy the MySQL server
With our secrets and persistent volume (claim) in place, we can start building our application. First we will deploy a MySQL server. Pull the latest mysql imagedocker pull mysql and create the mysql-deployment.yml file. There are several things worth mentioning about this file. We specify that we only spin-up one pod (spec.replicas: 1). The deployment will manage all pods with a label db specified by spec.selector.matchLabels.app: db . The templatefield and all it’s subfields specify the characteristics of the pod. It will run the image mysql, will be named mysql as well and looks for the db_root_password field in the flaskapi-secrets secret and will set the value to the MYSQL_ROOT_PASSWORD environment variable. Furthermore we specify a port that the container exposes and which path should be mounted to the persistent volume spec.selector.template.spec.containers.volumeMounts.mountPath: /var/lib/mysql. At the bottom we also specify a service also called mysql of the LoadBalancertype so we can access our database via this service.
You can now deploy the MySQL server with kubectl apply -f mysql-deployment.yml. And see if a pod is running via kubectl get pods.
Create database and table
The last thing we have to do before implementing the API is initializing a database and schema on our MySQL server. We can do this using multiple methods, but for the sake of simplicity let’s access the MySQL server via the newly created service. As the pod running the MySQL service is only accessible from inside the cluster, you will start up a temporary pod that serves as mysql-client:
- Set up the
mysql-clientvia the terminal:kubectl run -it --rm --image=mysql --restart=Never mysql-client -- mysql --host mysql --password=<your_password>. Fill in the (decoded) password that you specified in the secrets.yml file. - Create the database, table and schema. You can do whatever you like, but to make sure the sample Flask app will work do as follows:
CREATE DATABASE flaskapi;
USE flaskapi;

CREATE TABLE users(user_id INT PRIMARY KEY AUTO_INCREMENT, user_name VARCHAR(255), user_email VARCHAR(255), user_password VARCHAR(255));
Deploying the API
Finally it is time to deploy your REST API. The following gist demonstrates an example of a Flask app that implements the API with only two endpoints. One for checking if the API functions and one for creating users in our database. In the GitHub repo you can find the python file that has endpoints for reading, updating and deleting entries in the database as well. The password for connecting to the database API is retrieved from the environment variables that were set by creating secrets. The rest of the environment variables (e.g MYSQL_DATABASE_HOST) is retrieved from the MySQL service that was implemented before (further on I will explain how to make sure the Flask app has access to this information).
To deploy this app in your Kubernetes cluster you have to make an image of this Flask app by creating a simple Dockerfile. Nothing special, preparing your container, installing requirements, copying the folder content and running the Flask app. Go to the GitHub repo to find the Dockerfile and the requirements.txt file that is required for building the image. Before you can deploy the Flask app in the Kubernetes cluster, you first have to build the image and name it flask-api via docker build . -t flask-api.
Now it is time to define the deployment and service for the Flask app that implements a RESTful API. The deployment will start up 3 pods (specified in the flaskapp-deployment.yml at the spec.replicas: 3 field) Within each of these pods a container is created from the flask-api image you just build. To make sure Kubernetes uses the locally built image (instead of downloading an image from an external repo like Dockerhub) make sure to set the imagePullPolicy to never. To make sure the Flask app can communicate with the database a few environment variables should be set. The db_root_password is retrieved from your created secrets. Each container that starts up inherits environmental variables with information of all running services, including IP and port addresses. So you don’t have to worry about having to specify the host and port of the MySQL database to the Flask app. Finally, you will define a service of the LoadBalancer type to divide the incoming traffic between the three pods.
Making requests to the API
You are now ready to use our API and interact with your database. The last step is to expose the API service to the outside world via your terminal: minikube service flask-service. You will now see something like

Go to the provided URL and you will see the Hello World message, to make sure your API is running correctly. You can now interact with the API using your favorite request service like Postman or curl in your terminal. To create a user provide a json file with a name, email and pwd field. for example:curl -H "Content-Type: application/json" -d '{"name": "<user_name>", "email": "<user_email>", "pwd": "<user_password>"}' <flask-service_URL>/create. If you implemented the other methods of the API (as defined in the GitHub repo) as well, you may now be able to query all users in the database via: curl <flask-service_URL>/users.
Conclusion
curl in your terminal. To create a user provide a json file with a name, email and pwd field. for example:curl -H "Content-Type: application/json" -d '{"name": "<user_name>", "email": "<user_email>", "pwd": "<user_password>"}' <flask-service_URL>/create. If you implemented the other methods of the API (as defined in the GitHub repo) as well, you may now be able to query all users in the database via: curl <flask-service_URL>/users.
In this hands-on tutorial you set up deployments, services and pods, implemented a RESTful API by deploying a Flask app and connected it with other micro-services (a MySQL database in this case). You can keep running this locally, or implement it on a remote server for example in the cloud and get it to production. Feel free to clone the repo and adjust the API as you like, or add additional micro-services.
Feel free to reach out to me if you have any additional questions, remarks or suggestions!
Bio: Rik Kraan is a medical doctor with a PhD in radiology, working as a data scientist at Vantage AI, a data science consultancy company in the Netherlands. Get in touch via rik.kraan@vantage-ai.com
Original. Reposted with permission.
Related:
- Kubernetes vs. Amazon ECS for Data Scientists
- Create and Deploy your First Flask App using Python and Heroku
- Data Science Meets Devops: MLOps with Jupyter, Git, and Kubernetes