 The Best Machine Learning Frameworks & Extensions for Scikit-learn
 The Best Machine Learning Frameworks & Extensions for Scikit-learn
Learn how to use a selection of packages to extend the functionality of Scikit-learn estimators.
Plenty of packages implement the Scikit-learn estimator API.
If you’re already familiar with Scikit-learn, you’ll find the integration of these libraries pretty straightforward.
With these packages, we can extend the functionality of Scikit-learn estimators, and I’ll show you how to use some of them in this article.
Data formats
In this section, we’ll explore libraries that can be used to process and transform data.
Sklearn-pandas
You can use this package to map ‘DataFrame’ columns to Scikit-learn transformations. Then you can combine these columns into features.
To start using the package, install ‘sklearn-pandas’ via pip. The ‘DataFrameMapper’ can be used to map pandas data frame columns into Scikit-learn transformations. Let’s see how it’s done.
First, create a dummy DataFrame:
data =pd.DataFrame({
    'Name':['Ken','Jeff','John','Mike','Andrew','Ann','Sylvia','Dorothy','Emily','Loyford'],
    'Age':[31,52,56,12,45,50,78,85,46,135],
    'Phone':[52,79,80,75,43,125,74,44,85,45],
    'Uni':['One','Two','Three','One','Two','Three','One','Two','Three','One']
})
The `DataFrameMapper’ accepts a list of tuples – the first item’s name is the column name in Pandas DataFrame.
The second passed item is the kind of transformation that will be applied to the column.
For example, ‘LabelBinarizer’ can be applied to the ‘Uni’ column, whereas the ‘Age’ column is scaled using a ‘StandardScaler’.
from sklearn_pandas import DataFrameMapper mapper = DataFrameMapper([
    ('Uni', sklearn.preprocessing.LabelBinarizer()),
    (['Age'], sklearn.preprocessing.StandardScaler())
])
After defining the mapper, next we use it to fit and transform the data.
mapper.fit_transform(data)
The `transformed_names_` attribute of the mapper can be used to show resulting names after the transformation.
mapper.transformed_names_

Passing `df_out=True` to the mapper will return your results as a Pandas DataFrame.
mapper = DataFrameMapper([
    ('Uni', sklearn.preprocessing.LabelBinarizer()),
    (['Age'], sklearn.preprocessing.StandardScaler())
],df_out=True)

Sklearn-xarray
This package combines n-dimensional labeled arrays from xarray with Scikit-learn tools.
You can apply Scikit-learn estimators to ‘xarrays’ without losing their labels. You can also:
- ensure compatibility between Sklearn estimators with xarray DataArrays and Datasets,
- enable estimators to change the number of samples,
- have pre-processing transformers.
Sklearn-xarray is basically a bridge between xarray and Scikit-learn. In order to use its functionalities, install ‘sklearn-xarray’ via pip or ‘conda’.
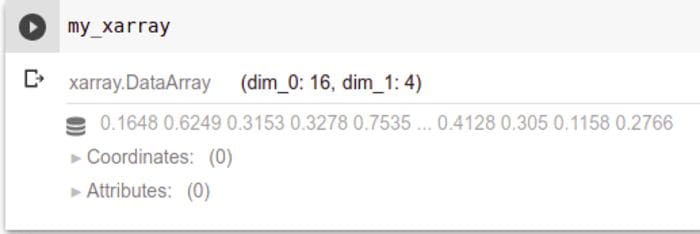
The package has wrappers, which let you use sklearn estimators on xarray DataArrays and Datasets. To illustrate this, let’s first create a ‘DataArray’.
import numpy as np
import xarray as xr
data = np.random.rand(16, 4)
my_xarray = xr.DataArray(data)
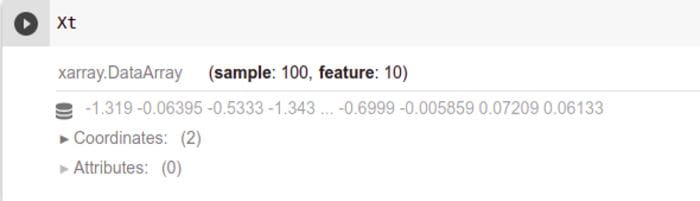
Select one transformation from Sklearn to apply to this ‘DataArray’. In this case, let’s apply the ‘StandardScaler’.
from sklearn.preprocessing import StandardScaler
Xt = wrap(StandardScaler()).fit_transform(X)
Wrapped estimators can be used in Sklearn pipelines seamlessly.
pipeline = Pipeline([
    ('pca', wrap(PCA(n_components=50), reshapes='feature')),
    ('cls', wrap(LogisticRegression(), reshapes='feature'))
])
When fitting this pipeline, you will just pass in the DataArray.
Similarly, DataArrays can be used in a cross-validated grid search.
For this, you need to create a ‘CrossValidatorWrapper’ instance from ‘sklearn-xarray’.
from sklearn_xarray.model_selection
import CrossValidatorWrapper from sklearn.model_selection
import GridSearchCV, KFold
cv = CrossValidatorWrapper(KFold())
pipeline = Pipeline([
    ('pca', wrap(PCA(), reshapes='feature')),
    ('cls', wrap(LogisticRegression(), reshapes='feature'))
])
gridsearch = GridSearchCV(
    pipeline, cv=cv, param_grid={'pca__n_components': [20, 40, 60]}
)
After that, you will fit the ‘gridsearch’ to X and y in the ‘DataArray’ data type.
Auto-ML
Are there tools and libraries that integrate Sklearn for better Auto-ML? Yes there are, and here are some examples.
Auto-sklearn
With this, you can perform automated machine learning with Scikit-learn. For the setup you need to install some dependencies manually.
$ curl https://raw.githubusercontent.com/automl/auto-sklearn/master/requirements.txt | xargs -n 1 -L 1 pip install
Next, install ‘auto-sklearn’ via pip.
When using this tool, you don’t need to worry about algorithm selection and hyper-parameter tuning. Auto-sklearn does all that for you.
It does this thanks to the latest advances in Bayesian optimization, meta-learning, and ensemble construction.
To use it, you need to select a classifier or regressor, and fit it to the training set.
from autosklearn.classification
import AutoSklearnClassifier
cls = AutoSklearnClassifier()
cls.fit(X_train, y_train)
predictions = cls.predict(X_test)
Auto_ViML – Automatic Variant Interpretable Machine Learning” (pronounced “Auto_Vimal”)
Given a certain dataset, Auto_ViML tries out different models with varying features. It eventually settles on the best performing model.
The package also selects the least number of features possible in building the model. This gives you a less complex and interpretable model. This package also:
- helps you clean data by suggesting changes to missing values, formatting, and adding variables;
- classifies variables automatically, whether it’s text, data, or numerical;
- generates model performance graphs automatically when verbose is set to 1 or 2;
- lets you use of ‘featuretools’ for feature engineering;
- handles imbalance data when ‘Imbalanced_Flag’ is set to ‘True’
To see it in action, install ‘autoviml’ via pip.
from sklearn.model_selection import train_test_split, cross_validate

X_train, X_test, y_train, y_test = train_test_split(X, y, test_size=0.1, random_state=42)
X_train, X_val, y_train, y_val = train_test_split(X_train, y_train, test_size=0.25, random_state=54)

train, test = X_train.join(y_train), X_val.join(y_val)
model, features, train, test = Auto_ViML(train,"target",test,verbose=2)
TPOT – Tree-based Pipeline Optimization Tool
This is a Python-based auto-ml tool. It uses genetic programming to optimize machine learning pipelines.
It explores multiple pipelines in order to settle on the best one for your dataset.
Install ‘tpot’ via pip to start tinkering with it. After running ‘tpot’, you can save the resulting pipeline in a file. The file will be exported once the exploration process is completed or when you terminate the process.
The snippet below shows how you can create a classification pipeline on the digits dataset.
from tpot import TPOTClassifier
from sklearn.datasets import load_digits
from sklearn.model_selection import train_test_split

digits = load_digits()
X_train, X_test, y_train, y_test = train_test_split(digits.data, digits.target, train_size=0.75, test_size=0.25, random_state=42)
tpot = TPOTClassifier(generations=5, population_size=50, verbosity=2, random_state=42)
tpot.fit(X_train, y_train)
print(tpot.score(X_test, y_test))
tpot.export('tpot_digits_pipeline.py')
Feature Tools
This is a tool for automated feature engineering. It works by transforming temporal and relational datasets into feature matrices.
Install ‘featuretools[complete]’ via pip to start using it.
Deep Feature Synthesis (DFS) can be used for automated feature engineering.
First, you define a dictionary containing all entities in a dataset. In ‘featuretools’, an entity is a single table. After that, the relationship between the different entities is defined.
The next step is to pass the entities, list of relationships, and the target entity to DFS. This will get you the feature matrix and the corresponding list of feature definitions.
import featuretools as ft

entities = {
    "customers" : (customers_df, "customer_id"),
    "sessions" : (sessions_df, "session_id", "session_start"),
    "transactions" : (transactions_df, "transaction_id", "transaction_time")
 }

relationships = [("sessions", "session_id", "transactions", "session_id"),
                 ("customers", "customer_id", "sessions", "customer_id")]

feature_matrix, features_defs = ft.dfs(entities=entities,
                                                 relationships = relationships,
                                                 target_entity = "customers")
Neuraxle
You can use Neuraxle for hyperparameter tuning and AutoML. Install ‘neuraxle’ via pip to start using it.
Apart from Scikit-learn, Neuraxle is also compatible with Keras, TensorFlow, and PyTorch. It also has:
- parallel computation and serialization,
- time series processing through the provision of abstractions key to such projects.
To do auto-ml with Neuraxle, you need:
- a defined pipeline
- a validation splitter
- definition of a scoring metric via the ‘ScoringCallback’
- a selected ‘hyperparams’ repository
- a selected ‘hyperparams’ optimizer
- an ‘AutoML’ loop
Check out a complete example here.
Experimentation frameworks
Now it’s time for a couple of SciKit tools that you can use for machine learning experimentation.
SciKit-Learn Laboratory
SciKit-Learn Laboratory is a command-line tool you can use to run machine learning experiments. To start using it, install `skll` via pip.
After that, you need to obtain a dataset in the `SKLL` format.
Next, create a configuration file for the experiment, and run the experiment in the terminal.
$ run_experimen experiment.cfg
When the experiment is complete, multiple files will be stored in the results folder. You can use these files to examine the experiment.
Neptune
The Scikit-learn integration of Neptune lets you log your experiments using Neptune. For instance, you can log the summary of your Scikit-learn regressor.
from neptunecontrib.monitoring.sklearn import log_regressor_summary

log_regressor_summary(rfr, X_train, X_test, y_train, y_test)
Check out this notebook for the complete example.
Model selection
Let’s now shift gears, and look at SciKit libraries that are focused on model selection and optimization.
Scikit-optimize
This library implements methods for sequential model-based optimization. Install ‘scikit-optimize’ via pip to start using these functions.
Scikit-optimize can be used to perform hyper-parameter tuning via Bayesian optimization based on the Bayes theorem.
You use ‘BayesSearchCV’ to obtain the best parameters using this theorem. A Scikit-learn model is passed to it as the first argument.
from skopt.space import Real, Categorical, Integer
from skopt import BayesSearchCV
regressor = BayesSearchCV(
    GradientBoostingRegressor(),
      {
         'learning_rate': Real(0.1,0.3),
         'loss': Categorical(['lad','ls','huber','quantile']),
         'max_depth': Integer(3,6),
      },
    n_iter=32,
    random_state=0,
    verbose=1,
    cv=5, n_jobs=-1,
  )
regressor.fit(X_train,y_train)
After fitting, you can get the best parameters of the model via the ‘best_params_’ attribute.
Sklearn-deap
Sklearn-deap is a package used to implement evolutionary algorithms. It reduces the time you need to find the best parameters for the model.
It doesn’t try out every possible combination, but only evolves the combination that results in the best performance. Install ‘sklearn-deap’ via pip.
from evolutionary_search import EvolutionaryAlgorithmSearchCV
cv = EvolutionaryAlgorithmSearchCV(estimator=SVC(),
                                   params=paramgrid,
                                   scoring="accuracy",
                                   cv=StratifiedKFold(n_splits=4),
                                   verbose=1,
                                   population_size=50,
                                   gene_mutation_prob=0.10,
                                   gene_crossover_prob=0.5,
                                   tournament_size=3,
                                   generations_number=5,
                                   n_jobs=4)
cv.fit(X, y)
Model export for production
Moving on, let’s now look at Scikit tools that you can use to export your models for production.
sklearn-onnx
sklearn-onnx enables the conversion of Sklearn models to ONNX.
To use it, you need to get ‘skl2onnx’ via pip. Once your pipeline is ready, you can use the ‘to_onnx’ function to convert the model to ONNX.
from skl2onnx import to_onnx
onx = to_onnx(pipeline, X_train[:1].astype(numpy.float32))
Treelite
This is a model compiler for decision tree ensembles.
It handles various tree-based models, such as random forests and gradient boosted trees.
You can use it to import Scikit-learn models. Here, ‘model’ is a scikit-learn model object.
import treelite.sklearn
model = treelite.sklearn.import_model(model)
Model inspection and visualization
In this section, let’s look at libraries that can be used for model visualization and inspection.
Dtreeviz
dtreeviz is used for decision tree visualization and model interpretation.
from dtreeviz.trees import dtreeviz
viz = dtreeviz(
   model, X_train, y_train,
   feature_names=boston.feature_names,
   fontname="Arial", title_fontsize=16,
   colors = {"title":"red"}
)

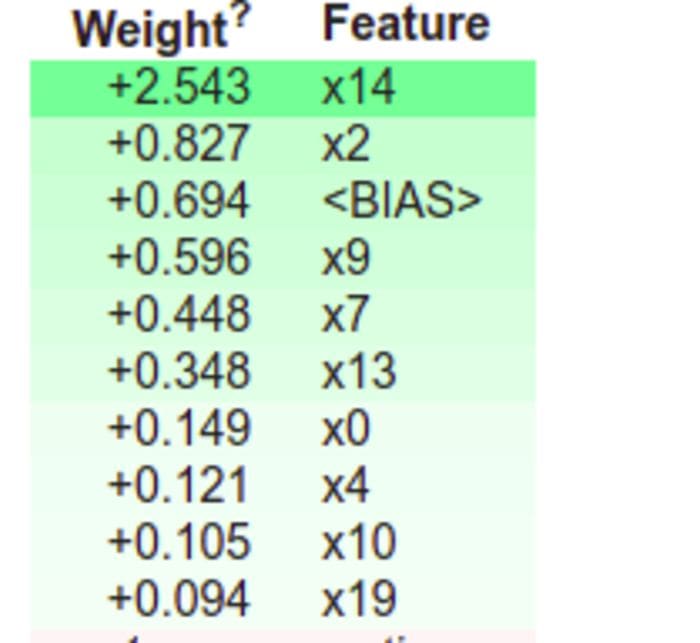
Eli5
eli5 is a package that can be used for debugging and inspecting machine learning classifiers. You can also use it to explain their predictions.
For example, an explanation of Scikit-learn estimator weights can be shown as follows:
import eli5
eli5.show_weights(model)
Other SciKit tools
dabl – Data Analysis Baseline Library
dabl provides boilerplate code for common machine learning tasks. It’s still in active development, so it’s not recommended for production systems.
import dabl
from sklearn.model_selection import train_test_split
from sklearn.datasets import load_digits
X, y = load_digits(return_X_y=True)
X_train, X_test, y_train, y_test = train_test_split(X, y, random_state=1)
sc = dabl.SimpleClassifier().fit(X_train, y_train)
print("Accuracy score", sc.score(X_test, y_test))
skorch
Skorch is a Scikit-learn wrapper for PyTorch.
It lets you use PyTorch in Scikit-learn. It supports numerous data types, like PyTorch Tensors, NumPy arrays and Python dictionaries.
from skorch import NeuralNetClassifier
net = NeuralNetClassifier(
    MyModule,
    max_epochs=10,
    lr=0.1,
    iterator_train__shuffle=True,
)
net.fit(X, y)
Final thoughts
In this article, we explored some of the popular tools and libraries that extend the Scikit-learn ecosystem.
As you see, these tools can be used to:
- process and transform data,
- implement automated machine learning,
- perform automatic feature selection,
- run machine learning experimentation,
- select the best models and pipelines for your problem,
- export models for production…
…and much more!
Try out these packages in your Scikit-learn workflow, and you might be surprised how convenient they are.
Bio: Derrick Mwiti is a data scientist who has a great passion for sharing knowledge. He is an avid contributor to the data science community via blogs such as Heartbeat, Towards Data Science, Datacamp, Neptune AI, KDnuggets just to mention a few. His content has been viewed over a million times on the internet. Derrick is also an author and online instructor. He also trains and works with various institutions to implement data science solutions as well as to upskill their staff. You might want to check his Complete Data Science & Machine Learning Bootcamp in Python course.
Original. Reposted with permission.
Related:
- Top Python Libraries for Data Science, Data Visualization & Machine Learning
- Top Python Libraries for Deep Learning, Natural Language Processing & Computer Vision
- Pruning Machine Learning Models in TensorFlow