Getting Started with PyTorch Lightning
As a library designed for production research, PyTorch Lightning streamlines hardware support and distributed training as well, and we’ll show how easy it is to move training to a GPU toward the end.

Getting Started with PyTorch Lightning: a High-Level Library for High Performance Research
Libraries like TensorFlow and PyTorch take care of most of the intricacies of building deep learning models that train and infer fast. Predictably, this leaves machine learning engineers spending most of their time on the next level up in abstraction, running hyperparameter search, validating performance, and versioning models and experiments to keep track of everything.
There’s a lot more to deep learning than just gluing some layers together.
If PyTorch and TensorFlow (and now JAX) are the deep learning cake, higher-level libraries are the icing. For years now TensorFlow has had its “icing on the cake” in the high-level Keras API, which became an official part of TensorFlow itself with the release of TF 2.0 in 2019. Similarly, PyTorch users have benefited from the high-level fastai library, which is exceptionally well-suited for efficiency and transfer learning. This makes fastai a favorite of successful data scientists on the Kaggle contest platform. More recently, another streamlined wrapper for PyTorch has been quickly gaining steam in the aptly named PyTorch Lightning.
PyTorch Lighting has actually been around, at least in some capacity, since 2019. It started as a sort of side project undertaken by William Falcon during his PhD research at New York University. By the time 2020 rolled around (and we mean the 2020 that started in March) PyTorch Lightning was no longer just a personal project as Falcon announced venture funding. Around the same time the open source (under the Apache 2.0 License) repository moved from Falcon’s personal GitHub profile to its own dedicated profile. As of this writing PyTorch Lightning has grown to over 15,000 stars and nearly 2,000 forks, becoming nearly as popular as fastai (which has over 21,000 stars) and handily more popular than the in-house high-level library from PyTorch, Ignite, which has about 4,000 stars!
Where fastai was designed to facilitate the inaugural fastai course, Practical Deep Learning for Coders, PyTorch Lightning is intended to streamline production research. Fastai has a focus on transfer learning and efficiency and its ease of use has made it a popular high-level library on the Kaggle data science competition platform, with over 4,500 notebooks referencing the library. Compare that to just over 100 notebook results referring to PyTorch Ignite, and about 500 for PyTorch Lightning. PyTorch Lightning is a relatively newer library, but it also targets a different demographic. PyTorch Lightning streamlines the engineering aspects of developing a new model, such as logging, validation and hooks, and it’s targeted toward machine learning researchers.
Research is all about answering falsifying questions, and in this tutorial we’ll take a look at what PyTorch Lightning can do for us to make that process easier. We’ll set up a simple mock research question of whether there is any advantage to using a “fancy” activation function (such as the so-called swish function) versus a more standard rectified linear unit (ReLU). We’ll use the vanishingly small (in terms of both number of samples and image size) digits dataset from SciKit-Learn to set up our experiment. Starting with digits should make this an accessible project for someone running the code on an efficient laptop, but readers are encouraged to swap in a more realistic images dataset like CIFAR10 for extra credit.
As a library designed for production research, PyTorch Lightning streamlines hardware support and distributed training as well, and we’ll show how easy it is to move training to a GPU toward the end.
Getting Started: Installing PyTorch Lightning
Like many Python projects these days, PyTorch Lightning installs easily using pip, and we recommend using your favorite virtual environment manager to manage installs and dependencies without cluttering up your base Python installation. We’ll provide three examples, the first of which is using virtualenv and pip, and we are assuming you are using a Unix-style command line on Linux or Mac, or that you are savvy enough to adapt the examples for Windows using something like Git Bash or Anaconda Prompt. After navigating to the project folder for this tutorial:
virtualenv ptl_env --python=python3
source ptl_env/bin/activate
pip install pytorch-lightning
pip install torchvision
pip install scikit-learn
You can also use Anaconda to manage your virtual environment:
conda create -n ptl_env
conda activate ptl_env
conda install -n ptl_env pytorch-lighnting -c conda-forge
conda install -n ptl_env torchvision
conda install -n ptl_env scikit-learn
Or even combine the two, creating a new anaconda environment and then using pipt o install packages. For more general usage there are some caveats to using pip and Anaconda together, but for purposes of this tutorial it should be fine:
conda create -n ptl_env
conda activate ptl_env
conda install -n ptl_env pip
pip install pytorch-lightning
pip install torchvision
pip install scikit-learn
Using PyTorch Lightning
The design strategy employed by PyTorch Lightning revolves around the LightningModule class. This class, itself inheriting from the pytorch.nn.Module class, provides a convenient entry point and attempts to organize as much of the training and validation process as possible all in one place.
A key feature of this strategy is that the contents of a typical training and validation loop is instead defined in the model itself, accessible via a fit API very similar to keras, fastai, or even SciKit-Learn. Unlike those other examples where fit is accessed through the model itself, in PyTorch Lightning fit is accessed via a Trainer object. But that’s getting ahead of ourselves, first let’s set the stage for our experiment by importing everything we’ll need.
import os
import numpy as np

import torch
import torch.nn as nn
import torch.nn.functional as F
from torchvision import transforms
from torch.utils.data import DataLoader, random_split
from torchvision.datasets import MNIST

# for rapid prototyping with a small dataset
import sklearn
import sklearn.metrics
import sklearn.datasets
# for building intuition with a few tens of thousands of samples
from torchvision.datasets import MNIST

import pytorch_lightning as pl
from pytorch_lightning.metrics import functional as FM
Then we can go ahead and define our model:
class MyClassifier(pl.LightningModule):

    def __init__(self, dim=28, activation=nn.ReLU()):

        super(MyClassifier, self).__init__()

        self.image_dim = dim
        self.hid_dim = 128
        self.num_classes = 10
        self.act = activation

        self.feature_extractor = nn.Sequential(\
                nn.Conv2d(1, 4, 3, padding=1), \
                self.act, \
                nn.Conv2d(4, 4, 3, padding=1), \
                self.act, \
                nn.Conv2d(4, 1, 3, padding=1), \
                self.act, \
                nn.Flatten())

        self.head = nn.Sequential(\
                nn.Linear(self.image_dim**2, self.hid_dim), \
                self.act, \
                nn.Linear(self.hid_dim, self.hid_dim), \
                self.act, \
                nn.Linear(self.hid_dim, self.num_classes))

    def forward(self, x):

        x = self.feature_extractor(x)
        output = self.head(x)

        return output

    def training_step(self, batch, batch_index):

        x, y = batch

        output = self.forward(x)

        loss = F.nll_loss(F.log_softmax(output, dim = -1), y)

        y_pred = output.argmax(-1).cpu().numpy()
        y_tgt = y.cpu().numpy()
        accuracy = sklearn.metrics.accuracy_score(y_tgt, y_pred)
        self.log("train loss", loss)
        self.log("train accuracy", accuracy)
        return loss

    def validation_step(self, batch, batch_idx):

        x, y = batch

        output = self.forward(x)

        loss = F.cross_entropy(output, y)

        pred = output.argmax(-1)

        return output, pred, y

    def validation_epoch_end(self, validation_step_outputs):

        losses = 0
        outputs = None
        preds = None
        tgts = None
        for output, pred, tgt in validation_step_outputs:
        preds = torch.cat([preds, pred]) if preds is not None else pred
        outputs = torch.cat([outputs, output], dim = 0) \
        if outputs is not None else output
        tgts = torch.cat([tgts, tgt]) if tgts is not None else tgt

        loss = F.nll_loss(F.log_softmax(outputs, dim = -1), tgts)

        y_preds = preds.cpu().numpy()
        y_tgts = tgts.cpu().numpy()

        fm_accuracy = FM.accuracy(outputs, tgts)

        # pytorch lightning prints a deprecation warning for FM.accuracy,
        # so we'll include sklearn.metrics.accuracy_score as an alternative
        accuracy = sklearn.metrics.accuracy_score(y_tgts, y_preds)

        self.log("val_accuracy", accuracy)
        self.log("val_loss", loss)

    def configure_optimizers(self):
        return torch.optim.Adam(self.parameters(), lr=3e-4)
Notably, training functionality is devolved to the module itself in the training_step function. Most ML practitioners having some practice with PyTorch will already be quite familiar with the practice of overloading the forward function, and LightningModule objects have many more methods to overload for fine-grained control of the relatively painless logging and evaluation features that are built-in.
The code that defines our MyClassifier model class might seem pretty verbose, but this strategy massively simplifies things when it’s time to actually start training, which we’ll see later. There are plenty of other callbacks and functions that are included in the LightningModule class, and all of them can be overloaded for more fine-tuned control. A full list of these callbacks can be found in the PyTorch Lightning documentation.
For this tutorial, we’ll also define a torch.utils.data.Dataset object to wrap the digits dataset from SciKit-Learn. This should make it easy to rapidly get everything working before switching to a larger and more informative dataset like MNIST or CIFAR10.
class SKDigitsDataset(torch.utils.data.Dataset):

    def __init__(self, mode="train"):
        super(SKDigitsDataset, self).__init__()
        x, y = sklearn.datasets.load_digits(return_X_y = True)

        num_samples = int(x.shape[0] * 0.8)
        np.random.seed(42)
        np.random.shuffle(x)
        np.random.seed(42)
        np.random.shuffle(y)

        if mode == "train":
        self.x = x[:num_samples]
        self.y = y[:num_samples]
        elif mode == "val":
        self.x = x[num_samples:]
        self.y = y[num_samples:]
        else:
        self.x = x
        self.y = y

        self.transform = lambda my_dict: \
        (torch.tensor(my_dict["x"]).float(), \
        torch.tensor(my_dict["y"]).long())

    def __len__(self):
        return self.x.shape[0]

    def __getitem__(self, index):

        got_x = self.x[index].reshape(-1, 8, 8)
        got_y = self.y[index]

        sample = {"x": got_x, "y": got_y}

        sample = self.transform(sample)

        return sample
With all that out of the way, actually launching a training run becomes incredibly simple. All we have to do is create a dataset and feed it into a DataLoader, instantiate our model, create a PyTorch Lightning Trainer object, and call the trainer’s fit method. Here’s a simplified version:
dataset = SKDigitsDataset()
dataloader = DataLoader(dataset)
model = MyClassifier(dim=8)
trainer = pl.Trainer()
trainer.fit(model, dataloader)
But of course we will want to continuously log validation metrics throughout the training process, making use of the validation_step and validation_epoch_end methods we overloaded in our model. Here’s the actual code I use to launch a training run, using the if __name__ == "__main__": pattern that provides a simple entry point for running a Python file as a module.
if __name__ == "__main__":
    # if using digits from sklearn

    train_dataset = SKDigitsDataset(mode = "train")
    val_dataset = SKDigitsDataset(mode = "val")

    dim = 8
    validation_interval = 1.0

    train_dataloader = DataLoader(train_dataset)
    val_dataloader = DataLoader(val_dataset)

    model = MyClassifier(dim=dim, activation=nn.ReLU())
    trainer = pl.Trainer(max_epochs = 100, \
    val_check_interval = validation_interval)

    trainer.fit(model, train_dataloader, val_dataloader)

    print("Training finished, all ok")
When you run the code above, you should see a progress bar displayed in your terminal that looks something like the one below.

After allowing training to run for a while, have a look in your working directory and you’ll notice a new folder called lightning_logs. This is where PyTorch Lightning records your training sessions, and you can quickly boot up a Tensorboard session to see how things are going. After launching tensorboard with the line below, use a browser to navigate to localhost:6006 (by default) to open up the dashboard.
tensorboard --logdir=lightning_logs
If it took you a few starts and stops to get training to take off, you’ll notice a list of training runs displayed in the left sidebar with version_0, version_1, version_2 and so on. PyTorch Lightning automatically versions your training runs this way, so it should be pretty easy to compare a few different experimental conditions or random seeds..
For example, if we wanted to run our little experiment comparing the efficacy of using Swish versus ReLU activations, we can use the code below.
if __name__ == "__main__":

    if(1):
        # if using digits from sklearn

        train_dataset = SKDigitsDataset(mode = "train")
        val_dataset = SKDigitsDataset(mode = "val")

        dim = 8
        validation_interval = 1.0

    else:
        # if using MNIST
        train_dataset = MNIST(os.getcwd(), download=True, \
                train=True, transform=transforms.ToTensor())
        val_dataset = MNIST(os.getcwd(), download=True, \
                train=False, transform=transforms.ToTensor())

        dim = 28
        validation_interval = 0.1


    train_dataloader = DataLoader(train_dataset)
    val_dataloader = DataLoader(val_dataset)
class Swish(nn.Module):

    def __init__(self):
        super(Swish, self).__init__()

    def forward(self, x):
        return x * torch.sigmoid(x)

for replicate in range(3):
    for activation in [Swish(), nn.ReLU()]:

        model = MyClassifier(dim=dim, activation=activation)

        trainer = pl.Trainer(max_epochs = 100, \
        val_check_interval = validation_interval)
        trainer.fit(model, train_dataloader, val_dataloader)

        print(f" round {replicate} finished.")
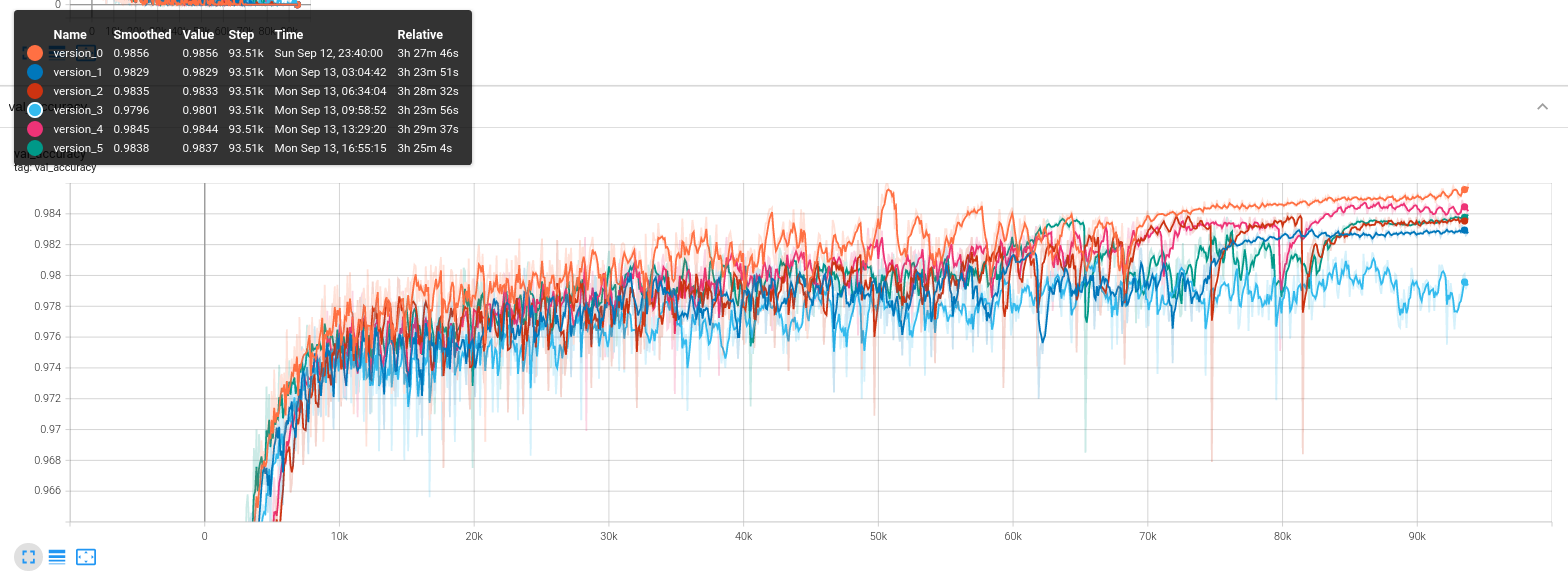
And after running our little experiment we’ll find our results nicely logged for our perusal in Tensorboard.
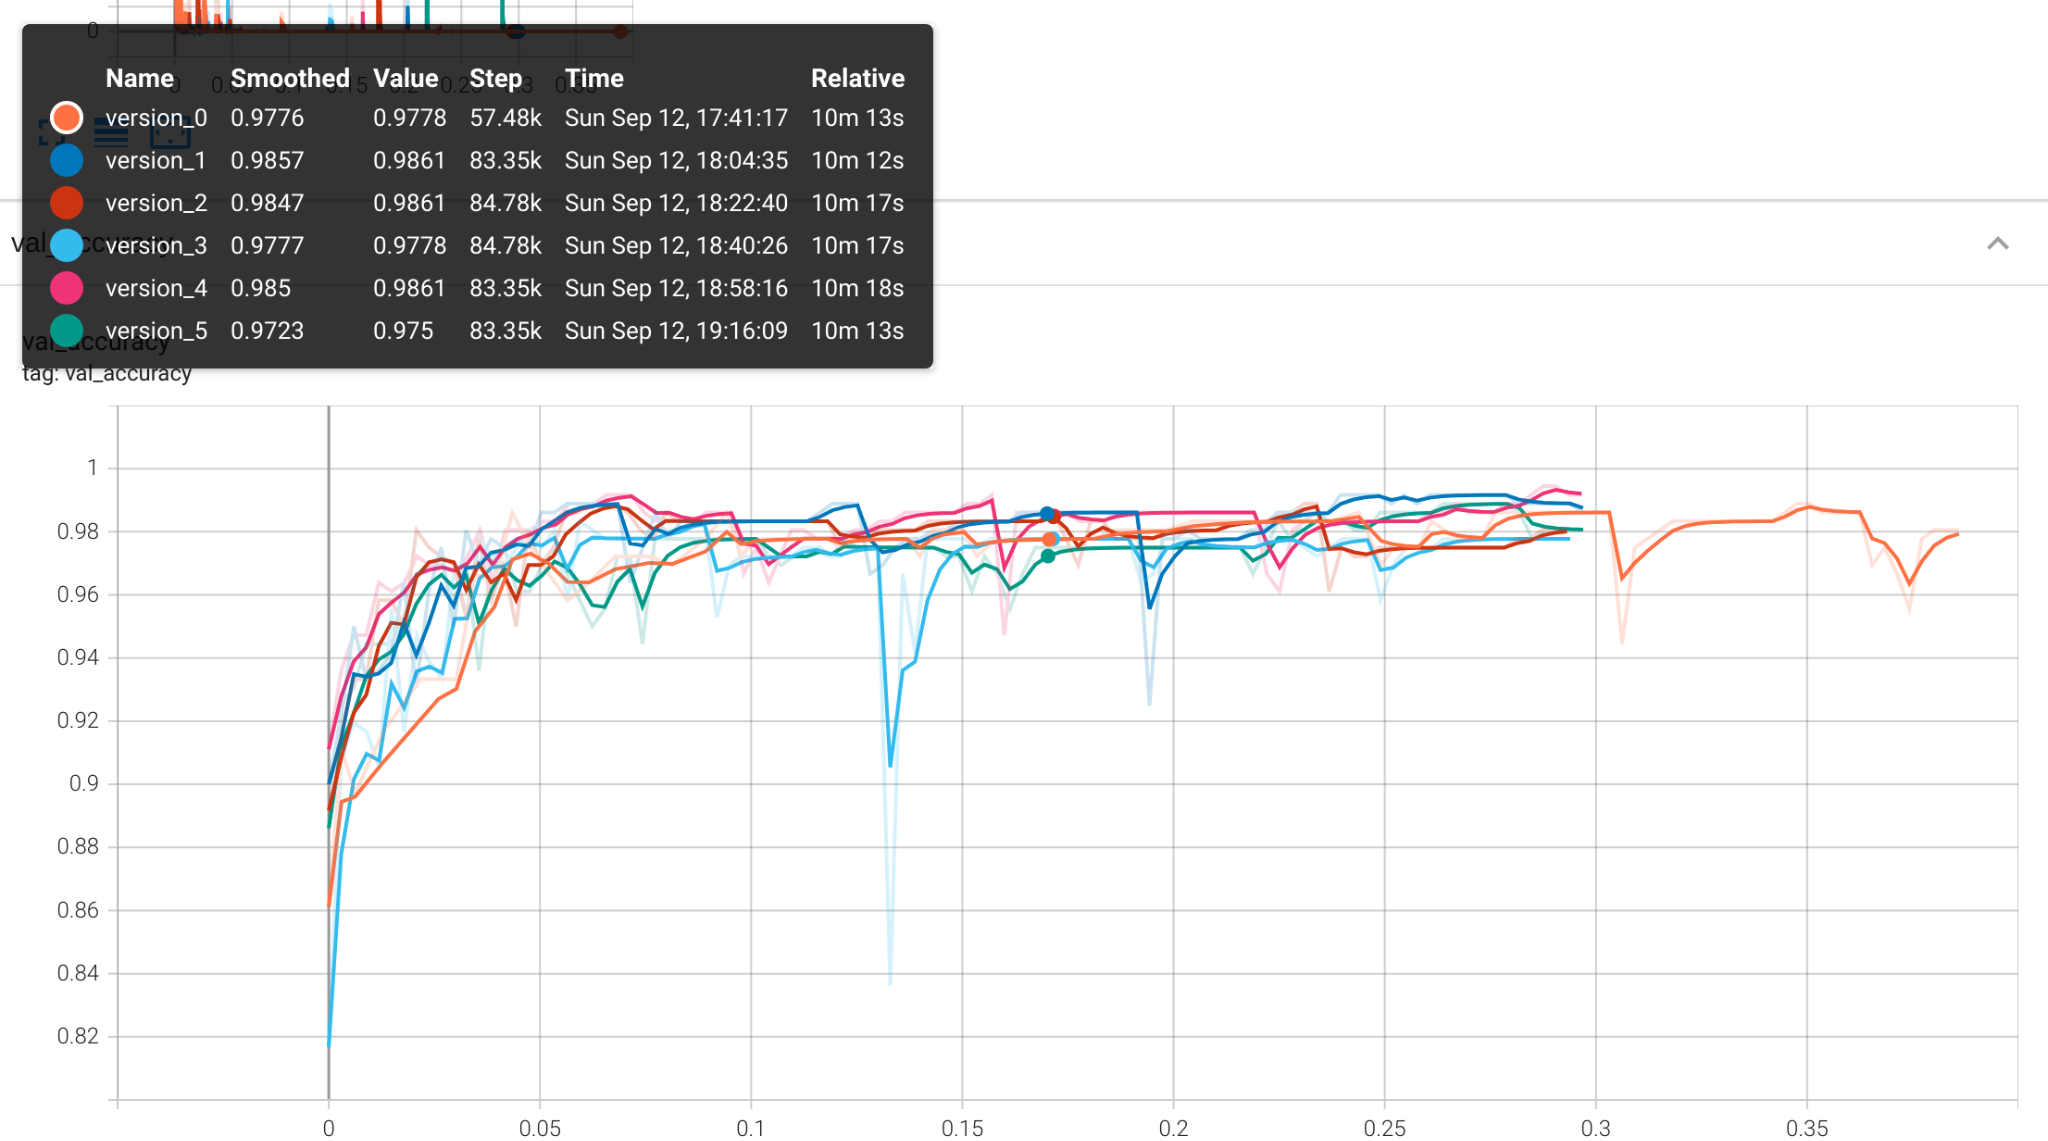
You’ll probably notice we have the option to run training on the much larger MNIST dataset. At 60,000 training samples of 28 by 28 pixel images, it’s closer to a useful real-world dataset than the miniaturized sklearn digits dataset, which provides fewer than 2,000 samples of 8 by 8 images. However, you probably won’t want to run 6 replicate training runs on the MNIST dataset using an underpowered laptop CPU, so we’ll want to move everything over to a GPU first.
If you are already used to building experiments and training pipelines in standard PyTorch from scratch, you probably know the frustration of a forgotten tensor languishing on a CPU device, and the show-stopping errors they generate. It’s usually an easy fix, but frustrating nonetheless.
Using a GPU for Training
If you’re working with a machine with an available GPU, you can easily use it to train. To launch training on the GPU instead of the CPU, we’ll have to modify some of the code:
trainer = pl.Trainer(max_epochs = 100, \
                val_check_interval = validation_interval, \
                gpus=[0])
That’s right, by modifying a single line of code defining the trainer object we can run training on the GPU. No worrying about forsaken tensors and with all the convenience of logging and validation we built into our original model.
Next Steps
A striking aspect of working with PyTorch Lightning is that it seems to get easier the further along you go. Defining our MyClassifer model was a little more complicated than a model of similar complexity sub-classed from torch.nn.Module up front, but once we had training, validation, and logging all taken care of by the LightningModule model, every subsequent step was easier than it would have been normally.
PyTorch Lightning also makes managing hardware a breeze, and we caught a glimpse of just how simple this is when we switched to training MNIST on a GPU. PyTorch Lightning also readily facilitates training on more esoteric hardware like Google’s Tensor Processing Units, and on multiple GPUs, and it is being developed in parallel alongside Grid, a cloud platform for scaling up experiments using PyTorch Lightning, and Lightning Bolts a modular toolbox of deep learning examples driven by the PyTorch Lightning community.
That covers our “Hello, World” introduction to PyTorch Lightning, but we’ve barely scratched the surface of what Lightning intends to deliver to your deep learning workflow.
In our next PyTorch Lightning tutorial, we’ll dive into two complementary PyTorch Lightning libraries: Lightning Flash and TorchMetrics. TorchMetrics unsurprisingly provides a modular approach to define and track useful metrics across batches and devices, while Lightning Flash offers a suite of functionality facilitating more efficient transfer learning and data handling, and a recipe book of state-of-the-art approaches to typical deep learning problems.
Now, on to our next PyTorch Lightning tutorial:
PyTorch Lightning Tutorial #2: Using TorchMetrics and Lightning Flash
Bio: Kevin Vu manages Exxact Corp blog and works with many of its talented authors who write about different aspects of Deep Learning.
Original. Reposted with permission.
Related:
- Introduction to PyTorch Lightning
- How to deploy PyTorch Lightning models to production
- PyTorch Multi-GPU Metrics Library and More in New PyTorch Lightning Release