Introduction to Deep Learning Libraries: PyTorch and Lightning AI
Simple explanation of PyTorch and Lightning AI.

Photo by Google DeepMind
Deep learning is a branch of the machine learning model based on neural networks. In the other machine model, the data processing to find the meaningful features is often done manually or relying on domain expertise; however, deep learning can mimic the human brain to discover the essential features, increasing the model performance.
There are many applications for deep learning models, including facial recognition, fraud detection, speech-to-text, text generation, and many more. Deep learning has become a standard approach in many advanced machine learning applications, and we have nothing to lose by learning about them.
To develop this deep learning model, there are various library frameworks we can rely upon rather than working from scratch. In this article, we will discuss two different libraries we can use to develop deep learning models: PyTorch and Lighting AI. Let’s get into it.
PyTorch
PyTorch is an open-source library framework to train deep-learning neural networks. PyTorch was developed by the Meta group in 2016 and has grown in popularity. The rise of popularity was thanks to the PyTorch feature that combines the GPU backend library from Torch with Python language. This combination makes the package easy to follow by the user but still powerful in developing the deep learning model.
There are a few standout PyTorch features that are enabled by the libraries, including a nice front-end, distributed training, and a fast and flexible experimentation process. Because there are many PyTorch users, the community development and investment were also massive. That is why learning PyTorch would be beneficial in the long run.
PyTorch building block is a tensor, a multi-dimensional array used to encode all the input, output, and model parameters. You can imagine a tensor like the NumPy array but with the capability to run on GPU.
Let’s try out the PyTorch library. It’s recommended to perform the tutorial in the cloud, such as Google Colab if you don’t have access to a GPU system (although it could still work with a CPU). But, If you want to start in the local, we need to install the library via this page. Select the appropriate system and specification you have.
For example, the code below is for pip installation if you have a CUDA-Capable system.
pip3 install torch torchvision torchaudio --index-url https://download.pytorch.org/whl/cu118
After the installation finishes, let’s try some PyTorch capabilities to develop the deep learning model. We will do a simple image classification model with PyTorch in this tutorial based on their web tutorial. We would walk on the code and have an explanation of what happened within the code.
First, we would download the dataset with PyTorch. For this example, we would use the MNIST dataset, which is the number handwritten classification dataset.
from torchvision import datasets

train = datasets.MNIST(
    root="image_data",
    train=True,
    download=True
)

test = datasets.MNIST(
    root="image_data",
    train=False,
    download=True,
)
We download both the MNIST train and test datasets to our root folder. Let’s see what our dataset looks like.
import matplotlib.pyplot as plt

for i, (img, label) in enumerate(list(train)[:10]):
    plt.subplot(2, 5, i+1)
    plt.imshow(img, cmap="gray")
    plt.title(f'Label: {label}')
    plt.axis('off')

plt.show()
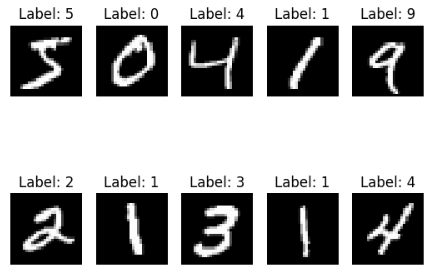
Every image is a single-digit number between zero and nine, meaning we have ten labels. Next, let’s develop an image classifier based on this dataset.
We need to transform the image dataset into a tensor to develop a deep learning model with PyTorch. As our image is a PIL object, we can use the PyTorch ToTensor function to perform the transformation. Additionally, we can automatically transform the image with the datasets function.
from torchvision.transforms import ToTensor
train = datasets.MNIST(
    root="data",
    train=True,
    download=True,
    transform=ToTensor()
)

test = datasets.MNIST(
    root="data",
    train=False,
    download=True,
    transform=ToTensor()
)
By passing the transformation function to the transform parameter, we can control what the data would be like. Next, we would wrap the data into the DataLoader object so the PyTorch model could access our image data.
from torch.utils.data import DataLoader
size = 64

train_dl = DataLoader(train, batch_size=size)
test_dl = DataLoader(test, batch_size=size)

for X, y in test_dl:
    print(f"Shape of X [N, C, H, W]: {X.shape}")
    print(f"Shape of y: {y.shape} {y.dtype}")
    break
Shape of X [N, C, H, W]: torch.Size([64, 1, 28, 28])
Shape of y: torch.Size([64]) torch.int64
In the code above, we create a DataLoader object for the train and test data. Each data batch iteration would return 64 features and labels in the object above. Additionally, the shape of our image is 28 * 28 (height * width).
Next, we would develop the Neural Network model object.
from torch import nn

#Change to 'cuda' if you have access to GPU
device = 'cpu'

class NNModel(nn.Module):
    def __init__(self):
        super().__init__()
        self.flatten = nn.Flatten()
        self.lr_stack = nn.Sequential(
            nn.Linear(28*28, 128),
            nn.ReLU(),
            nn.Linear(128, 128),
            nn.ReLU(),
            nn.Linear(128, 10)
        )

    def forward(self, x):
        x = self.flatten(x)
        logits = self.lr_stack(x)
        return logits

model = NNModel().to(device)
print(model)
NNModel(
  (flatten): Flatten(start_dim=1, end_dim=-1)
  (lr_stack): Sequential(
    (0): Linear(in_features=784, out_features=128, bias=True)
    (1): ReLU()
    (2): Linear(in_features=128, out_features=128, bias=True)
    (3): ReLU()
    (4): Linear(in_features=128, out_features=10, bias=True)
  )
)
In the object above, we create a Neural Model with few layer structure. To develop the Neural Model object, we use the subclassing method with the nn.module function and create the neural network layers within the__init__.
We initially convert the 2D image data into pixel values inside the layer with the flatten function. Then, we use the sequential function to wrap our layer into a sequence of layers. Inside the sequential function, we have our model layer:
nn.Linear(28*28, 128),
nn.ReLU(),
nn.Linear(128, 128),
nn.ReLU(),
nn.Linear(128, 10)
By sequence, what happens above is:
- First, the data input which is 28*28 features is transformed using a linear function in the linear layer and having 128 features as the output.
- ReLU is a non-linear activation function that is present between the model input and output to introduce non-linearity.
- 128 features input to the linear layer and have 128 features output
- Another ReLU activation function
- 128 features as the input in the linear layer and 10 features as the output (our dataset label only has 10 labels).
Lastly, the forward function is present for the actual input process for the model. Next, the model would need a loss function and optimization function.
from torch.optim import SGD

loss_fn = nn.CrossEntropyLoss()
optimizer = SGD(model.parameters(), lr=1e-3)
For the next code, we just prepare the training and test preparation before we run the modeling activity.
import torch
def train(dataloader, model, loss_fn, optimizer):
    size = len(dataloader.dataset)
    model.train()
    for batch, (X, y) in enumerate(dataloader):
        X, y = X.to(device), y.to(device)
        pred = model(X)
        loss = loss_fn(pred, y)

        loss.backward()
        optimizer.step()
        optimizer.zero_grad()

        if batch % 100 == 0:
            loss, current = loss.item(), (batch + 1) * len(X)
            print(f"loss: {loss:>2f}  [{current:>5d}/{size:>5d}]")

def test(dataloader, model, loss_fn):
    size = len(dataloader.dataset)
    num_batches = len(dataloader)
    model.eval()
    test_loss, correct = 0, 0
    with torch.no_grad():
        for X, y in dataloader:
            X, y = X.to(device), y.to(device)
            pred = model(X)
            test_loss += loss_fn(pred, y).item()
            correct += (pred.argmax(1) == y).type(torch.float).sum().item()
    test_loss /= num_batches
    correct /= size
    print(f"Test Error: \n Accuracy: {(100*correct):>0.1f}%, Avg loss: {test_loss:>2f} \n")
Now we are ready to run our model training. We would decide how many epochs (iterations) we want to perform with our model. For this example, let’s say we want it to run for five times.
epoch = 5
for i in range(epoch):
    print(f"Epoch {i+1}\n-------------------------------")
    train(train_dl, model, loss_fn, optimizer)
    test(test_dl, model, loss_fn)
print("Done!")
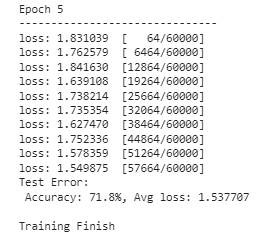
The model now has finished their training and able to be used for any image prediction activity. The result could vary, so expect different results from the above image.
It’s just a few things that PyTorch can do, but you can see that building a model with PyTorch is easy. If you are interested in the pre-trained model, PyTorch has a hub you can access.
Lighting AI
Lighting AI is a company that provides various products to minimize the time to train the PyTorch deep learning model and simplify it. One of their open-source product is PyTorch Lighting, which is a library that offers a framework to train and deploy the PyTorch model.
Lighting offers a few features, including code flexibility, no boilerplate, minimal API, and improved team collaboration. Lighting also offers features such as multi-GPU utilization and swift, low-precision training. This made Lighting a good alternative to develop our PyTorch model.
Let’s try out the model development with Lighting. To start, we need to install the package.
pip install lightning
With the Lighting installed, we would also install another Lighting AI product called TorchMetrics to simplify the metric selection.
pip install torchmetrics
With all the libraries installed, we would try to develop the same model from our previous example using a Lighting wrapper. Below is the whole code for developing the model.
import torch
import torchmetrics
import pytorch_lightning as pl
from torch import nn
from torch.optim import SGD

# Change to 'cuda' if you have access to GPU
device = 'cpu'

class NNModel(pl.LightningModule):
    def __init__(self):
        super().__init__()
        self.flatten = nn.Flatten()
        self.lr_stack = nn.Sequential(
            nn.Linear(28 * 28, 128),
            nn.ReLU(),
            nn.Linear(128, 128),
            nn.ReLU(),
            nn.Linear(128, 10)
        )
        self.train_acc = torchmetrics.Accuracy(task="multiclass", num_classes=10)
        self.valid_acc = torchmetrics.Accuracy(task="multiclass", num_classes=10)

    def forward(self, x):
        x = self.flatten(x)
        logits = self.lr_stack(x)
        return logits

    def training_step(self, batch, batch_idx):
        x, y = batch
        x, y = x.to(device), y.to(device)
        pred = self(x)
        loss = nn.CrossEntropyLoss()(pred, y)
        self.log('train_loss', loss)

        # Compute training accuracy
        acc = self.train_acc(pred.softmax(dim=-1), y)
        self.log('train_acc', acc, on_step=True, on_epoch=True, prog_bar=True)
        return loss

    def configure_optimizers(self):
        return SGD(self.parameters(), lr=1e-3)

    def test_step(self, batch, batch_idx):
        x, y = batch
        x, y = x.to(device), y.to(device)
        pred = self(x)
        loss = nn.CrossEntropyLoss()(pred, y)
        self.log('test_loss', loss)

        # Compute test accuracy
        acc = self.valid_acc(pred.softmax(dim=-1), y)
        self.log('test_acc', acc, on_step=True, on_epoch=True, prog_bar=True)
        return loss
Let’s break down what happen in the code above. The difference with the PyTorch model we developed previously is that the NNModel class now uses subclassing from the LightingModule. Additionally, we assign the accuracy metrics to assess using the TorchMetrics. Then, we added the training and testing step within the class and set up the optimization function.
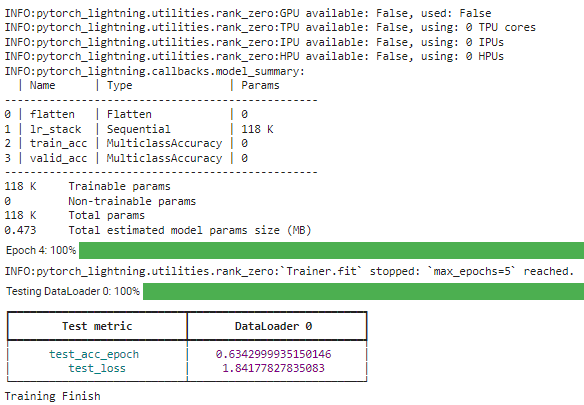
With all the models set, we would run the model training using the transformed DataLoader object to train our model.
# Create a PyTorch Lightning trainer
trainer = pl.Trainer(max_epochs=5)

# Create the model
model = NNModel()

# Fit the model
trainer.fit(model, train_dl)

# Test the model
trainer.test(model, test_dl)

print("Training Finish")
With the Lighting library, we can easily tweak the structure you need. For further reading, you could read their documentation.
Conclusion
PyTorch is a library for developing deep learning models, and it provides an easy framework for us to access many advanced APIs. Lighting AI also supports the library, which provides a framework to simplify the model development and enhance the development flexibility. This article introduced us to both the library's features and simple code implementation.
Cornellius Yudha Wijaya is a data science assistant manager and data writer. While working full-time at Allianz Indonesia, he loves to share Python and Data tips via social media and writing media.