AutoML: An Introduction Using Auto-Sklearn and Auto-PyTorch
AutoML is a broad category of techniques and tools for applying automated search to your automated search and learning to your learning. In addition to Auto-Sklearn, the Freiburg-Hannover AutoML group has also developed an Auto-PyTorch library. We’ll use both of these as our entry point into AutoML in the following simple tutorial.
Getting a Computer to Do What You Want Automatically
Machine learning (ML) now impacts a wide swath of business, engineering, and research domains, to the extent where you’d be hard-pressed to find a niche where machine learning is totally uninvolved. Progress in ML has come on the coattails of broader trends in software and automation: Wherever human activity depends on doing repetitive tasks that can be readily described in a way that a computer can handle, it’s generally useful to write down a recipe (or program) for the task that the computer can follow.
Using ML now means that for many useful tasks it’s no longer necessary to manually write a program, or even to know exactly how to solve the problem. Instead we can approach many problems by defining a search space and a learning algorithm, and then let the machine figure it out.
Modern machine learning is sometimes referred to as “software 2.0” and is a trend that has been super-charged by the effectiveness of, and ensuing research and development interest in, deep learning. There are obvious applications that make a good fit for this approach: like fitting a statistical model to data, for example; but there are more esoteric and impressive examples that were never so obvious in the days of statistical or old-school machine learning.
In the last few years we’ve seen machine learning predict protein folding better than any other method, beat expert human game players in Go, Dota II, Starcraft II, and more, and create reasonably coherent text and speech responses (though the last accomplishment can be hit or miss).
Still, these projects almost always require the application of substantial world-class engineering and research talent. That’s not entirely surprising, as coaxing a computer program, even one equipped with sophisticated state-of-the-art machine learning algorithms, to accomplish completely new objectives still requires human innovation. That may change in the future, when AI researchers create new machine learning agents that crack the human expert-level AI researcher threshold.
For now, while groundbreaking AI science is still difficult to automate, there’s an ever-growing volume of ML applications where a human engineer isn’t necessarily needed to optimize a model for a given task. In fact, in some tasks, leaving the task of choosing a specific model and stirring the learning hyperparameters up to human judgment might actually slow things down or lead to sub-par results. A human might do a poor job of exploring hyperparameter space, might tend to favor their preferred types of models for bad reasons, or might stop and start training runs more often than is good for effectively training the model for the task (which can also be bad for their mental state).
Instead, a good ML practitioner should take advantage of all the tools at their disposal, which now includes open source off-the-shelf tools and best practices for applying ML to ML. In other words, AutoML.
What is AutoML?
AutoML is a broad category of techniques and tools for applying automated search to your automated search and learning to your learning. These range from applying Bayesian optimization to the hyperparameters for a statistical learning algorithm, to neural architecture search for deep learning models.
The field is quite active and diverse, with a healthy ecosystem of contests, many of which are cataloged at automl.ai. In fact, one of the most prominent AutoML packages, Auto-SciKit-Learn (Auto-Sklearn), got started as the winner of the 2014 to 2016 ChaLearn AutoML challenge.
Auto-Sklearn was developed by one of the most notable research groups pursuing Automated machine learning in the pre-eminent AutoML supergroup from Germany. This collaboration is made up of labs at the University of Freiburg and the University of Hannover. Other noteworthy contributors to the field include the scientists behind Auto-WEKA, one of the first popular AutoML toolkits, and its successor Auto-WEKA 2.0. These researchers are mostly scattered around North America but with a nucleus at the University of British Columbia in Canada. Whereas Auto-WEKA works with the open-source WEKA software and Java, Auto-Sklearn is a Python package and is built to closely follow the usage patterns of SciKit-Learn (hence the name "Auto-SciKit-Learn").
In addition to Auto-Sklearn, the Freiburg-Hannover AutoML group has also developed an Auto-PyTorch library. We’ll use both of these as our entry point into AutoML in the following simple tutorial.
AutoML Tutorial Demo
First we’ll set up our needed packages and dependencies. We're using Python3’s virtualenv to manage a virtual environment for this project, but you’ll find similar instructions should work if you prefer Anaconda (especially if you use pip in Anaconda).
The following are commands to set up your environment from the command line on a unix-based system like Ubuntu, or from something like Anaconda prompt if you happen to be using Windows. The Auto-Sklearn documentation recommends installing from their requirements.txt dependency file first, but we haven’t found it necessary for the code used in this tutorial.
# create and activate a new virtual environment
virtualenv automl --python=python3
source automl/bin/activate
# install auto-sklearn
pip install auto-sklearn
You’re likely to run into conflicts if you use the same environment for both AutoML libraries, so make a second environment for Auto-PyTorch. Note that this environment needs to use Python of version greater than or equal to 3.7.
deactivate
virtualenv autopt –-python=python3.7
source autopt/bin/activate
# install auto-pytorch from the github repo
git clone https://github.com/automl/Auto-PyTorch.git
cd Auto-PyTorch
pip install -e .
pip install numpy==1.20.0
pip install ipython
Note the extra two install statements following pip install -e . In our hands, upgrading the NumPy version to 1.20.0 fixed a strange error, reproduced below.
ValueError: numpy.ndarray size changed, may indicate binary incompatibility. Expected 88 from C header, got 80 from PyObject
If you want to contribute to the project, or just want to view the latest work-in-progress code, check out the development branch.
# (optional)
git checkout development
# make sure to switch back to the primary branch for the tutorial
git checkout master
The rest of the code for this tutorial is in Python, so spin up your Python prompt, Jupyter notebook, or text editor.
This tutorial will consist of minimal demonstrations of classification using standard SciKit-Learn, Auto-Sklearn, and Auto-PyTorch classifiers. We'll use one of the built-in datasets from SciKit-Learn for each scenario, and each demonstration shares some code to import common dependencies and load and split the dataset.
import time
import sklearn
import sklearn.datasets

#** load and split data **
data, target = sklearn.datasets.load_iris(return_X_y=True)

# split
n = int(data.shape[0] * 0.8)

train_x = data[:n]
train_y = target[:n]
test_x = data[n:]
test_y = target[n:]
The code for setting up the dataset above will be used for every demo in this tutorial.
We're using the small “iris” dataset (150 samples, 4 features, and 3 label categories) in the interest of time, but you may want to try more complex datasets once you’ve been through the examples.
Other classification datasets from sklearn.datasets to try include the diabetes (load_diabetes) dataset and the digits dataset (load_digits). The diabetes dataset has 569 samples with 30 features each and 2 label categories, while the digits set has 1797 samples with 64 features each (corresponding to 8 by 8 images) with 10 label categories.
Before we start working with the AutoML classifier from sklearn, let’s train a few standard classifiers from vanilla sklearn with default settings. There are plenty to choose from, but we’ll stick to a k-nearest neighbors classifier, a support vector machine classifier, and a multilayer perceptron.
# import classifiers
from sklearn.svm import SVC
from sklearn.neural_network import MLPClassifier
from sklearn.neighbors import KNeighborsClassifier

# instantiate with default parameters
knn = KNeighborsClassifier()
mlp = MLPClassifier()
svm = SVC()
SciKit-Learn uses a friendly fit/predict API, making training models a snap, and Auto-Sklearn and Auto-PyTorch retain the same API. This is a major factor in ease-of-use, as training a model in any of the three packages feels very much the same.
t0 = time.time()
knn.fit(train_x, train_y)
mlp.fit(train_x, train_y)
svm.fit(train_x, train_y)
t1 = time.time()
Likewise, evaluating your models is simple. SciKit-Learn classification models have a predict method that takes input data and predicts the labels, which can then be passed to sklearn.metrics.accuracy_score to calculate the accuracy.
The code below can be used to calculate predictions and prediction accuracy on the held-out test set using the k-nearest neighbors, support vector machine, and multilayer perceptron classifiers trained in the last snippet.
knn_predict = knn.predict(test_x)
train_knn_predict = knn.predict(train_x)

svm_predict = svm.predict(test_x)
train_svm_predict = svm.predict(train_x)

mlp_predict = mlp.predict(test_x)
train_mlp_predict = mlp.predict(train_x)

knn_accuracy = sklearn.metrics.accuracy_score(test_y, knn_predict)
train_knn_accuracy = sklearn.metrics.accuracy_score(train_y,train_knn_predict)

svm_accuracy = sklearn.metrics.accuracy_score(test_y, svm_predict)
train_svm_accuracy = sklearn.metrics.accuracy_score(train_y,train_svm_predict)

mlp_accuracy = sklearn.metrics.accuracy_score(test_y, mlp_predict)
train_mlp_accuracy = sklearn.metrics.accuracy_score(train_y,train_mlp_predict)

print(f"svm, knn, mlp test accuracy: {svm_accuracy:.4f}," \
           f"{knn_accuracy:.4}, {mlp_accuracy:.4}")
print(f"svm, knn, mlp train accuracy: {train_svm_accuracy:.4f}," \
           f"{train_knn_accuracy:.4}, {train_mlp_accuracy:.4}")
print(f"time to fit: {t1-t0}")
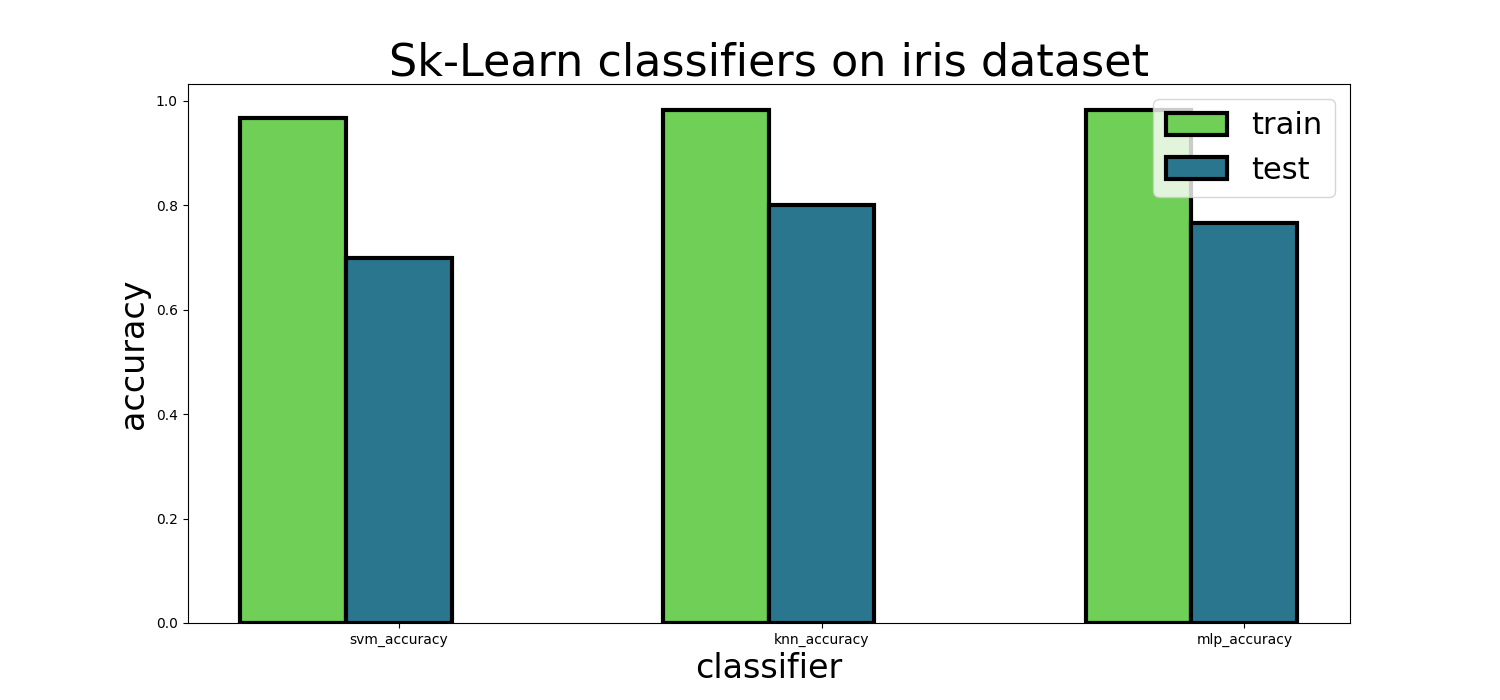
Sklearn classifiers on iris dataset image
These models were pretty effective on the iris training dataset, but there was a significant gap between the training and test set.
Next let’s use the class
AutoSKlearnClassifier
from
autosklearn.classification
The code for using this basic AutoML class looks exactly like training a single model in the example above, but in fact it performs a hyperparameter search over multiple types of machine learning models and retains the best as an ensemble.
After bringing in common imports and setting up our training and test dataset split, we’ll need to import and instantiate the AutoML classifier.
import autosklearn
from autosklearn.classification import AutoSklearnClassifier as ASC

classifier = ASC()
classifier.time_left_for_this_task = 300

t0 = time.time()
classifier.fit(train_x, train_y)
t1 = time.time()

autosk_predict = classifier.predict(test_x)
train_autosk_predict = classifier.predict(train_x)

autosk_accuracy = sklearn.metrics.accuracy_score( \
           test_y, autosk_predict \
           )
train_autosk_accuracy = sklearn.metrics.accuracy_score( \
           Train_y,train_autosk_predict \
           )

print(f"test accuracy {autosk_2_accuracy:.4f}")
print(f"train accuracy {train_autosk_2_accuracy:.4f}")
print(f"time to fit: {t1-t0}")
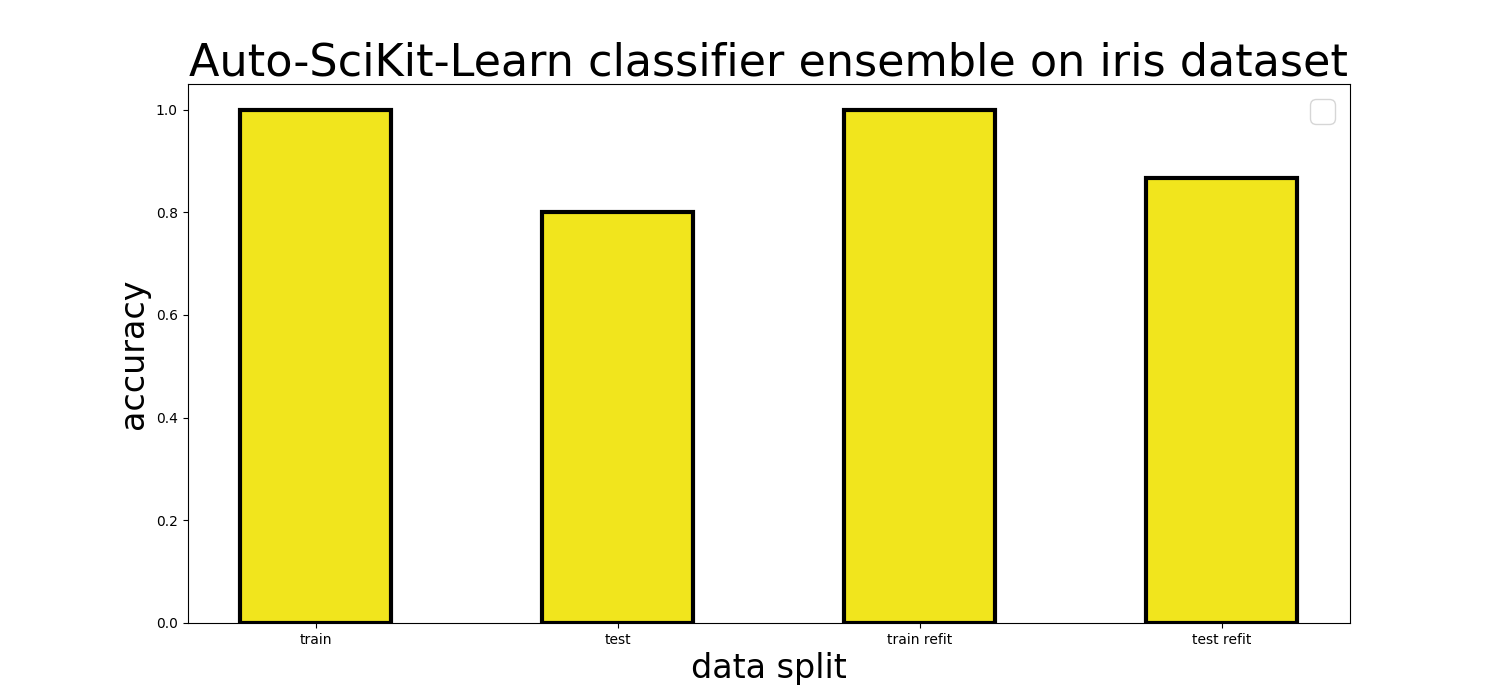
Auto-Sklearn classifier ensemble on iris dataset
Running the fit method with an AutoSklearnClassifier will take a significant amount of time if you don’t reset time_left_for_this_task as the default value is 3600 seconds (one hour). That’s substantial overkill for our simple iris dataset. Judging from the package documentation, the time limit is supposed to be settable as an input argument when initializing the classifier object, but in our experience (version 0.13.0) this wasn’t the case.
You can also try running the fit method with cross validation enabled, and if you choose to do so you’ll need to train again using the method
refit
to train on the entire training dataset with the best models and hyperparameters. We found a slight improvement in the test set accuracy from 80% to 86.67% when using cross-validation and refit as compared to the default settings.
Remember, when you run inference after fitting an AutoSklearnClassifier object with the predict method, you’re actually taking advantage of an ensemble of the best models found during the AutoML hyperparameter search.
| Method | Training Accuracy | Test Accuracy | Run Time |
| Default KNN | 0.9833 | 0.8000 | 0.6 ms total |
| Default SVM | 0.9667 | 0.7000 | 0.6 ms total |
| Default MLP | 0.9833 | 0.7667 | 0.6 ms total |
| Auto-Sklearn | 1.000 | 0.8000 | 291.390 s |
| Auto-Sklearn
(with cv + refit) |
1.000 | 0.8667 | 918.658 s |
| Auto-PyTorch | 0.9917 | 0.9667 | 302.236 s |
Finally, let’s try an AutoML package that caters to deep learning enthusiasts.
Auto-PyTorch, like Auto-Sklearn, is built to be extremely simple to use. To run the next bit of code, remember to switch to your Auto-PyTorch environment to ensure the correct dependencies are available. After importing common imports and splitting up the data:
import autoPyTorch
from autoPyTorch import AutoNetClassification as ANC

model = ANC(max_runtime=300, min_budget=30, max_budget=90, cuda=False)

t0 = time.time()
model.fit(train_x, train_y, validation_split=0.1)
t1 = time.time()

auto_predict = model.predict(test_x)
train_auto_predict = model.predict(train_x)

auto_accuracy = sklearn.metrics.accuracy_score(test_y, auto_predict)
train_auto_accuracy = sklearn.metrics.accuracy_score(train_y, train_auto_predict)

print(f"auto-pytorch test accuracy {auto_accuracy:.4}")
print(f"auto-pytorch train accuracy {train_auto_accuracy:.4}")
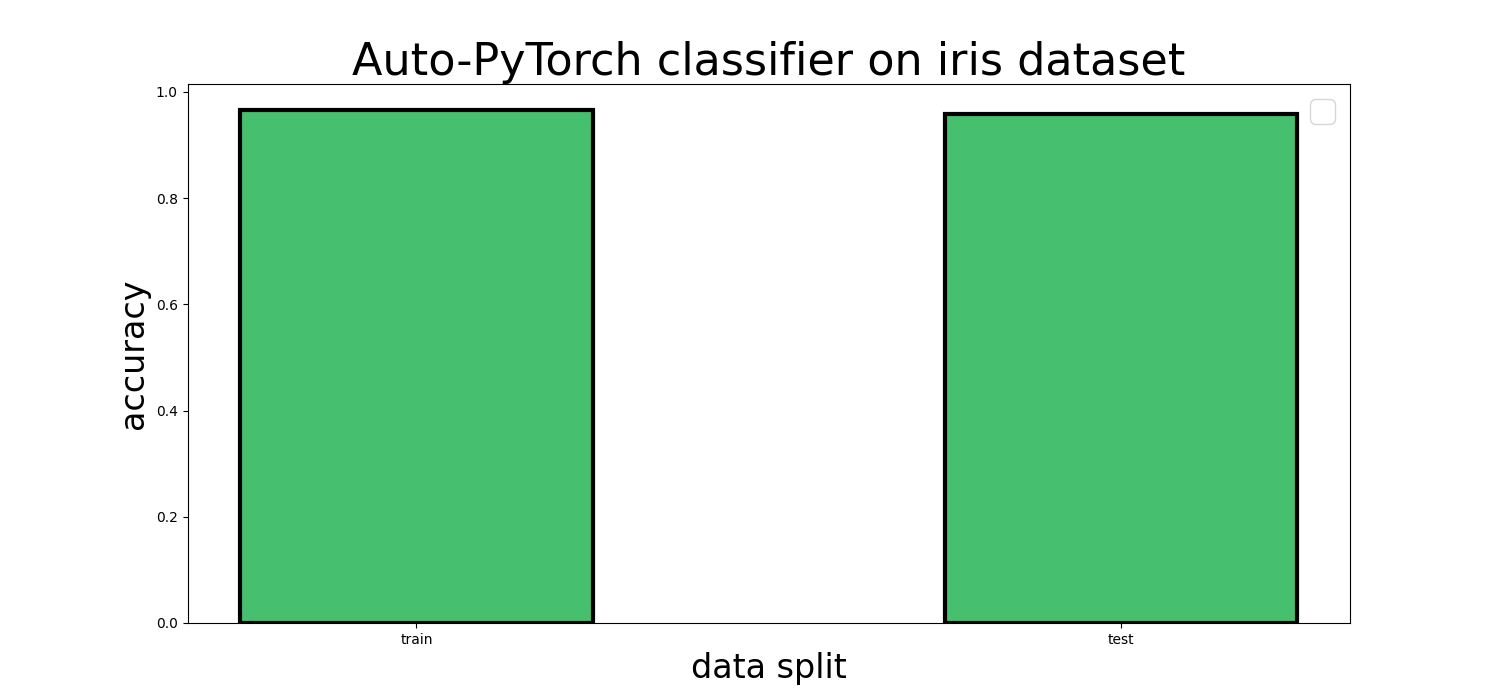
Auto-PyTorch classifier on iris dataset diagram
As you’ll notice in the results table, Auto-PyTorch is efficient and effective at fitting the iris dataset, yielding training and test accuracy in the mid to high 90s. This is moderately better than the automatic SciKit-Learn classifier we trained earlier and much better than the standard sklearn classifiers with default parameters.
Will AutoML Replace Data Scientists?
No, not necessarily. AutoML promises to improve the utility, performance, and efficiency of typical data science and machine learning workflows. The additional layer of abstraction and automated best-practices hyperparameter search certainly can make a big difference if used properly. For the packages we experimented with in today’s tutorial, we would describe their level of readiness as working research prototypes.
There were a number of little fixes we had to go through to get everything to work properly, like upgrading NumPy to 1.20.0 to fix a cryptic error message, not being able to set the run time limits as n input argument (as suggested in the documentation for Auto-Sklearn), and not being able to use a single virtual environment for both package due to some cryptic conflicts. There’s also some humor to the fact that AutoML’s value comes from automating hyperparameter search, but the auto-classifiers themselves have quite a few parameters that can have a big impact on ultimate results.
All that being said, we think AutoML is a valuable addition to any ML or data science practitioner’s toolbox, whether they use Auto-Sklearn/Auto-PyTorch, Auto-WEKA, some other package, or even roll their own solutions. When the AutoML tool fits, it not only should give a boost to your project’s performance, but a decrease in the economic and energetic (including environmental) costs of a long meandering hyperparameter and architecture search.
Even if some of the tools still have plenty of rough edges, that’s only a good excuse and motivation to contribute to the projects yourself. Auto-PyTorch is available under an Apache 2.0 license, while Auto-Sklearn uses a BSD 3-Clause license.
Bio: Kevin Vu manages Exxact Corp blog and works with many of its talented authors who write about different aspects of Deep Learning.
Original. Reposted with permission.
Related:
- Introduction to Automated Machine Learning
- How to Create an AutoML Pipeline Optimization Sandbox
- Machine Learning Pipeline Optimization with TPOT