Beginner’s Guide to Building LLM Apps with Python
In this article, you will be impacted by the knowledge you need to start building LLM apps with Python programming language.

Image by Editor | Midjourney & Canva
Robin Sharma said, "Every master was once a beginner. Every pro was once an amateur." You have heard about large language models (LLMs), AI, and Transformer models (GPT) making waves in the AI space for a while, and you are confused about how to get started. I can assure you that everyone you see today building complex applications was once there.
That is why, in this article, you will be impacted by the knowledge you need to start building LLM apps with Python programming language. This is strictly beginner-friendly, and you can code along while reading this article.
What will you build in this article? You will create a simple AI personal assistant that generates a response based on the user's prompt and deploys it to access it globally. The image below shows what the finished application looks like.
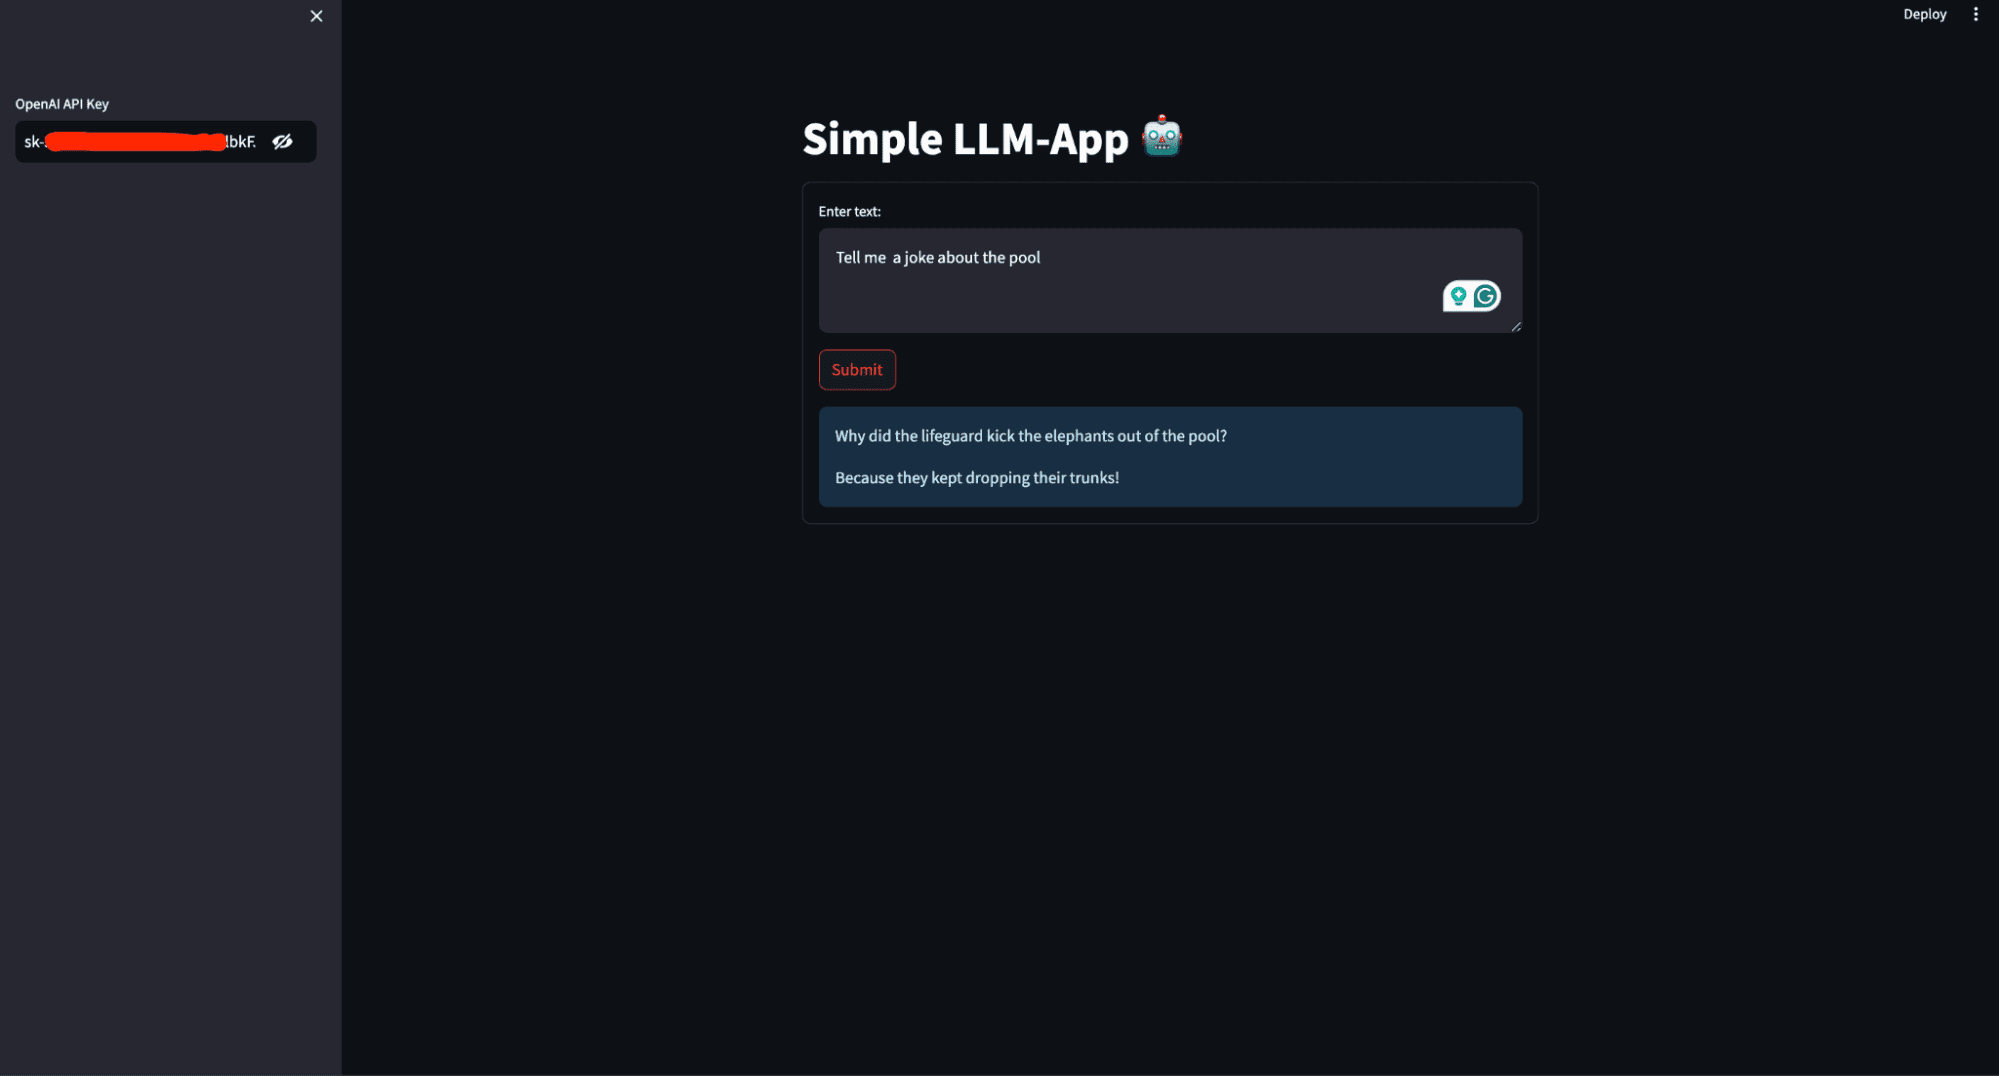
This image shows the user interface of the AI personal assistant that will be built in this article
Prerequisites
For you to follow through with this article, there are a few things you need to have on lock. This includes:
- Python (3.5+), and background writing Python scripts.
- OpenAI: OpenAI is a research organization and technology company that aims to ensure artificial general intelligence (AGI) benefits all of humanity. One of its key contributions is the development of advanced LLMs such as GPT-3 and GPT-4. These models can understand and generate human-like text, making them powerful tools for various applications like chatbots, content creation, and more.
Sign up for OpenAI and copy your API keys from the API section in your account so that you can access the models. Install OpenAI on your computer using the command below:
pip install openai
- LangChain:LangChain is a framework designed to simplify the development of applications that leverage LLMs. It provides tools and utilities to manage and streamline the various aspects of working with LLMs, making building complex and robust applications easier.
Install LangChain on your computer using the command below:
pip install langchain
- Streamlit: Streamlit is a powerful and easy-to-use Python library for creating web applications. Streamlit allows you to create interactive web applications using Python alone. You don't need expertise in web development (HTML, CSS, JavaScript) to build functional and visually appealing web apps.
It's beneficial for building machine learning and data science apps, including those that utilize LLMs. Install streamlit on your computer using the command below:
pip install streamlit
Code Along
With all the required packages and libraries installed, it is time to start building the LLM application. Create a requirement.txt in the root directory of your working directory and save the dependencies.
streamlit
openai
langchain
Create an app.py file and add the code below.
# Importing the necessary modules from the Streamlit and LangChain packages
import streamlit as st
from langchain.llms import OpenAI
- Imports the Streamlit library, which is used to create interactive web applications.
- from langchain.llms import OpenAI imports the OpenAI class from the langchain.llms module, which is used to interact with OpenAI's language models.
# Setting the title of the Streamlit application
st.title('Simple LLM-App 🤖')
- st.title('Simple LLM-App 🤖') sets the title of the Streamlit web.
# Creating a sidebar input widget for the OpenAI API key, input type is password for security
openai_api_key = st.sidebar.text_input('OpenAI API Key', type='password')
- openai_api_key = st.sidebar.text_input('OpenAI API Key', type='password') creates a text input widget in the sidebar for the user to input their OpenAI API key. The input type is set to 'password' to hide the entered text for security.
# Defining a function to generate a response using the OpenAI language model
def generate_response(input_text):
    # Initializing the OpenAI language model with a specified temperature and API key
    llm = OpenAI(temperature=0.7, openai_api_key=openai_api_key)
    # Displaying the generated response as an informational message in the Streamlit app
    st.info(llm(input_text))
- def generate_response(input_text) defines a function named generate_response that takes input_text as an argument.
- llm = OpenAI(temperature=0.7, openai_api_key=openai_api_key) initializes the OpenAI class with a temperature setting of 0.7 and the provided API key.
Temperature is a parameter used to control the randomness or creativity of the text generated by a language model. It determines how much variability the model introduces into its predictions.
- Low Temperature (0.0 - 0.5): This makes the model more deterministic and focused.
- Medium Temperature (0.5 - 1.0): Provides a balance between randomness and determinism.
- High Temperature (1.0 and above): Increases the randomness of the output. Higher values make the model more creative and diverse in its responses, but this can also lead to less coherence and more nonsensical or off-topic outputs.
- st.info(llm(input_text)) calls the language model with the provided input_text and displays the generated response as an informational message in the Streamlit app.
# Creating a form in the Streamlit app for user input
with st.form('my_form'):
    # Adding a text area for user input
    text = st.text_area('Enter text:', '')
    # Adding a submit button for the form
    submitted = st.form_submit_button('Submit')
    # Displaying a warning if the entered API key does not start with 'sk-'
    if not openai_api_key.startswith('sk-'):
        st.warning('Please enter your OpenAI API key!', icon='⚠')
    # If the form is submitted and the API key is valid, generate a response
    if submitted and openai_api_key.startswith('sk-'):
        generate_response(text)
- with st.form('my_form') creates a form container named my_form.
- text = st.text_area('Enter text:', '') adds a text area input widget within the form for the user to enter text.
- submitted = st.form_submit_button('Submit') adds a submit button to the form.
- if not openai_api_key.startswith('sk-') checks if the entered API key does not start with sk-.
- st.warning('Please enter your OpenAI API key!', icon='⚠') displays a warning message if the API key is invalid.
- if submitted and openai_api_key.startswith('sk-') checks if the form is submitted and the API key is valid.
- generate_response(text) calls the generate_response function with the entered text to generate and display the response.
Putting it together here is what you have:
# Importing the necessary modules from the Streamlit and LangChain packages
import streamlit as st
from langchain.llms import OpenAI

# Setting the title of the Streamlit application
st.title('Simple LLM-App 🤖')

# Creating a sidebar input widget for the OpenAI API key, input type is password for security
openai_api_key = st.sidebar.text_input('OpenAI API Key', type='password')

# Defining a function to generate a response using the OpenAI model
def generate_response(input_text):
    # Initializing the OpenAI model with a specified temperature and API key
    llm = OpenAI(temperature=0.7, openai_api_key=openai_api_key)
    # Displaying the generated response as an informational message in the Streamlit app
    st.info(llm(input_text))

# Creating a form in the Streamlit app for user input
with st.form('my_form'):
    # Adding a text area for user input with a default prompt
    text = st.text_area('Enter text:', '')
    # Adding a submit button for the form
    submitted = st.form_submit_button('Submit')
    # Displaying a warning if the entered API key does not start with 'sk-'
    if not openai_api_key.startswith('sk-'):
        st.warning('Please enter your OpenAI API key!', icon='⚠')
    # If the form is submitted and the API key is valid, generate a response
    if submitted and openai_api_key.startswith('sk-'):
        generate_response(text)
Running the application
The application is ready; you need to execute the application script using the appropriate command for the framework you're using.
streamlit run app.py
By running this code using streamlit run app.py, you create an interactive web application where users can enter prompts and receive LLM-generated text responses.
When you execute streamlit run app.py, the following happens:
- Streamlit server starts: Streamlit starts a local web server on your machine, typically accessible at `http://localhost:8501` by default.
- Code execution: Streamlit reads and executes the code in `app.py,` rendering the app as defined in the script.
- Web interface: Your web browser automatically opens (or you can manually navigate) to the URL provided by Streamlit (usually http://localhost:8501), where you can interact with your LLM app.
Deploying your LLM application
Deploying an LLM app means making it accessible over the internet so others can use and test it without requiring access to your local computer. This is important for collaboration, user feedback, and real-world testing, ensuring the app performs well in diverse environments.
To deploy the app to the Streamlit Cloud, follow these steps:
- Create a GitHub repository for your app. Make sure your repository includes two files: app.py and requirements.txt
- Go to Streamlit Community Cloud, click the "New app" button from your workspace, and specify the repository, branch, and main file path.
- Click the Deploy button, and your LLM application will now be deployed to Streamlit Community Cloud and can be accessed globally.
Conclusion
Congratulations! You've taken your first steps in building and deploying a LLM application with Python. Starting from understanding the prerequisites, installing necessary libraries, and writing the core application code, you have now created a functional AI personal assistant. By using Streamlit, you've made your app interactive and easy to use, and by deploying it to the Streamlit Community Cloud, you've made it accessible to users worldwide.
With the skills you've learned in this guide, you can dive deeper into LLMs and AI, exploring more advanced features and building even more sophisticated applications. Keep experimenting, learning, and sharing your knowledge with the community. The possibilities with LLMs are vast, and your journey has just begun. Happy coding!
Shittu Olumide is a software engineer and technical writer passionate about leveraging cutting-edge technologies to craft compelling narratives, with a keen eye for detail and a knack for simplifying complex concepts. You can also find Shittu on Twitter.