Building End-to-End Data Pipelines with Dask
Learn how to implement a parallelization process in your data pipeline.
 Image by Author | Ideogram
Data is a vital asset that businesses utilize to gain a competitive edge. With advancements in technology, it has become much easier to collect and store data. The problem is that the abundance of data hinders processing, as it becomes slower with larger data sizes.
To enhance data processing, several tools can assist, including Dask. Dask is a powerful Python library that provides a Pandas-compatible API to scale data processing via parallel, out-of-core computation. It handles large datasets by partitioning workflows into smaller batches and executing them concurrently across multiple cores or machines.
As Dask is a valuable tool, it was wise to learn how to establish an end-to-end data pipeline that any data professional can use. That’s why this article will teach you how to set up the data pipeline with Dask.
Let’s get into it.
Preparation
For this tutorial to work, we need to set up a few things. First, we will establish a database to store our data. In this case, we will use MySQL as the database; therefore, simply download it and follow the standard installation instructions.
For the dataset, we will utilise the Data Scientist Salary dataset, which is publicly available on Kaggle. Save the data in a folder called 'data' and leave it for now.
Next, set up the environment by creating a virtual environment using the following code.
python -m venv dask_pipeline
You can choose other names for your virtual environment, but I prefer a self-explanatory name. Activate the virtual environment and create a requirements.txt file, which will be populated with the necessary libraries for the project.
dask[complete]
pandas
numpy
sqlalchemy
PyMySQL
luigi
python-dotenv
setuptools
Once the file is ready, we will install the libraries using the following code.
pip install -r requirements.txt
Then, create a file called '.env', where we will store all the variables used in this project, primarily for database access. Fill the file with the following information:
DB_USER=your_username
DB_PASS=your_password
DB_HOST=localhost
DB_PORT=3306
DB_NAME=analytics
Then, create a file called config.py, which will be used for connecting to the database.
from dotenv import load_dotenv
import os

load_dotenv()

DB_USER = os.getenv("DB_USER")
DB_PASS = os.getenv("DB_PASS")
DB_HOST = os.getenv("DB_HOST")
DB_PORT = os.getenv("DB_PORT")
DB_NAME = os.getenv("DB_NAME")

CONN_STR = (
    f"mysql+pymysql://{DB_USER}:{DB_PASS}@"
    f"{DB_HOST}:{DB_PORT}/{DB_NAME}"
)
With everything in place, we will then create our end-to-end data pipelines with Dask.
Data Pipeline with Dask
To set up the data pipeline, we will utilize the Luigi Python library, which is typically used to build complex pipelines for batch jobs. In our case, it will be used to develop a pipeline that utilizes Dask to ingest CSV data into the database, transform it using Dask,, and load it back into the database.
Let’s start creating the pipeline by setting up the code for creating the database which I will create in the Python file called luigi_pipeline.py. We will import all the necessary libraries and create a task to establish a database.
import luigi
from luigi import LocalTarget, Parameter, IntParameter
from sqlalchemy import create_engine, text
import pandas as pd
from dask import delayed
import dask.dataframe as dd
from config import DB_USER, DB_PASS, DB_HOST, DB_PORT, DB_NAME, CONN_STR

class CreateDatabase(luigi.Task):
    def output(self):
        return LocalTarget("tmp/db_created.txt")

    def run(self):
        engine = create_engine(
            f"mysql+pymysql://{DB_USER}:{DB_PASS}@{DB_HOST}:{DB_PORT}/"
        )
        with engine.connect() as conn:
            conn.execute(text(f"CREATE DATABASE IF NOT EXISTS {DB_NAME}"))
        self.output().makedirs()
        with self.output().open("w") as f:
            f.write("ok")
The code above will create a new database when run if the database name doesn’t exist previously. We will use the class above in the CSV ingestion pipeline with Dask that we will set up below.
class IngestCSV(luigi.Task):
    csv_path   = Parameter()
    table_name = Parameter(default="ds_salaries")

    def requires(self):
        return CreateDatabase()

    def output(self):
        return LocalTarget("tmp/ingest_done.txt")

    def run(self):

        url_no_db = f"mysql+pymysql://{DB_USER}:{DB_PASS}@{DB_HOST}:{DB_PORT}/"
        engine0 = create_engine(url_no_db)
        with engine0.connect() as conn:
            conn.execute(text(f"CREATE DATABASE IF NOT EXISTS {DB_NAME}"))

        ddf = dd.read_csv(self.csv_path, assume_missing=True)

        engine = create_engine(CONN_STR)
        empty = ddf.head(0)
        empty.to_sql(self.table_name, con=engine, if_exists="replace", index=False)

        def append_part(pdf):
            pdf.to_sql(self.table_name, con=engine, if_exists="append", index=False)

        ddf.map_partitions(append_part, meta=()).compute()

        with self.output().open("w") as f:
            f.write("ok")
In the code above, we use Dask to read the CSV files and send them to the database. We are using Dask to enhance the reading process and make it more manageable to send the data to the database.
As a part of the pipeline, we will put the CSV ingestion into the ETL transformation using the code below.
class TransformETL(luigi.Task):
    csv_path   = Parameter()
    table_name = Parameter(default="ds_salaries")
    chunk_size = IntParameter(default=100_000)

    def requires(self):
        return IngestCSV(csv_path=self.csv_path,
                         table_name=self.table_name)

    def output(self):
        return LocalTarget("tmp/etl_done.txt")

    def run(self):
        engine = create_engine(CONN_STR)

        # 1. Count total rows for chunking
        with engine.connect() as conn:
            total = conn.execute(
                text(f"SELECT COUNT(*) FROM {self.table_name}")
            ).scalar()

        # 2. Build delayed partitions
        @delayed
        def load_chunk(offset, limit):
            return pd.read_sql(
                f"SELECT * FROM {self.table_name} LIMIT {limit} OFFSET {offset}",
                engine
            )

        parts = [
            load_chunk(i * self.chunk_size, self.chunk_size)
            for i in range((total // self.chunk_size) + 1)
        ]

        # 3. Load zero‐row metadata and cast to correct dtypes
        meta = (
            pd.read_sql(f"SELECT * FROM {self.table_name} LIMIT 0", engine)
              .astype({
                  "work_year":     "int64",
                  "salary":        "float64",
                  "salary_in_usd": "float64",
                  "remote_ratio":  "int64",
                  # leave the rest as object
              })
        )

        # 4. Create Dask DataFrame with corrected meta
        ddf = dd.from_delayed(parts, meta=meta)

        # 5. Filter & clean
        ddf = (
            ddf
            .dropna(subset=["salary_in_usd"])
            .assign(
                salary_in_usd=ddf["salary_in_usd"].astype(float)
            )
        )

        # 6. Keep only full-time roles
        ddf = ddf[ddf["employment_type"] == "FT"]

        # 7. Compute salary bracket at 10k USD
        bracket = (ddf["salary_in_usd"] // 10_000).astype(int) * 10_000
        ddf = ddf.assign(salary_bracket=bracket)

        # 8. Aggregate: average salary by year
        result = (
            ddf.groupby("work_year")["salary_in_usd"]
               .mean()
               .compute()
               .reset_index()
               .rename(columns={"salary_in_usd": "avg_salary_usd"})
        )

        # 9. Persist results
        result.to_sql("avg_salary_by_year",
                      con=engine, if_exists="replace", index=False)

        with self.output().open("w") as f:
            f.write("ok")
The code above performs multiple tasks using Dask to transform the data we have. Specifically, here is what Dask does within the pipeline:
- Load the dataset from the database in chunks.
- Set the metadata and create a Dask dataframe.
- Filter and data cleaning with Dask.
- Data Transformation with Dask.
- Load the data into the Database.
The data pipeline is then ready to use, and we can execute it with Python using the code below.
python luigi_pipeline.py TransformETL --csv-path data\ds_salaries.csv
You will receive the output information as follows.
===== Luigi Execution Summary =====

Scheduled 1 tasks of which:
* 1 complete ones were encountered:
    - 1 TransformETL(csv_path=data\ds_salaries.csv, table_name=ds_salaries, chunk_size=100000)

Did not run any tasks
This progress looks :) because there were no failed tasks or missing dependencies
Then, you can check the Luigi UI to see if the pipeline is working well.
luigid
You can see the dashboard output in the image below.

If it’s successful, you can see that the pipeline has executed successfully, and you can check the result in your database.
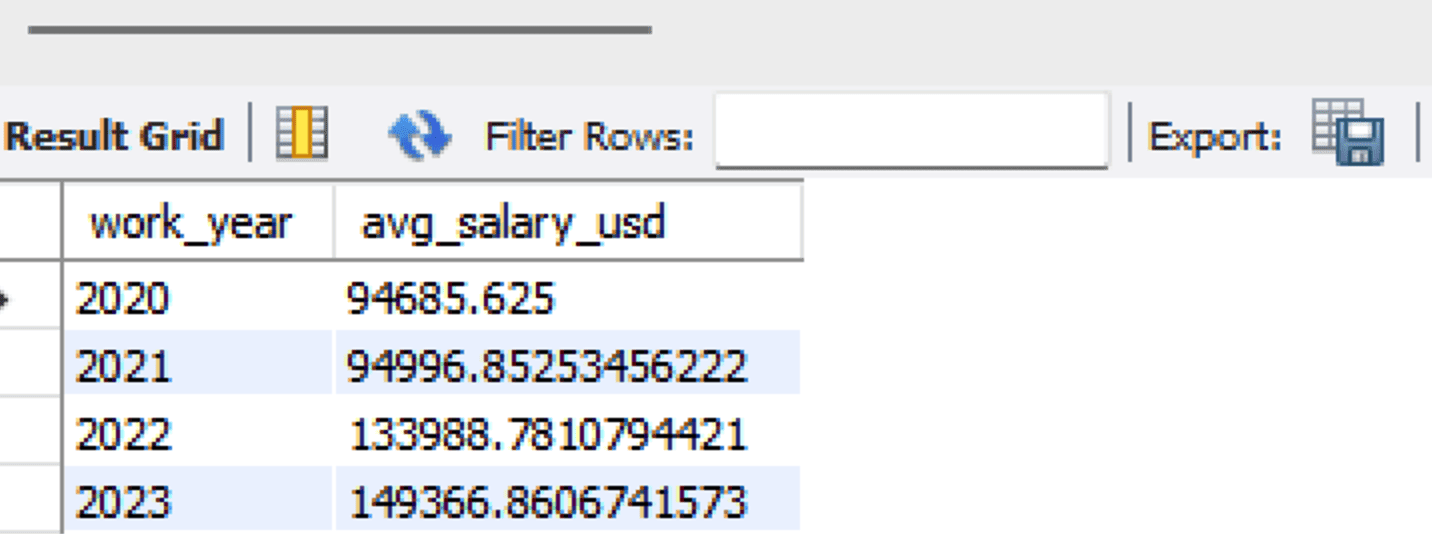
SELECT * FROM analytics.avg_salary_by_year;
Where the output is shown below.
With that, you just built an end-to-end data pipeline with Dask. All the code is stored in the following GitHub repository.
Conclusion
Building a data pipeline is a crucial skill for data professionals, particularly when utilizing Dask, as it is a tool that enhances data processing and manipulation. In this article, we have learned how to build the end-to-end data pipeline from ingesting data to loading it back into the database.
I hope this has helped!
Cornellius Yudha Wijaya is a data science assistant manager and data writer. While working full-time at Allianz Indonesia, he loves to share Python and data tips via social media and writing media. Cornellius writes on a variety of AI and machine learning topics.