Deploying Your First Machine Learning Model
With just 3 simple steps, you can build & deploy a glass classification model faster than you can say...glass classification model!

Photo by Lucas Fonseca
Introduction
In this tutorial, we will learn how to build a simple multi-classification model using the Glass Classification dataset. Our goal is to develop and deploy a web application that can predict various types of glass, such as:
- Building Windows Float Processed
- Building Windows Non-Float Processed
- Vehicle Windows Float Processed
- Vehicle Windows Non Float Processed (missing in the dataset)
- Containers
- Tableware
- Headlamps
Moreover, we will learn about:
- Skops: Share your scikit-learn based models and put them in production.
- Gradio: ML web applications framework.
- HuggingFace Spaces: free machine learning model and application hosting platform.
By the end of this tutorial, you will have hands-on experience building, training, and deploying a basic machine learning model as a web application.
Model Training and Saving
In this part, we will import the dataset, split it into training and testing subsets, build the machine learning pipeline, train the model, assess model performance, and save the model.
Dataset
We have loaded the dataset and then shuffled it for an equal distribution of the labels.
import pandas as pd
glass_df = pd.read_csv("glass.csv")
glass_df = glass_df.sample(frac = 1)
glass_df.head(3)
Our dataset

After that, we selected the model features and target variables using the dataset and split them into training and testing datasets.
from sklearn.model_selection import train_test_split

X = glass_df.drop("Type",axis=1)
y = glass_df.Type

X_train, X_test, y_train, y_test = train_test_split(X, y, test_size=0.3, random_state=125)
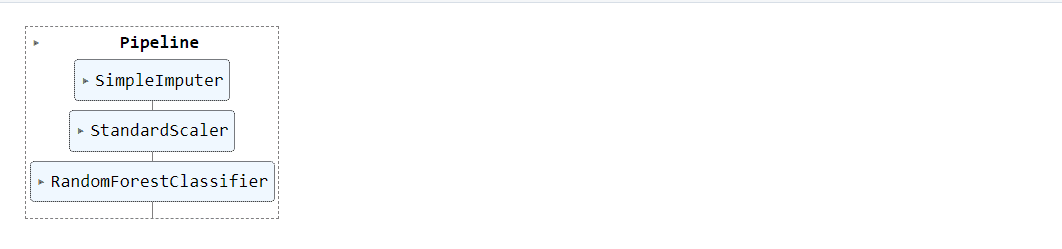
Machine Learning Pipeline
Our model pipeline is straightforward. First, we pass our feature through an imputer and then normalize it using Standard Scaler. Finally, we feed the processed data into a random forest classifier.
After fitting the pipeline on the training set, we use `.score()` to generate the accuracy score on the testing set.
The score is average, and I am satisfied with the performance. While we could improve the model by ensembling or using various optimization methods, our goal is different.
from sklearn.ensemble import RandomForestClassifier
from sklearn.preprocessing import StandardScaler
from sklearn.impute import SimpleImputer
from sklearn.pipeline import Pipeline


pipe = Pipeline(
    steps=[
        ("imputer", SimpleImputer()),
        ("scaler", StandardScaler()),
        ("model", RandomForestClassifier(n_estimators=100, random_state=125)),
    ]
)
pipe.fit(X_train, y_train)

pipe.score(X_test, y_test)
>>> 0.7538461538461538
The classification report also looks good.
from sklearn.metrics import classification_report

y_pred = pipe.predict(X_test)
print(classification_report(y_test,y_pred))
precision    recall  f1-score   support

           1       0.65      0.73      0.69        15
           2       0.82      0.79      0.81        29
           3       0.40      0.50      0.44         4
           5       1.00      0.80      0.89         5
           6       1.00      0.67      0.80         3
           7       0.78      0.78      0.78         9

    accuracy                           0.75        65
   macro avg       0.77      0.71      0.73        65
weighted avg       0.77      0.75      0.76        65
Saving the Model
Skops is a great library to deploy scikit-learn models into products. We will use it to save the model and later load it into production.
import skops.io as sio
sio.dump(pipe, "glass_pipeline.skops")
As we can see, with a single line of code, we can load the entire pipeline.
sio.load("glass_pipeline.skops", trusted=True)
Building Web Application
In this part, we will learn how to use Gradio to build a simple classification user interface.
- Load the model using the skops.
- Create an array of class names and leave the first one empty or “None” as our numerical class starters from 1.
- Write a classification Python function that takes inputs from the user and predicts the class using the pipeline.
- Create the inputs for each feature using the sliders. Users can use a mouse to select the numerical values.
- Create the output using the Label. It will display the Label in bold text on the top.
- Add the title and description of the app.
- Finally, combine all of it using `gradio.Interface`
import gradio as gr
import skops.io as sio

pipe = sio.load("glass_pipeline.skops", trusted=True)

classes = [
    "None",
    "Building Windows Float Processed",
    "Building Windows Non Float Processed",
    "Vehicle Windows Float Processed",
    "Vehicle Windows Non Float Processed",
    "Containers",
    "Tableware",
    "Headlamps",
]


def classifier(RI, Na, Mg, Al, Si, K, Ca, Ba, Fe):
    pred_glass = pipe.predict([[RI, Na, Mg, Al, Si, K, Ca, Ba, Fe]])[0]
    label = f"Predicted Glass label: **{classes[pred_glass]}**"
    return label


inputs = [
    gr.Slider(1.51, 1.54, step=0.01, label="Refractive Index"),
    gr.Slider(10, 17, step=1, label="Sodium"),
    gr.Slider(0, 4.5, step=0.5, label="Magnesium"),
    gr.Slider(0.3, 3.5, step=0.1, label="Aluminum"),
    gr.Slider(69.8, 75.4, step=0.1, label="Silicon"),
    gr.Slider(0, 6.2, step=0.1, label="Potassium"),
    gr.Slider(5.4, 16.19, step=0.1, label="Calcium"),
    gr.Slider(0, 3, step=0.1, label="Barium"),
    gr.Slider(0, 0.5, step=0.1, label="Iron"),
]
outputs = [gr.Label(num_top_classes=7)]

title = "Glass Classification"
description = "Enter the details to correctly identify glass type?"

gr.Interface(
    fn=classifier,
    inputs=inputs,
    outputs=outputs,
    title=title,
    description=description,
).launch()
Deploying the Machine Learning Model
In the final part, we will create the spaces on the Hugging Face and add our model and the app file.
To create the spaces, you have to sign in to https://huggingface.co. Then, click on your profile image on the top right and select “+ New Space”.
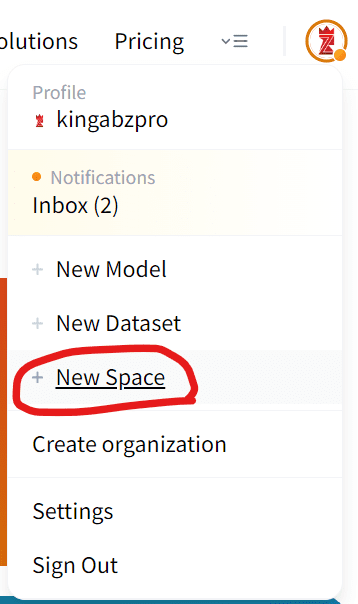
Image from HuggingFace
Write the name of your application, select SDK, and click on the Create Space button.
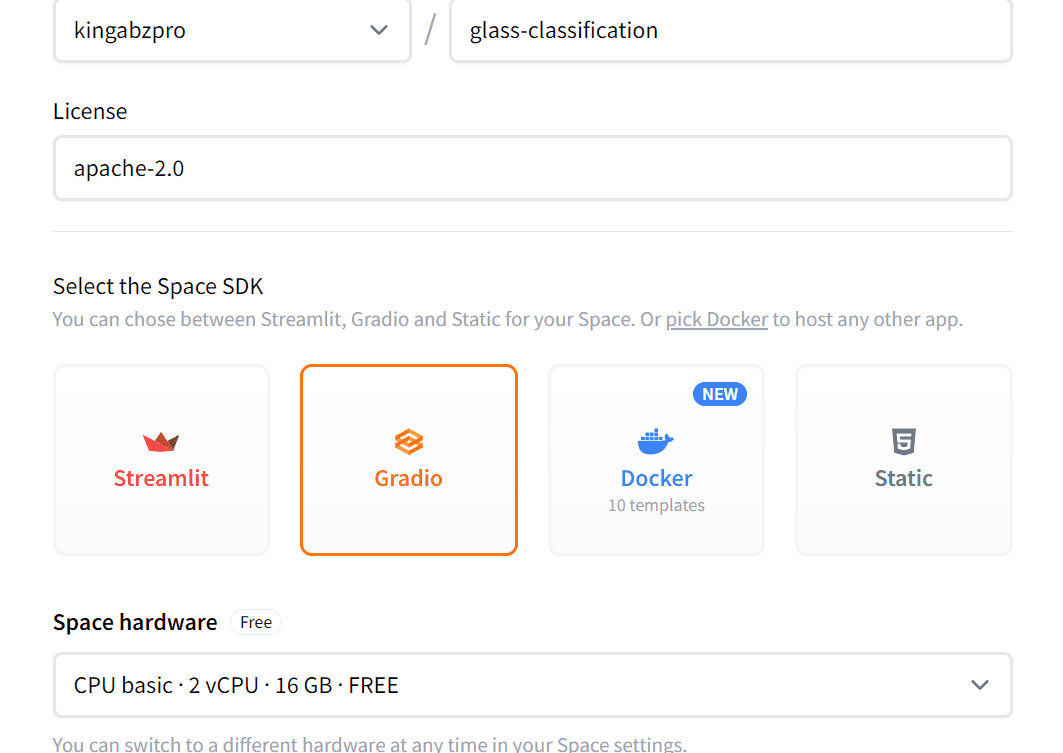
Image from Spaces
Then, create a `requirements.txt` file. You can add or create a file by going to the “Files” tab and selecting the “+Add file” button.
In the `requirements.txt` file, you have to add skops and scikit-learn.
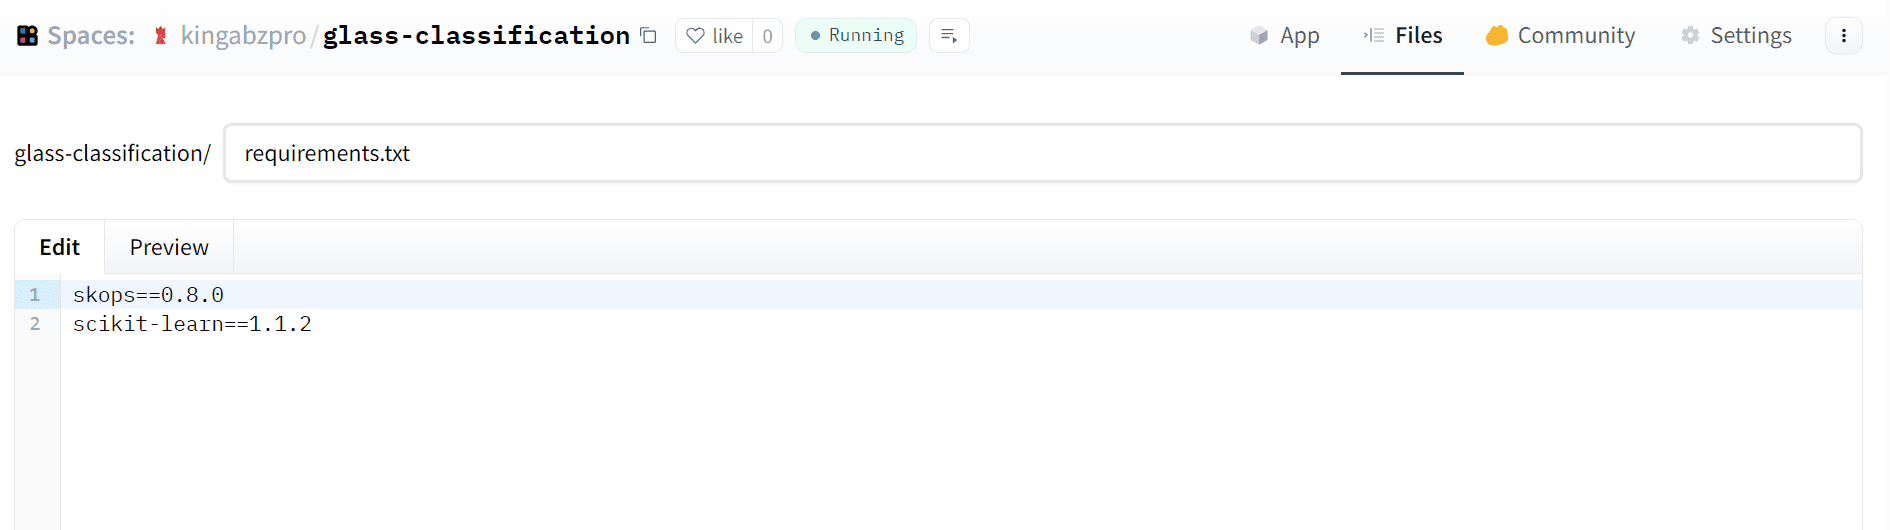
Image from Spaces
After that, add the model and file by dragging and dropping them from your local folder to the space. After that, commit.
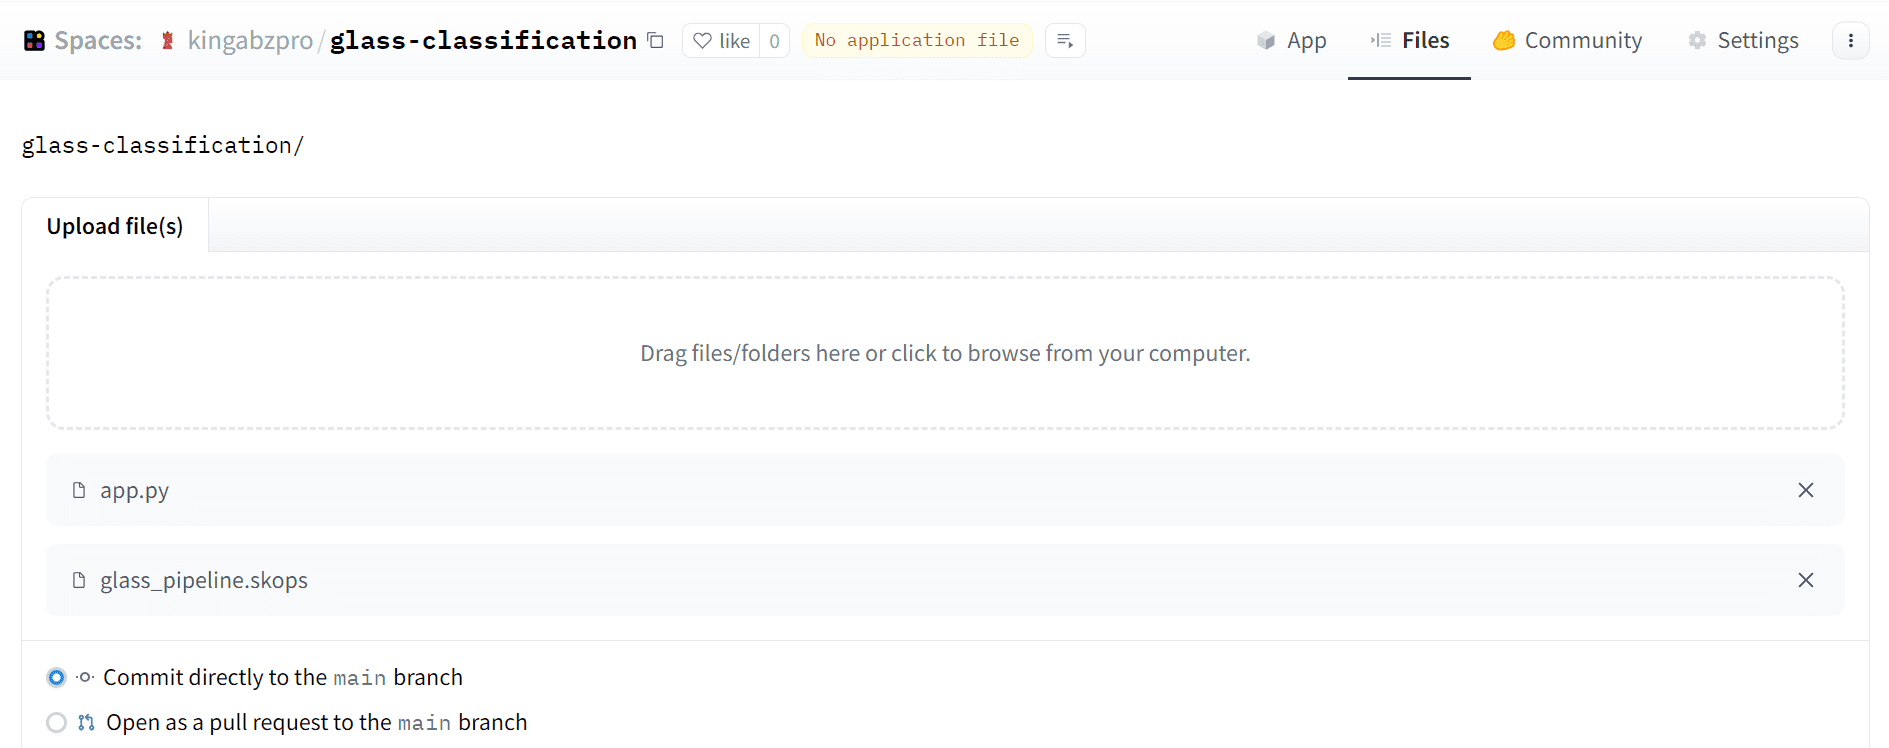
Image from Spaces
It will take a few minutes for the spaces to install the required packages and build the container.

Image from Spaces
In the end, you will be greeted with a bug-free application that you can share with your family and colleagues. You can even check out the live demo by clicking on the link: Glass Classification.
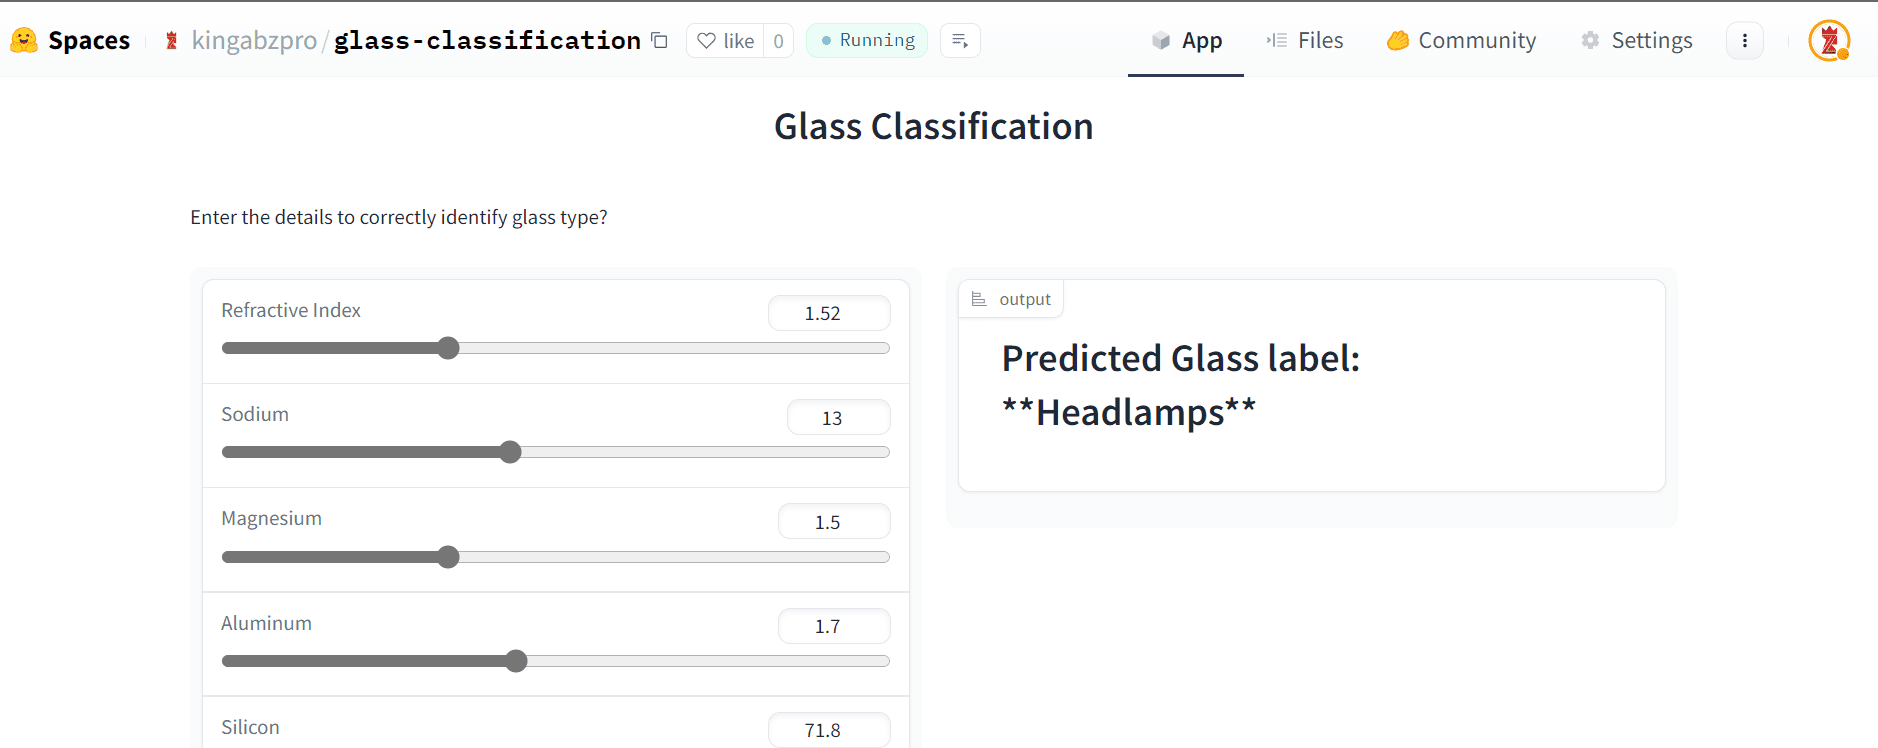
Image from Glass Classification
Conclusion
In this tutorial, we walked through the end-to-end process of building, training, and deploying a machine learning model as a web application. We used the glass classification dataset to train a simple multi-class classification model. After training the model in scikit-learn, we leveraged skops and Gradio to package and deploy the model as a web app on HuggingFace Spaces.
There are many possibilities to build on this starter project. You could incorporate more features into the model, try different algorithms, or deploy the web app on other platforms. The important thing is that you now have hands-on experience with an end-to-end machine learning workflow. You've gotten exposure to training models, packaging them for production, and building web interfaces for interacting with model predictions.
Thanks for following along! Let me know if you have any other questions as you continue your machine learning journey.
Abid Ali Awan (@1abidaliawan) is a certified data scientist professional who loves building machine learning models. Currently, he is focusing on content creation and writing technical blogs on machine learning and data science technologies. Abid holds a Master's degree in Technology Management and a bachelor's degree in Telecommunication Engineering. His vision is to build an AI product using a graph neural network for students struggling with mental illness.