Deploying Serverless spaCy Transformer Model with AWS Lambda
A step-by-step guide on how to deploy NER transformer model serverless.
By Walid Amamou, Founder of UBIAI
Photo by Joshua Sortino on Unsplash
Introduction
With transformer becoming essential for many NLP tasks thanks to their unmatched performance, various useful and impactful NLP models are created everyday. However, many NLP practitioners find it challenging to deploy models into production. According to this report, 90% of machine learning models never make it into production.
Model deployment enables you to host your model in a server environment so it can be used to output prediction when called by an API, for example.
In this tutorial I will show you how to push an NER spacy transformer model to Huggingface and deploy the model on AWS Lambda to run predictions.
According to AWS website:
“AWS Lambda is a serverless compute service that lets you run code without provisioning or managing servers, creating workload-aware cluster scaling logic, maintaining event integrations, or managing runtimes. With Lambda, you can run code for virtually any type of application or backend service — all with zero administration.”
Deploying models without the need to manage backend servers is a game changer. It will enable developers and small startups who do not have devops resources to start deploying models ready to use in production.
Below are the steps we are going to follow:
- Deploy a trained spaCy transformer model in Huggingface
- Store the model in S3
- Deploy the model in AWS Lambda
- Run AWS Lambda function to output prediction based on user’s input
Deploy Spacy Transformer Model in Huggingface
In this tutorial, we fine-tuned the transformer NER model SciBert to extract materials, processes, and tasks from scientific abstracts. The annotation was done using the UBIAI text annotation tool. We have followed the same approach presented in my previous article where we leveraged google colab to train the model. The next step after training the model, is to host it on huggingface so it can be accessible by API. For more information on how to push a spacy model to huggingface, check this link.
First, install spacy-huggingface-hub from pip:
pip install spacy-huggingface-hub
Build a .whl file from the trained spacy pipeline (make sure to create the output directory beforehand):
huggingface-cli login
python -m spacy package ./model_science_scibert/model-last ./output --build wheel
Push the wheel file into the Huggingface hub:
cd ./output/en_scibert_ScienceIE-0.0.0/dist
python -m spacy huggingface-hub push en_scibert_ScienceIE-0.0.0-py3-none-any.whl
Let’s check that the model has been successfully uploaded to Huggingface:

Image by Author
Now that the model is pushed into the huggingface library, we can test it out on a scientific abstract:
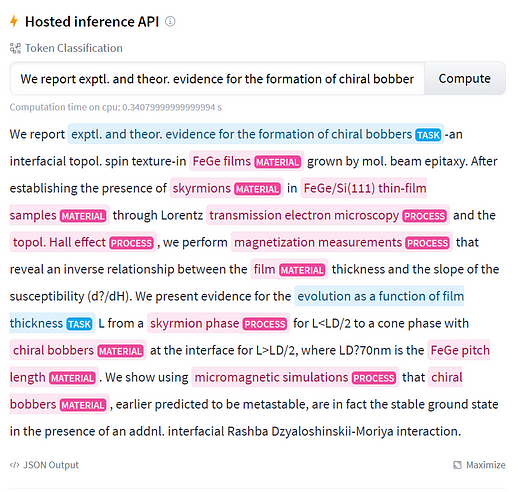
Image by Author
Great — it works as expected! We can now query the model with API directly:
import requests

API_URL = "https://api-inference.huggingface.co/models/UBIAI/en_scibert_ScienceIE"
headers = {"Authorization": "[API Token]"}

def query(payload):
	response = requests.post(API_URL, headers=headers, json=payload)
	return response.json()

output = query({"inputs": "We report exptl. and theor. evidence for the formation of chiral bobbers-an interfacial topol. spin texture-in"})
Next step is to integrate the model with AWS Lambda so we are not limited by Huggingface’s API usage.
Deploy on AWS Lambda:
In this section, we will store the trained model on S3 and import it into lambda function for predictions. Below are the steps:
- Store the trained model on S3 (alternatively, we can download the model directly from the huggingface library)
- Setup the inference Lambda function based on a container image
- Store container image in Amazon Elastic Container Registry (ECR) repository within your account
- Import and cache the trained model on Amazon Elastic File System storage in order to improve inference latency
- Run predictions on AWS Lambda
In order to speed up the process, we follow this tutorial from AWS that will automatically provisions the container image-based Lambda function. First, let’s clone the repo as shown in the tutorial:
git clone https://github.com/aws-samples/zero-administration-inference-with-aws-lambda-for-hugging-face.git
Install all the requirements:
pip install -r requirements.txt
Install AWS CDK:
npm install -g aws-cdk
Next, we will add the inference file to get predictions from our model.
Change directory to the inference folder and add a new python file to run the model, for this tutorial I added science_ie.py file:

Image by Author
Now, we will create two functions inside science_ie.py:
- A function to download the model from S3, unzip it and store it inside the cache folder /mnt/hf_models_cache.
- A second function to query our model and return the extracted entities.
import os
import urllib.request
import spacy
import spacy_transformers
from zipfile import ZipFile
from pathlib import Path

#Download the model from S3
def download(model, dest):
    save_path = Path(dest) / model
    if not os.path.exists(save_path):
        print('Downloading...')# Enter url path to the model on S3
        url = f'https://[bucket name].s3.us-west-2.amazonaws.com/{model}.zip'
        filename = Path(dest) / f'{model}.zip'
        res = urllib.request.urlretrieve(url, filename)
        with ZipFile(filename, 'r') as f:
            print(dest)
            f.extractall(path=dest)
            print('finished extracting')
    dirname = model.split('-')[0]
    return save_path

#Handler function for predictions
def handler(event, context):
    doc = nlp(event['text'])
    response = [
        {
            'text': ent.text,
            'label': ent.label_,
            'start': ent.start_char,
            'end': ent.end_char
        }
        for ent in doc.ents

    ]
    return response

model = 'model-last'
mnt_path = '/mnt/hf_models_cache'
model_path = download(model, mnt_path)
nlp = spacy.load(mnt_path)
We are now ready for deployment. Simply Run the following commands to deploy the CDK application (note: I got an error when running the command below for python not found, if that happens simply replace python3 by python in this line “app”: “python app.py” in the cdk.json file):
cdk bootstrap
cdk deploy
Once the deployment starts, we will start seeing progress, it will take some time for the full deployment to be complete. Once it’s done, go to AWS Lambda in the AWS console and select the test tab:

Image by Author
Input the test text as follows and press the Test button:
{
"text": "We report exptl. and theor. evidence for the formation of chiral bobbers-an interfacial topol. spin texture-in FeGe films grown by mol. beam epitaxy.  After establishing the presence of skyrmions in FeGe/Si(111) thin-film samples through Lorentz transmission electron microscopy and the topol. Hall effect, we perform magnetization measurements that reveal an inverse relationship between the film thickness and the slope of the susceptibility (d?/dH).  We present evidence for the evolution as a function of film thickness L from a skyrmion phase for L<LD/2 to a cone phase with chiral bobbers at the interface for L>LD/2, where LD?70nm is the FeGe pitch length.  We show using micromagnetic simulations that chiral bobbers, earlier predicted to be metastable, are in fact the stable ground state in the presence of an addnl. interfacial Rashba Dzyaloshinskii-Moriya interaction."
}
Here are the predictions:
[
  {
    "text": "exptl. and theor. evidence for the formation of chiral bobbers",
    "label": "TASK",
    "start": 10,
    "end": 72
  },
  {
    "text": "FeGe films",
    "label": "MATERIAL",
    "start": 111,
    "end": 121
  },
  {
    "text": "skyrmions",
    "label": "MATERIAL",
    "start": 186,
    "end": 195
  },
  {
    "text": "FeGe/Si(111) thin-film samples",
    "label": "MATERIAL",
    "start": 199,
    "end": 229
  },
  {
    "text": "transmission electron microscopy",
    "label": "PROCESS",
    "start": 246,
    "end": 278
  },
  {
    "text": "topol. Hall effect",
    "label": "PROCESS",
    "start": 287,
    "end": 305
  },
  {
    "text": "magnetization measurements",
    "label": "PROCESS",
    "start": 318,
    "end": 344
  },
  {
    "text": "film",
    "label": "MATERIAL",
    "start": 393,
    "end": 397
  },
  {
    "text": "evolution as a function of film thickness",
    "label": "TASK",
    "start": 482,
    "end": 523
  },
  {
    "text": "skyrmion phase",
    "label": "PROCESS",
    "start": 533,
    "end": 547
  },
  {
    "text": "chiral bobbers",
    "label": "MATERIAL",
    "start": 580,
    "end": 594
  },
  {
    "text": "FeGe pitch length",
    "label": "MATERIAL",
    "start": 645,
    "end": 662
  },
  {
    "text": "micromagnetic simulations",
    "label": "PROCESS",
    "start": 679,
    "end": 704
  },
  {
    "text": "chiral bobbers",
    "label": "MATERIAL",
    "start": 710,
    "end": 724
  }
]
Et voila, we got predictions from our model on AWS Lambda without ever worrying about setting up server infrastructure.
Conclusion:
In this tutorial, we demonstrated how to deploy a trained transformer model on Huggingface, store it on S3 and get predictions using AWS lambda functions without the need to setup server infrastructure.
If you have any question, don’t hesitate to ask below or send us an email at admin@ubiai.tools.
If you liked this article, please like and share!
Follow us on Twitter @UBIAI5 or subscribe here!
Bio: Walid Amamou is the Founder of UBIAI, an annotation tool for NLP applications, and holds a PhD in Physics.
Original. Reposted with permission.
Related:
- How to Fine-Tune BERT Transformer with spaCy 3
- Building a Knowledge Graph for Job Search Using BERT
- Fine-Tuning Transformer Model for Invoice Recognition