Tips & Tricks of Deploying Deep Learning Webapp on Heroku Cloud
Learn model deployment issues and solutions on deploying a TensorFlow-based image classifier Streamlit app on a Heroku server.

Image by Author.
Heroku Cloud is famous among web developers and machine learning enthusiasts. The platform provides easy ways to deploy and maintain the web application, but if you are not familiar with deploying deep learning applications, you might struggle with storage and dependence issues. This guide will make your deployment process smoother so that you can focus on creating amazing web applications. We will be learning about DVC integration, Git & CLI-based deployment, error code H10, playing around with Python packages, and optimizing storage.
Git & CLI-based Deployment
The Streamlit app can be deployed with git, GitHub integration, or using Docker. The git-based approach is by far a faster and easier way to deploy any data app on Heroku server.
Simple Git-based
The Streamlit app can be deployed using:
git remote add heroku https://heroku:$HEROKU_API_KEY@git.heroku.com/.git

git push -f heroku HEAD:master
For this to work, you need:
- Heroku API Key
- Heroku App: either by CLI or using the website.
- Git-based project
- Procfile
CLI-based
CLI-based deployment is basic and easy to learn.
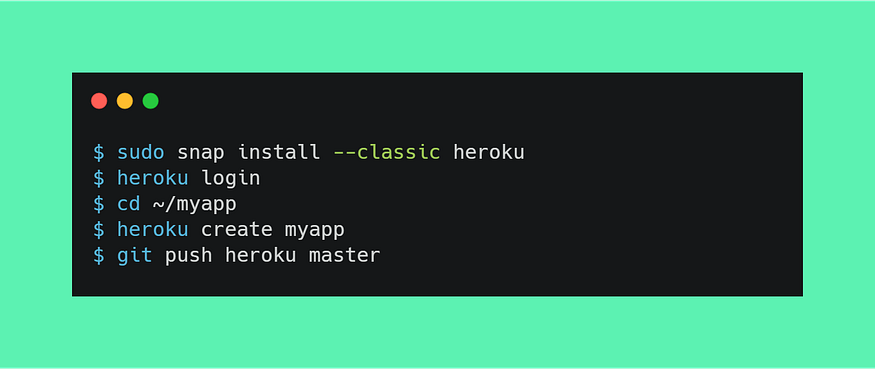
Image by Author.
- Create a free Heroku account here.
- Install Heroku CLI using this link.
- Either clone remote repository or use git init
- Type heroku login and heroku create dagshub-pc-app. This will log you into the server and create an app on a web server.
- Now create Procfile containing the commands to run the app: web: streamlit run --server.port $PORT streamlit_app.py
- Finally, commit and push code to heroku server git push heroku master
PORT
If you are running the app with streamlit run app.py it will produce an error code H10 which means $PORT assigned by the server was not used by the Streamlit app.
You need to:
- Set PORT by using Heroku CLI
heroku config:set PORT=8080
- Make changes in your Procfile and add server port in arguments.
web: streamlit run --server.port $PORT app.py
Tweaking Python Packages
This part took me 2 days to debug as Heroku cloud comes with a 500MB limitation, and the new TensorFlow package is 489.6MB. To avoid dependencies and storage issues, we need to make changes in the requirements.txt file:
- Add tensorflow-cpu instead of tensorflow which will reduce our slug size from 765MB to 400MB.
- Add opencv-python-headless instead of opencv-python to avoid installing external dependencies. This will resolve all the cv2 errors.
- Remove all unnecessary packages except numpy, Pillow, andstreamlit.
DVC Integration

Image by Author.
There are a few steps required for successfully pulling data from the DVC server.
- First, we will install a buildpack that will allow the installation of apt-files by using Heroku API
heroku buildpacks:add --index 1 heroku-community/apt
- Create a file name Aptfile and add the latest DVC version https://github.com/iterative/dvc/releases/download/2.8.3/dvc_2.8.3_amd64.deb
- In your app.py file add extra lines of code:
import os

if "DYNO" in os.environ and os.path.isdir(".dvc"):
    os.system("dvc config core.no_scm true")
    if os.system(f"dvc pull") != 0:
        exit("dvc pull failed")
    os.system("rm -r .dvc .apt/usr/lib/dvc")
After that, commit and push your code to Heroku server. Upon successful deployment, the app will automatically pull the data from DVC server.
Optimizing Storage
There are multiple ways to optimize storage, and the most common is to use Docker. By using the docker method, you can bypass the 500MB limit, and you also have the freedom to install any third-party integration or packages. To learn more about how to use docker, check out this guide.
For optimizing storage:
- Only add model inference python libraries in requiremnets.txt
- We can pull selective data from DVC by using
dvc pull {model} {sample_data1} {sample_data2}..
- We only need a model inference file, so add the rest of the files to .slugignore, which works similarly to .gitignore. To learn more, check out Slug Compiler.
- Remove .dvc and .apt/usr/lib/dvc directories after successfully pulling the data from the server.
Outcomes
The initial slug size was 850MB, but with storage and package optimizations, the final slug size was reduced to 400MB. We have solved error code H10 with a simple command and added opencv-python-headless package to solve dependency issues. This guide was created to overcome some of the common problems faced by beginners on Heroku servers.
The Docker-based deployment can solve a lot of storage problems, but it comes with complexity and a slow deployment process. You can use heroku container:push web, but before that, you need to build the docker, test it, and resolve all the issues locally before you can push it. This method is preferred by advanced Heroku users.
The next challenge is to deploy your web application with webhook. This will allow us to automate the entire machine learning ecosystem from any platform. The automation process will involve creating a simple Flask web server that will run shell commands.
Additional Resources