Building NLP Classifiers Cheaply With Transfer Learning and Weak Supervision
In this blog, I’ll walk you through a personal project in which I cheaply built a classifier to detect anti-semitic tweets, with no public dataset available, by combining weak supervision and transfer learning.
By Abraham Starosta, Stanford University
Introduction
There is a catch to training state-of-the-art NLP models: their reliance on massive hand-labeled training sets. That’s why data labeling is usually the bottleneck in developing NLP applications and keeping them up-to-date. For example, imagine how much it would cost to pay medical specialists to label thousands of electronic health records. In general, having domain experts label thousands of examples is too expensive.
On top of the initial labeling cost, there is another huge cost in keeping models up-to-date with changing contexts in the real-world. Louise Matsakis on Wired explains that the main reasons social media platforms find it so hard to detect hate speech are “shifting contexts, changing circumstances, and disagreements between people.” That’s mainly because when context changes, we usually have to label thousands of new examples or relabel a big part of our dataset. Again, this is very expensive.
This is an important problem to solve if we want to automate knowledge acquisition from text data, but it’s also very hard to solve. Thankfully, new technologies like transfer learning, multitask learning and weak supervision are pushing NLP forward and might be finally converging to offer solutions. In this blog, I’ll walk you through a personal project in which I cheaply built a classifier to detect anti-semitic tweets, with no public dataset available, by combining weak supervision and transfer learning. I hope that by the end you’ll be able to follow this approach to build your own classifiers relatively cheaply.
We have 3 steps:
- Collect a small number of labeled examples (~600)
- Use weak supervision to build a training set from many unlabeled examples using weak supervision
- Use a large pre-trained language model for transfer learning
Background
Weak Supervision
Weak supervision (WS) helps us alleviate the data bottleneck problem by enabling us to cheaply leverage subject matter expertise to programmatically label millions of data points. More specifically, it’s a framework that helps subject matter experts (SMEs) infuse their knowledge into an AI system in the form of hand-written heuristic rules or distant supervision. As an example of WS adding value in the real-world, Google just published a paper in December 2018 describing Snorkel DryBell, an internal tool they built to use WS to build 3 powerful text classifiers in a fraction of the time.
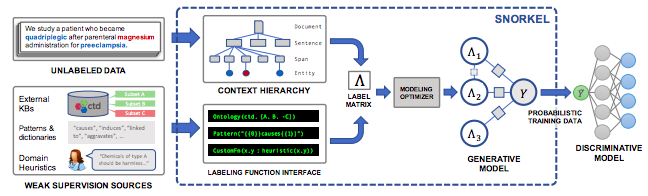
Throughout this project, I used the same general approach Google took: Snorkel (Ratner et al., 2018.) The Stanford Infolab implements the Snorkel framework in this handy Python package called Snorkel Metal. I suggest you go through this tutorial to learn the basic workflow and this one to learn how to get the most out of it.
In Snorkel, the heuristics are called Labeling Functions (LFs). Here are some common types of LFs:
- Hard-coded heuristics: usually regular expressions (regexes)
- Syntactics: for instance, Spacy’s dependency trees
- Distant supervision: external knowledge bases
- Noisy manual labels: crowdsourcing
- External models: other models with useful signals
After you write your LFs, Snorkel will train a Label Model that takes advantage of conflicts between all LFs to estimate their accuracy. Then, when labeling a new data point, each LF will cast a vote: positive, negative, or abstain. Based on those votes and the LF accuracy estimates, the Label Model can programmatically assign probabilistic labels to millions of data points. Finally, the goal is to train a classifier that can generalize beyond our LFs.
For example, below is the code for an LF I wrote to detect anti-semitic tweets. This LF focuses on catching common conspiracy theories that depict wealthy Jews as controlling the media and politics.
# Set voting values.
ABSTAIN = 0
POSITIVE = 1
NEGATIVE = 2

# Detects common conspiracy theories about jews owning the world.
GLOBALISM = r"\b(Soros|Adelson|Rothschild|Khazar)"

def jews_symbols_of_globalism(tweet_text):
    return POSITIVE if re.search(GLOBALISM, tweet_text) else ABSTAIN
Key advantages of Weak Supervision:
- Flexibility: when we want to update our model, all we need to do is update the LFs, rebuild our training set and retrain our classifier.
- Improvement in recall: a discriminative model will be able to generalize beyond the rules in our WS model, thus often giving us a bump in recall.
Transfer Learning and ULMFiT
Transfer Learning has greatly impacted computer vision. Using a pre-trained ConvNet on ImageNet as initialization or fine-tuning it to your task at hand has become very common. But, that hadn’t translated into NLP until ULMFiT came about.
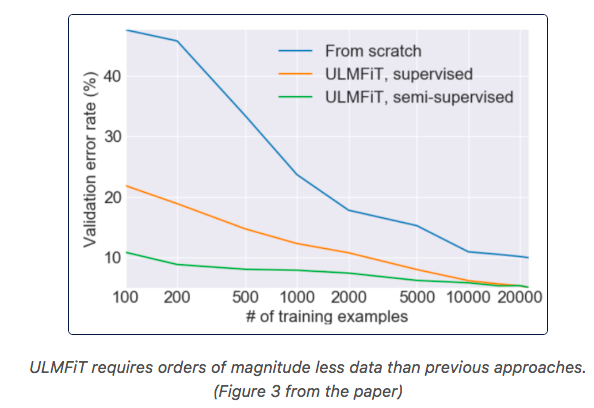
Similar to how computer vision engineers use ConvNets pre-trained on ImageNet, Fast.ai provides a Universal Language Model, pre-trained on millions of Wikipedia pages, which we can fine-tune to our specific domain space. Then, we can train a text classification model that leverages the LM’s learned text representations which can learn with very few examples (up to 100x less data).
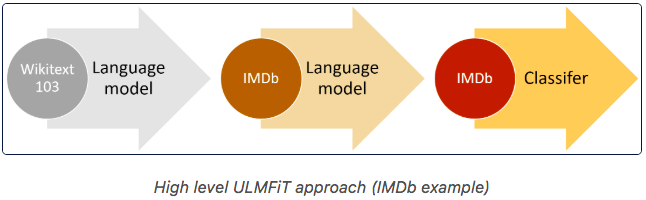
ULMFiT consists of 3 stages:
- Pre-trained an LM on a general purpose corpus (Wikipedia)
- Fine-tune the LM for the task at hand with a large corpus of unlabeled data points
- Train a discriminative classifier by fine-tuning it with gradual unfreezing
Key advantages of ULMFiT:
- With only 100 labels, it can match the performance of training from scratch on 100x more data
- Fastai’s API is very easy to use. This tutorial is very good
- Produces a PyTorch model we can deploy in production
Step-By-Step Guide for Building an Anti-Semitic Tweet Classifier
In this section, we’ll dive more deeply into the steps I took to build an anti-semitic tweet classifier and I’ll share some more general things I learned throughout this process.
First step: Data Collection and Setting a Target
Collecting unlabeled data: The first step is to put together a large set of unlabeled examples (at least 20,000). For the anti-semitic tweet classifier, I downloaded close to 25,000 tweets that mention the word “jew.”
Label 600 examples: 600 isn’t a large number but I consider this is a good place to start for most tasks because we’ll have about 200 examples in each data split. If you already have the labeled examples, then use those! Otherwise, just pick 600 examples at random and label them.
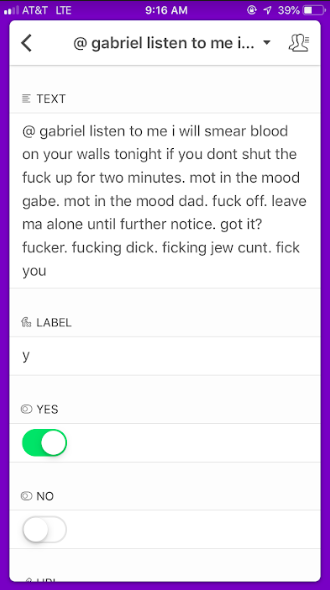
As a labeling tool, you can use Google Sheets. Or, if you’re like me and would rather label on your phone, you can use Airtable. Airtable is free and it has a slick iPhone app. If you’re working in teams, it also lets you easily split the work. I’ll probably write another blog focusing on how to use Airtable for labeling. You can just label as you scroll through examples. If you’re curious about how I set up Airtable for labeling, feel free to reach out to me.
Split data: for the purpose of this project, we’ll have a train, test and an LF set. The purpose of the LF set is to both help validate our LFs and to get ideas for new LFs. The test set is used to check the performance of your models (we can’t look at it). If you want to do hyperparameter tuning, you would want to label about 200 more samples for a validation set.
I have 24,738 unlabeled tweets (train set), 733 labeled tweets for building LFs, and 438 labeled tweets for testing. So I labeled a total of 1,171, but I realized that was probably too many.
DATA_PATH = "../data"
train = pd.read_csv(os.path.join(DATA_PATH, "train_tweets.csv"))
test = pd.read_csv(os.path.join(DATA_PATH, "test_tweets.csv"))
LF_set = pd.read_csv(os.path.join(DATA_PATH, "LF_tweets.csv"))
train.shape, LF_set.shape, test.shape

>> ((24738, 6), (733, 7), (438, 7))
Setting our goals: after labeling a few hundred examples you’ll have a better idea of how hard the task is and you’ll be able to set a goal for yourself. I considered that for anti-semitism classification, it was very important to have high precision so I set myself the goal of getting at least 90% precision and 30% recall.