Deployment of Machine learning models using Flask
This blog will explain the basics of deploying a machine learning algorithm, focusing on developing a Naïve Bayes model for spam message identification, and using Flask to create an API for that model.
So, till now, we developed many data science models, produced forecasts on the testing data, and checked results offline. In the real world, creating predictions is only a part of your data science project. Let us consider a CPU/GPU using ML to detect spam text messages. A Naïve Bayes classifier is trained on CPU/GPU with spam and non-spam text messages. The trained model is deployed as a service on the web to general public or users.
This blog will explain us about the basics of deploying a machine learning algorithm. In this blog, we will focus on developing a Naïve Bayes model for spam message identification, and use Flask (Flask is a web service development microframework in python.) to create an API for model. API allows us to make use of classifying abilities of the algorithm via HTTP requests.
Flask is based on 2 components, WSGI (web server gateway interface) toolkit and Jinja2 template. WSGI is used for web applications and Jinja2 provides web pages. Flask is always used for bigger size machine learning projects. Flask can be used to build REST applications, email services, chat applications etc.
Here We Go!
For More Information related to Data Science Course in Bangalore Follow us @ExcelR
Step 1:
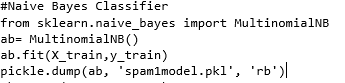
First, we will use a dataset (messages.csv) to build a classifying model that will accurately identify which texts are spam. The classifier model works on bag of word features to identify spam email. Once we train the model, it is advisable to save the model for future use thereafter reducing time to retrain. To accomplish it, we save our model as a.pkl file for future use. This is a pickle file which is a native python library to save and load python objects files.
Step 2:
Next step, we will have to develop a web application with a user-friendly web page consisting a form field for user input. After entering the user defined message into the web application, it will relay the message to be spam or not on a result page.
Step 3:
For developing a web application, we create a folder for this project called Spam Identifier on your desktop, make sure you make a directory of files within this. The directory branch inside folder will look like
app.py
HTML files/
homepage.html
output.html
style/
design.css
Step 4:
Check if this app.py file has the source code to be executed by the Python which runs the Flask web application, it should include the ML program developed (.pkl file) for classifying spam messages. This file is a link to HTML file and API calling the model to display the output form user defined inputs.
Step 5:
After that run the application as a single module to initialize a new flask instance with the argument __name__, this will help flask to find the html files folder (containing html files) in the same folder (Spam Identifier).
app = Flask(__name__)
Step 6:
To furnish the web page, flask will look for html files present in the subdirectory called html files. In this case, we have two create 2 html files: homepage.html and output.html.
Step 7:
CSS can be used to design the look of 2 html documents. Don’t forget to save design.css file in a subdirectory called style, which happens to be the default directory of Flask.
Step 8:
Next use the route decorator (@app.route('/')) url to activate the execution of homepage function. On the back of which homepage function will simply provision homepage.html file available in the sub category.

Step 9:
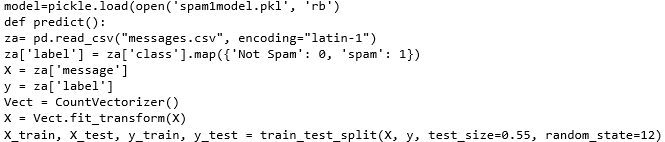
Thereafter, we define predict function, wherein we read messages.csv set, pre-process the text, make estimations, and store the model.
Step 10:
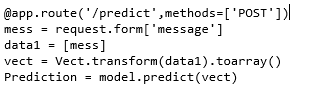
Next, we access the new message inputted by the user and make a prediction. Afterwards, make use of the POST method to transfer the form data to the server.
Step 11:
Post which output.html file can be activated through the render_htmlfiles function inside the predict function which we defined in the app.py script.

Step 12:
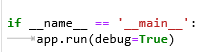
Finally, use the run function to only run the application on the server, by using if statement with __name__ == '__main__'. Later, set the debug=True argument inside the app.run method, to trigger flask's debugger.
Step 13:
For running the model , you can start running the API either by double clicking app.py, or executing the command from the terminal as follows:
cd -Spam Identifier
Python app.py
Step 14:
Next, open a web browser and navigate to http://127.0.0.1:5000/, where you should see a simple website which is similar to the one below

Congratulations! You have now created an end-to-end NLP application at zero cost and little effort. Hosting and sharing data science models can be uncomplicated. Developing android apps, chatbots and many more applications dependent on machine learning algorithms back-end can be created with no difficulty. When you have time, I recommend to start reading about deployment in machine learning. That’s it for flask. Thanks for reading.
For More Information related to Data Science Course Follow us @ExcelR