Build an app to generate photorealistic faces using TensorFlow and Streamlit
We’ll show you how to quickly build a Streamlit app to synthesize celebrity faces using GANs, Tensorflow, and st.cache.
By Adrien Treuille, Co-founder at Streamlit

Machine learning models are black boxes. Yes, you can run them on test sets and plot fancy performance curves, but it’s still often hard to answer basic questions about how they perform. A surprisingly powerful source of insight is simply to play with your models! Tweak inputs. Watch outputs. Let your coworkers and managers play with them too. This interactive approach is not only a powerful way to gain intuition, but also a great way to get people excited about your work.
Making interactive models is one of the use-cases that inspired Streamlit, a Python framework that makes writing apps as easy as writing Python scripts. This overview will walk you through creating a Streamlit app to play with one of the hairiest and black-box-iest models out there: a deep Generative Adversarial Network (GAN). In this case, we’ll visualize Nvidia’s PG-GAN [1] using TensorFlow to synthesize photorealistic human faces from thin air. Then, using Shaobo Guan’s amazing TL-GAN model [2], we’ll create an app that gives us the ability to tweak GAN-synthesized celebrity faces by attributes like age, smileyness, male likeness, and hair color. By the end of the tutorial, you’ll have a fully parametric model of humans! (Note we didn’t create the attributes. They came from the CelebA dataset [3], and some of them can get a bit weird…)
Getting started with Streamlit
If you haven’t installed Streamlit yet, you can do so by running:
pip install streamlit
streamlit hello
And if you’re a seasoned Streamlit-er, you’ll need to be on 0.57.1 or later, so make sure to upgrade!
pip install --upgrade streamlit
Setting up your environment
Before we begin, use the commands below to check out the project’s GitHub repo and running the Face GAN demo for yourself. This demo depends on Tensorflow 1, which does not support Python 3.7 or 3.8, so you’ll need Python 3.6. On Mac and Linux, we recommend using pyenv to install Python 3.6 alongside your current version, then setting up a new virtual environment using venv or virtualenv. On Windows, the Anaconda Navigator allows you to pick your Python version with a point-and-click interface.
When you’re all set, open a terminal window and type:
git clone https://github.com/streamlit/demo-face-gan.git
cd demo-face-gan
pip install -r requirements.txt
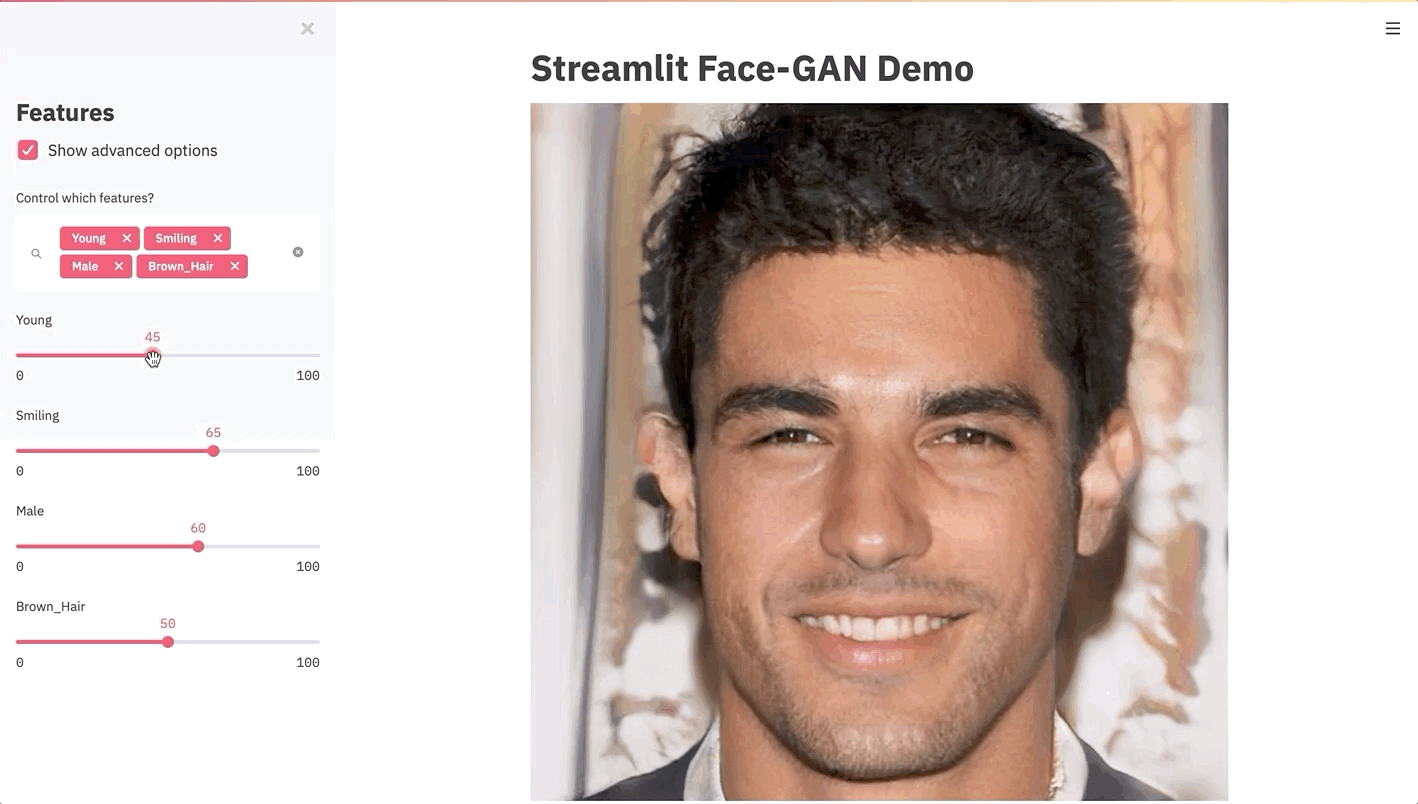
streamlit run app.pyGive it a minute to finish downloading the trained GAN and then try playing with the sliders to explore the different faces the GAN can synthesize. Pretty cool, right?
The full app code is a file that has ~190 lines of code, out of which only 13 are Streamlit calls. That’s right, the entire UI above is drawn from just those 13 lines!
Let’s take a look at how the app is structured:
Now that you have a sense of how it is structured, let’s dive into each of the 5 steps above to see how they work.
Step 1. Download models and data files
This step downloads the files we need: a pre-trained PG-GAN model and a TL-GAN model pre-fitted to it (we’ll dive into these a little bit later!).
The download_file utility function is a little smarter than a pure downloader:
- It checks if the file is already present in the local directory, so it only downloads it if needed. It also checks if the downloaded file’s size is what we expected it to be, so it’s able to fix interrupted downloads. This is a great pattern to follow!
- It uses
st.progress()andst.warning()to show a nice UI to the user while the file downloads. Then it calls.empty()on those UI elements to hide them when done.
Step 2. Load the models into memory
The next step is to load these models into memory. Here is the code for loading the PG-GAN model:
Notice the @st.cache decorator at the start of load_pg_gan_model(). Normally in Python, you could just run load_pg_gan_model() and reuse that variable over and over. Streamlit’s execution model is unique, however, in that every time a user interacts with a UI widget your script executes again in its entirety, from top to bottom. By adding @st.cache to the costly model-loading functions, we are telling Streamlit to only run those functions the first time the script executes — and just reuse the cache output for every execution after that. That is one of Streamlit’s most fundamental features, as it lets you run scripts efficiently by caching the results of function calls. This way, the large fitted GAN models will be loaded into memory exactly once; and by the same token, our TensorFlow session will be created exactly once, as well. (See our launch article for a refresher on Streamlit’s execution model.)
There’s one wrinkle, though: the TensorFlow session object can mutate internally as we use it to run different computations. Ordinarily, we don’t want cached objects to mutate, as that can lead to unexpected results. So when Streamlit detects such mutations, it issues a warning to the user. However, in this case we happen to know that it’s OK if the TensorFlow session object mutates, so we bypass the warning by setting allow_output_mutation=True.
Step 3. Draw the sidebar UI
If this is the first time you’re seeing Streamlit’s API for drawing widgets, here’s the 30-second crash course:
- You add widgets by calling API methods like
st.slider()andst.checkbox(). - The return value of those methods is the value shown in the UI. For example, when the user moves a slider to position 42, your script will be re-executed and in that execution the return value of that
st.slider()will be 42. - You can put anything in a sidebar by prepending it with
st.sidebar. For example,st.sidebar.checkbox().
So to add a slider in the sidebar, for example — a slider to allow the user to tune the brown_hair parameter, you would just add:
In our app we want to get a little fancy to show off just how easy it is to make the UI itself modifiable in Streamlit! We want to allows users to first use a multiselect widget to pick a set of features they want to control in the generated image, which means our UI needs to be drawn programmatically:
With Streamlit, the code for that is actually quite simple:
Step 4. Synthesize the image
Now that we have a set of features telling us what kind of face to synthesize, we need to do the heavy lifting of synthesizing the face. The way we’ll do that is by passing the features into the TL-GAN to generate a vector in the PG-GAN’s latent space, then feed that vector to PG-GAN. If that sentence made no sense to you, let’s take a detour and talk about how our two neural nets work.
A detour into GANs
To understand how the above app generates faces from slider values, you first have to understand something about how PG-GAN and TL-GAN work — but don’t worry, you can skip this section and still understand how the app works at a higher level!
PG-GAN, like any GAN, is fundamentally a pair of neural networks, one generative and one discriminative, which are trained against each other, forever locked in mortal combat. The generative network is in charge of synthesizing images it believes look like faces, and the discriminative network is in charge of deciding whether or not the images are indeed faces. The two networks are iteratively trained against each other’s output, so each one does its best to learn to fool the other network. The end result is the final generative network is able to synthesize realistic-looking faces even though at the start of training all it could synthesize was random noise. Its really quite amazing! In this case, the face-generating GAN we use was trained on celebrity faces by Karras et al using their Progressive Growing of GANs algorithm (PG-GAN), which trains GANs using progressively higher-resolution images. [1]
The input to PG-GAN is a high-dimensional vector belonging to its so-called latent-space. The latent-space is basically the space of all possible faces the network can generate, so each random vector in that space corresponds to a unique face (or at least it should! Sometimes you get weird results…) The way you typically use a GAN is to give it a random vector and then check out what face gets synthesized (Figure 2.a).
However, that sounds a bit dull and we’d rather have some more control over the output. We’d like to tell PG-GAN “generate an image of a man with a beard”, or “generate an image of a brown-haired woman”. That’s where the TL-GAN comes in.
The TL-GAN is yet another neural network, this one trained by entering random vectors into PG-GAN, taking the generated faces, and running them through classifiers for attributes like “is young-looking”, “is bearded”, “is brown-haired”, etc. In the training phase, TL-GAN labels thousands of faces from PG-GAN with those classifiers and identifies directions in the latent space that correspond to changes in the labels we care about. As a result, the TL-GAN learns how to map those classes (i.e. “young-looking”, “bearded”, “brown-haired”) into the appropriate random-looking vector that should be input into PG-GAN to generate a face with those characteristics (Figure 2.b).
Going back to our app, at this point we’ve already downloaded the pre-trained GAN models and loaded them into memory, and we’ve also grabbed a feature vector from the UI. So now we just have to feed those features into TL-GAN and then PG-GAN to get an image out:
Optimize performance
The generate_image() function above can take some time to execute, especially when running on a CPU. To improve our app’s performance it would be great if we could cache the output of that function, so we don’t have to re-synthesize faces we’ve already seen as we move the slider back and forth.
Well, as you may have noticed in the snippet above already, the solution here is to once again use the @st.cache decorator.
But notice the two arguments we passed to @st.cache in this case: show_spinner=False and hash_funcs={tf.Session: id}. What are those there for?
The first one is easy to explain: by default, @st.cache shows a status box in the UI letting you know that a slow-running function is currently executing. We call that a “spinner”. However, in this case, we’d like to avoid showing it, so the UI doesn’t jump around unexpectedly. So we set show_spinner to False.
The next one solves a more involved problem: the TensorFlow session object, which is passed as an argument to generate_image(), is usually mutated by TensorFlow’s internals in between runs of this cached function. This means the input arguments to generate_image() will always be different and we’ll never actually get a cache hit. In other words, the @st.cache decorator won’t actually do anything! How can we solve this?
Hash_funcs to the rescue
The hash_funcs option allows us to specify custom hash functions that tell @st.cache how it should interpret different objects when checking whether this is a cache hit or a cache miss. In this case, we’re going to use that option to tell Streamlit to hash a TensorFlow session by calling Python’s id() function rather than by examining its contents:
This works for us because the session object in our case is actually a singleton across all executions of the underlying code since it comes from the @st.cache’d load_pg_gan_model() function.
For more information about hash_funcs, check out our documentation about advanced caching techniques.
Step 5. Draw the synthesized image
Now that we have the output image, drawing it is a piece of cake! Just call Streamlit’s st.image function:
st.image(image_out, use_column_width=True)And we’re done!
Wrapping up
So there you have it: interactive face synthesis with TensorFlow in a 190-line Streamlit app and only 13 Streamlit function calls! Have fun exploring the space of faces these two GANs can draw, and many thanks to Nvidia and Shaobo Guan for letting us build off their super cool demos. We hope that you have as much fun building apps and playing with models as we do. ????
For more Streamlit app examples, you can check out our gallery at https://www.streamlit.io/gallery.
Thanks to Ash Blum, TC Ricks, Amanda Kelly, Thiago Teixeira, Jonathan Rhone and Tim Conkling for their helpful input on this article.
References:
[1] T. Karras, T. Aila, S. Laine, J. Lehtinen. Progressive Growing of GANs for Improved Quality, Stability, and Variation. International Conference on Learning Representations (ICLR 2018)
[2] S. Guan. Controlled image synthesis and editing using a novel TL-GAN model. Insight Data Science Blog (2018)
[3] Z. Liu, P. Luo, X. Wang, X. Tang. Deep Learning Face Attributes in the Wild. International Conference on Computer Vision (ICCV 2015)
Bio: Adrien Treuille is co-founder of Streamlit, the ML tooling framework. Adrien was a computer science prof at Carnegie Mellon, lead a Google X project, and was VP at Zoox.
Original. Reposted with permission.
Related:
- Generate Realistic Human Face using GAN
- 12-Hour Machine Learning Challenge: Build & deploy an app with Streamlit and DevOps tools
- The Forgotten Algorithm