Deploy a Machine Learning Pipeline to the Cloud Using a Docker Container
In this tutorial, we will use a previously-built machine learning pipeline and Flask app to demonstrate how to deploy a machine learning pipeline as a web app using the Microsoft Azure Web App Service.
By Moez Ali, Founder & Author of PyCaret
RECAP
In our last post, we demonstrated how to develop a machine learning pipeline and deploy it as a web app using PyCaret and Flask framework in Python. If you haven’t heard about PyCaret before, please read this announcement to learn more.
In this tutorial, we will use the same machine learning pipeline and Flask app that we built and deployed previously. This time we will demonstrate how to deploy a machine learning pipeline as a web app using the Microsoft Azure Web App Service.
In order to deploy a machine learning pipeline on Microsoft Azure, we will have to containerize our pipeline in a software called “Docker”. If you don’t know what does containerize means, no problem — this tutorial is all about that.
???? Learning Goals of this Tutorial
- What is a container? What is Docker? and why do we need it?
- Build a Docker file on your local computer and publish it into Azure Container Registry (ACR).
- Deploy a web service on Azure using the container we uploaded into ACR.
- See a web app in action that uses a trained machine learning pipeline to predict on new data points in real-time.
In our last post, we covered the basics of model deployment and why it is needed. If you would like to learn more about model deployment, click here to read our last article.
This tutorial will cover the entire workflow of building a container locally to pushing it onto Azure Container Registry and then deploying our pre-trained machine learning pipeline and Flask app onto Azure Web Services.
???? Toolbox for this tutorial
PyCaret
PyCaret is an open source, low-code machine learning library in Python that is used to train and deploy machine learning pipelines and models into production. PyCaret can be installed easily using pip.
pip install pycaret
Flask
Flask is a framework that allows you to build web applications. A web application can be a commercial website, blog, e-commerce system, or an application that generates predictions from data provided in real-time using trained models. If you don’t have Flask installed, you can use pip to install it.
Docker
Docker is a tool designed to make it easier to create, deploy, and run applications by using containers. Containers are used to package up an application with all of its necessary components, such as libraries and other dependencies, and ship it all out as one package. If you haven’t used docker before, this tutorial also covers the installation of docker on Windows 10.
Microsoft Azure
Microsoft Azure is a set of cloud services that is used to build, manage and deploy applications on a massive and global network. Other cloud services that are often used for deploying ML pipelines are Amazon Web Services (AWS), Google Cloud, IBM Cloud and Alibaba Cloud. We will cover most of them in our future tutorials.
If you haven’t used Microsoft Azure before you can sign up for a free account here. When you sign up for the first time you get a free credit for the first 30 days. You can utilize that credit in building your own web app by following this tutorial.
What is a Container and why do we need it?
Have you ever had the problem where your python code (or any other code) works fine on your computer but when your friend tries to run the exact same code, it doesn’t work? If your friend is repeating the exact same steps, they should get the same results right? The one-word answer to this is the environment. Your friend’s Python environment is different than yours.
What does an environment include? → Python (or any other language you have used) and all the libraries and dependencies with the exact versions using which application was built and tested.
If we can somehow create an environment that we can transfer to other machines (for example: your friend’s computer or a cloud service provider like Microsoft Azure), we can reproduce the results anywhere.
Hence, a container is a type of software that packages up an application and all its dependencies so the application runs reliably from one computing environment to another.
“Think about containers, when you think about containers.”
This is the most intuitive way to understand containers in data science. They are just like containers on a ship where the goal is to isolate the contents of one container from the others so they don’t get mixed up. This is exactly what containers are used for in data science.
Now that we understand the metaphor behind containers, let’s look at alternate options for creating an isolated environment for our application. One simple alternative is to have a separate machine for each of your applications.
(1 machine = 1 application = no conflict = everything is good)
Using a separate machine is straight forward but it doesn’t outweigh the benefits of using containers since maintaining multiple machines for each application is expensive, a nightmare-to-maintain and hard-to-scale. In short, it’s not practical in many real-life scenarios.
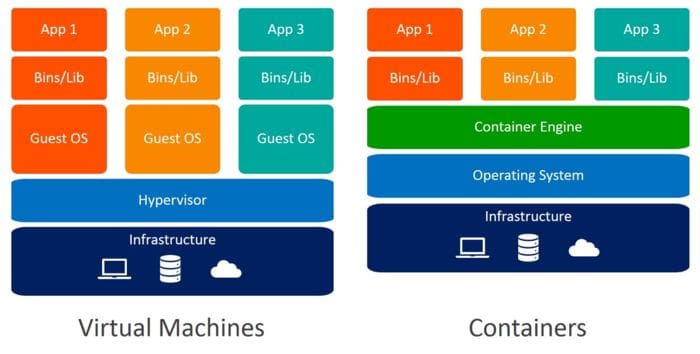
Another alternate for creating an isolated environment are virtual machines. Containers are again preferable here because they require fewer resources, are very portable, and are faster to spin up.
Can you spot the difference between Virtual Machines and Containers? When you use containers, you do not require guest operating systems. Imagine 10 applications running on a virtual machine. This would require 10 guest operating systems compared to none required when you use containers.
I understand containers but what is Docker?
Docker is a company that provides software (also called Docker) that allows users to build, run and manage containers. While Docker’s container are the most common, there are other less famous alternatives such as LXD and LXC that provides container solution.
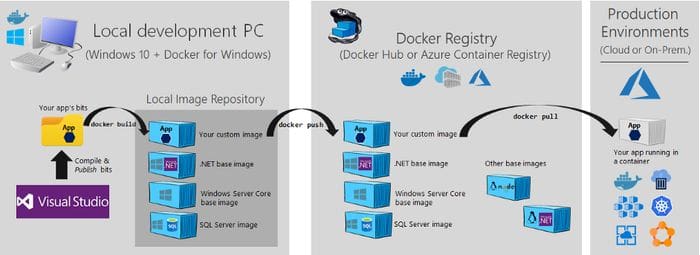
In this tutorial, we will use Docker Desktop for Windows to create a container that we will publish on Azure Container Registry. We will then deploy a web app using that container.
![]()
Docker Image vs. Docker Container
What is the difference between a docker image and a docker container? This is by far the most common question asked so let’s clear this right away. There are many technical definitions available, however, it is intuitive to think about a docker image as a mold based on which container is created. An image is essentially a snapshot of container.
If you prefer a slightly more technical definition then consider this: Docker images become containers at runtime when they run on a Docker Engine.
Breaking the hype:
At the end of the day, docker is just a file with a few lines of instructions that are saved under your project folder with the name “Dockerfile”.
Another way to think about docker file is that they are like recipes you have invented in your own kitchen. When you share those recipes with somebody else and they follow the exact same instructions, they are able to produce the same dish. Similarly, you can share your docker file with other people, who can then create images and run containers based on that docker file.
Now that you understand containers, docker and why we should use them, let’s quickly set the business context.
Setting the Business Context
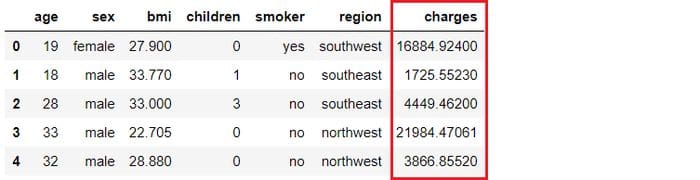
An insurance company wants to improve its cash flow forecasting by better predicting patient charges using demographic and basic patient health risk metrics at the time of hospitalization.
Objective
To build and deploy a web application where the demographic and health information of a patient is entered into a web-based form which then outputs a predicted charge amount.
Tasks
- Train and develop a machine learning pipeline for deployment.
- Build a web app using Flask framework. It will use the trained ML pipeline to generate predictions on new data points in real-time.
- Create a docker image and container.
- Publish the container onto Azure Container Registry (ACR).
- Deploy the web app in the container by publishing onto ACR. Once deployed, it will become publicly available and can be accessed via a Web URL.
Since we have already covered the first two tasks in our last tutorial, we will quickly recap them and focus on the remaining tasks in the list above. If you are interested in learning more about developing machine learning pipeline in Python using PyCaret and building a web app using Flask framework, you can read our last tutorial.
???? Develop Machine Learning Pipeline
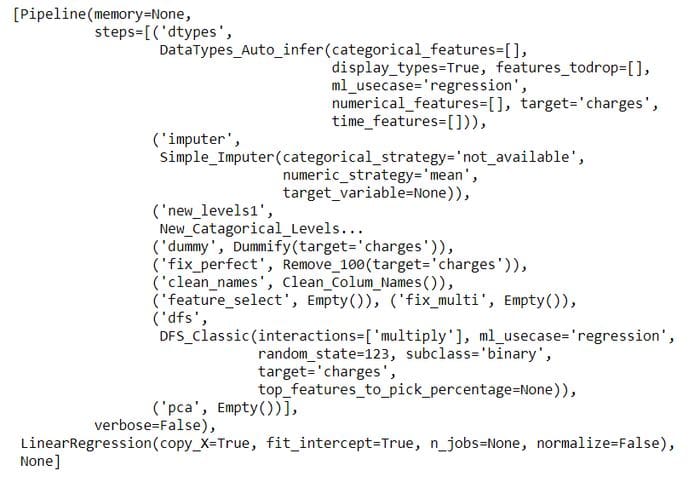
We are using PyCaret in Python for training and developing a machine learning pipeline which will be used as part of our web app. The Machine Learning Pipeline can be developed in an Integrated Development Environment (IDE) or Notebook. We have used a notebook to run the below code:
When you save a model in PyCaret, the entire transformation pipeline based on the configuration defined in the setup() function is created . All inter-dependencies are orchestrated automatically. See the pipeline and model stored in the ‘deployment_28042020’ variable:
???? Build Web Application
This tutorial is not focused on building a Flask application. It is only discussed here for completeness. Now that our machine learning pipeline is ready we need a web application that can connect to our trained pipeline to generate predictions on new data points in real-time. We have created the web application using Flask framework in Python. There are two parts of this application:
- Front-end (designed using HTML)
- Back-end (developed using Flask)
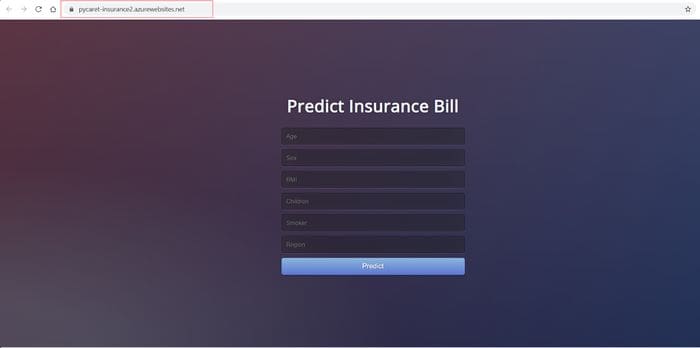
This is how our web application looks:

If you would like to see this web app in action, click here to open a deployed web app on Heroku (It may take few minutes to open).
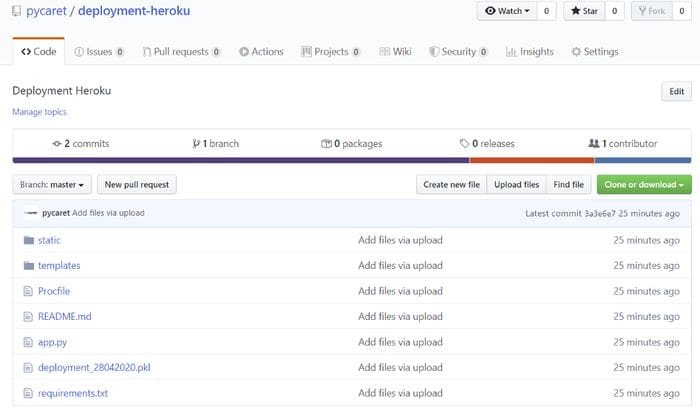
If you haven’t followed along, no problem. You can simply fork this repository from GitHub. If you don’t know how to fork a repo, please read this official GitHub tutorial. This is how your project folder should look at this point:
Now that we have a fully functional web application, we can start the process of containerizing the app using Docker.
10-steps to deploy a ML pipeline in docker container:
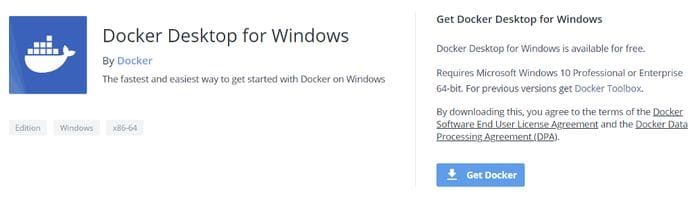
???? Step 1 — Install Docker Desktop for Windows
You can use Docker Desktop on Mac as well as Windows. Depending on your operating system, you can download the Docker Desktop from this link. We will be using Docker Desktop for Windows in this tutorial.
The easiest way to check if the installation was successful is by opening the command prompt and typing in ‘docker’. It should print the help menu.
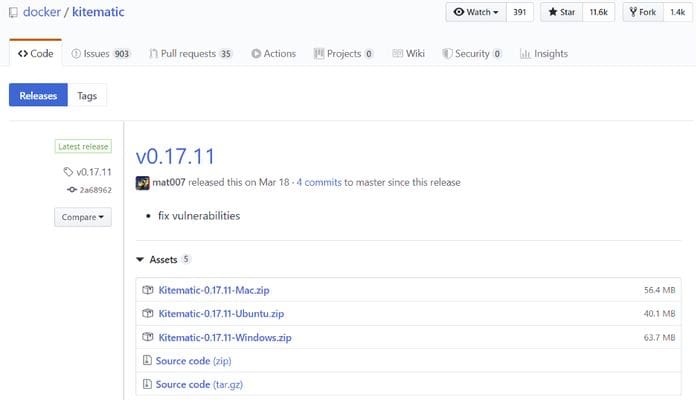
???? Step 2 — Install Kitematic
Kitematic is an intuitive graphical user interface (GUI) for running Docker containers on Windows or Mac. You can download Kitematic from Docker’s GitHub repository.
Once downloaded, simply unzip the file into the desired location.
???? Step 3 — Create a Dockerfile
The first step of creating a Docker image is to create a Dockerfile. A Dockerfile is just a file with a set of instructions. The Dockerfile for this project looks like this:
Dockerfile is case-sensitive and must be in the project folder with the other project files. A Dockerfile has no extension and can be created using any editor. We have used Visual Studio Code to create it.
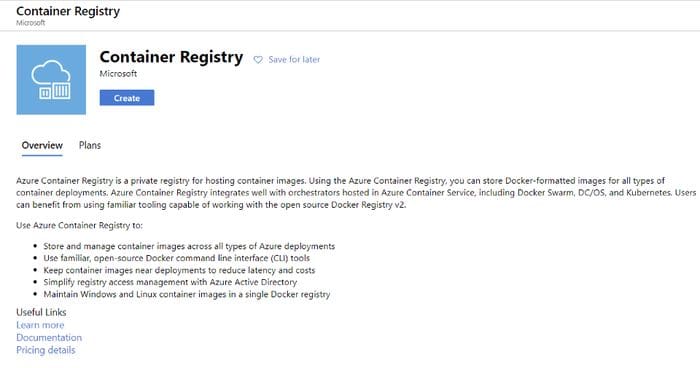
???? Step 4— Create Azure Container Registry
If you don’t have a Microsoft Azure account or haven’t used it before, you can sign up for free. When you sign up for the first time you get a free credit for the first 30 days. You can utilize that credit to build and deploy a web app on Azure. Once you sign up, follow these steps:
- Login on https://portal.azure.com.
- Click on Create a Resource.
- Search for Container Registry and click on Create.
- Select Subscription, Resource group and Registry name (in our case: pycaret.azurecr.io is our registry name)
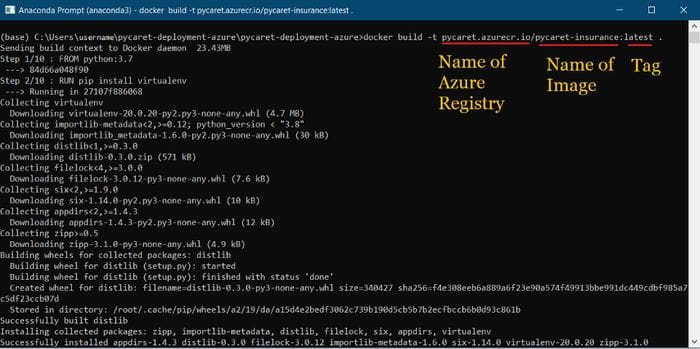
???? Step 5— Build Docker Image
Once a registry is created in Azure portal, the first step is to build a docker image using command line. Navigate to the project folder and execute the following code.
docker build -t pycaret.azurecr.io/pycaret-insurance:latest . 
- pycaret.azurecr.io is the name of the registry that you get when you create a resource on Azure portal.
- pycaret-insurance is the name of the image and latest is the tag. This can be anything you want.
???? Step 6— Run container from docker image
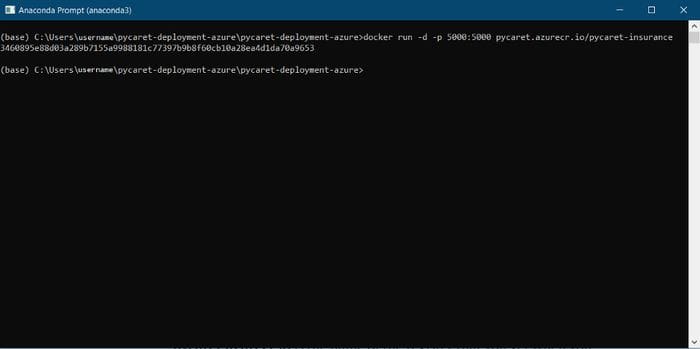
Now that the image is created we will run a container locally and test the application before we push it to Azure Container Registry. To run the container locally execute the following code:
docker run -d -p 5000:5000 pycaret.azurecr.io/pycaret-insuranceOnce this command is successfully executed it will return an ID of the container created.
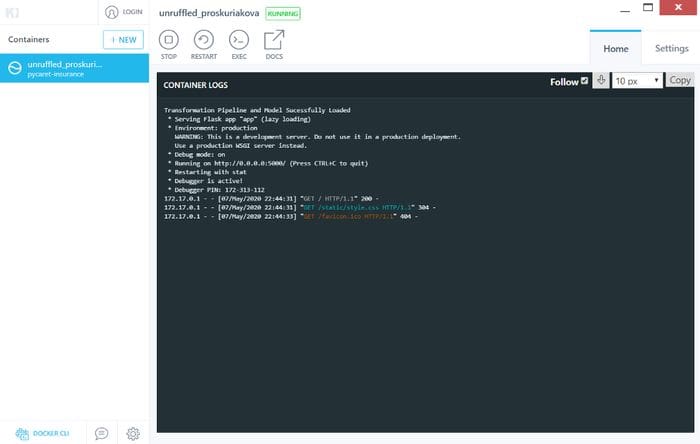
???? Step 7 — Test container on your local machine
Open Kitematic and you should be able to see an application up and running.
You can see the app in action by going to localhost:5000 in your internet browser. It should open up a web app.
Make sure that once you are done with this, you stop the app using Kitematic, otherwise, it will continue to utilize resources on your computer.
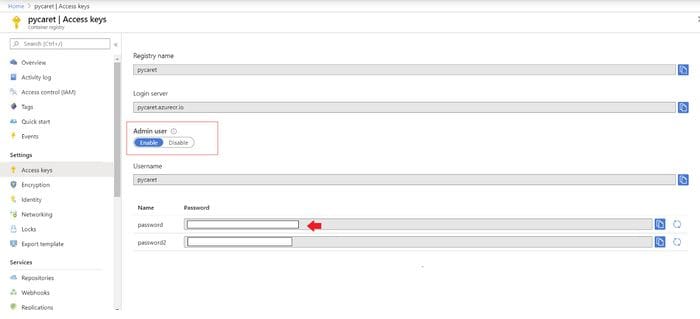
???? Step 8— Authenticate Azure Credentials
One final step before you can upload the container onto ACR is to authenticate azure credentials on your local machine. Execute the following code in the command line to do that:
docker login pycaret.azurecr.ioYou will be prompted for a Username and password. The username is the name of your registry (in this example username is “pycaret”). You can find your password under the Access keys of the Azure Container Registry resource you created.

???? Step 9— Push Container onto Azure Container Registry
Now that you have authenticated to ACR, you can push the container you have created to ACR by executing the following code:
docker push pycaret.azurecr.io/pycaret-insurance:latestDepending on the size of the container, the push command may take some time to transfer the container to the cloud.
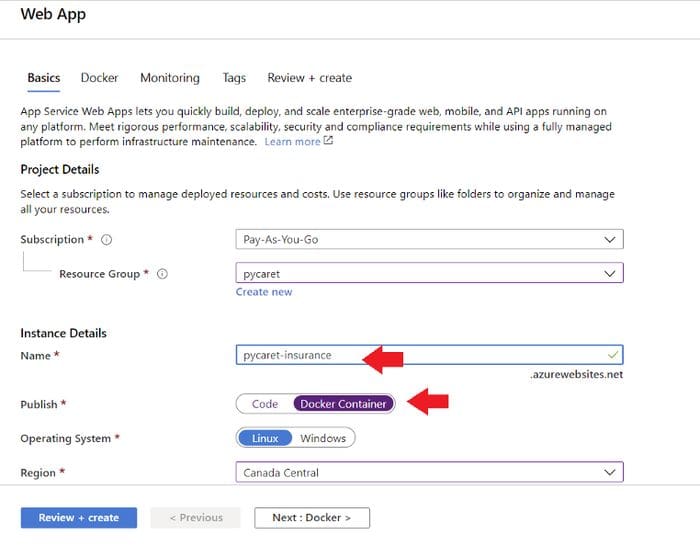
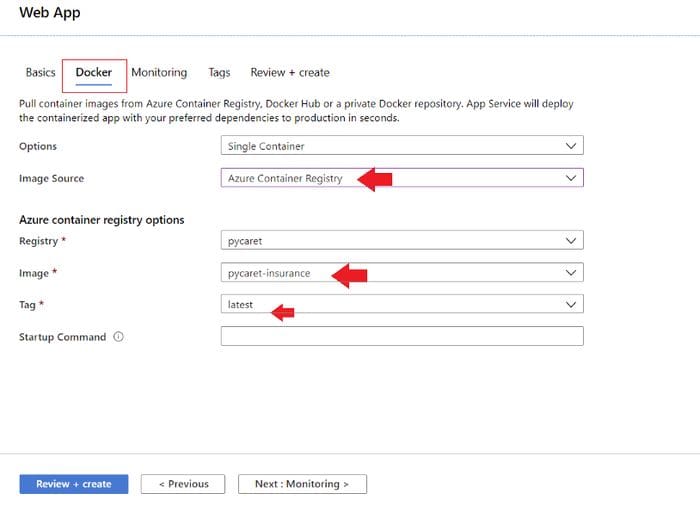
???? Step 10— Create a Azure Web App and see your model in action
To create a web app on Azure, follow these steps:
- Login on https://portal.azure.com.
- Click on Create a Resource.
- Search for Web App and click on Create.
- Link your ACR image that you pushed in (step 9 above) to your app.
BOOM!! The app is now up and running on Azure Web Services.

Note: By the time this story is published, the app from https://pycaret-insurance2.azurewebsites.net will be removed to restrict resource consumption.
Link to GitHub Repository for this tutorial.
Link to GitHub Repository for Heroku Deployment. (without docker)
Next Tutorial
In the next tutorial for deploying machine learning pipelines, we will dive deeper into deploying machine learning pipelines using the Kubernetes Service on Google Cloud and Microsoft Azure.
Follow our LinkedIn and subscribe to our Youtube channel to learn more about PyCaret.
Important Links
- User Guide / Documentation
- GitHub Repository
- Install PyCaret
- Notebook Tutorials
- Contribute in PyCaret
PyCaret 1.0.1 is coming!
We have received overwhelming support and feedback from the community. We are actively working on improving PyCaret and preparing for our next release. PyCaret 1.0.1 will be bigger and better. If you would like to share your feedback and help us improve further, you may fill this form on the website or leave a comment on our GitHub or LinkedIn page.
Want to learn about a specific module?
As of the first release 1.0.0, PyCaret has the following modules available for use. Click on the links below to see the documentation and working examples in Python.
- Classification
- Regression
- Clustering
- Anomaly Detection
- Natural Language Processing
- Association Rule Mining
Also see:
PyCaret getting started tutorials in Notebook:
- Clustering
- Anomaly Detection
- Natural Language Processing
- Association Rule Mining
- Regression
- Classification
Would you like to contribute?
PyCaret is an open source project. Everybody is welcome to contribute. If you would like contribute, please feel free to work on open issues. Pull requests are accepted with unit tests on dev-1.0.1 branch.
Please give us ⭐️ on our GitHub repo if you like PyCaret.
Medium : https://medium.com/@moez_62905/
LinkedIn : https://www.linkedin.com/in/profile-moez/
Twitter : https://twitter.com/moezpycaretorg1
Bio: Moez Ali is a Data Scientist, and is Founder & Author of PyCaret.
Original. Reposted with permission.
Related:
- Announcing PyCaret 1.0.0
- Build and deploy your first machine learning web app
- Machine Learning in Power BI using PyCaret