Build Your Own AutoML Using PyCaret 2.0
In this post we present a step-by-step tutorial on how PyCaret can be used to build an Automated Machine Learning Solution within Power BI, thus allowing data scientists and analysts to add a layer of machine learning to their Dashboards without any additional license or software costs.
By Moez Ali, Founder & Author of PyCaret

PyCaret 2.0
Last week we have announced PyCaret 2.0, an open source, low-code machine learning library in Python that automates machine learning workflow. It is an end-to-end machine learning and model management tool that speeds up machine learning experiment cycle and helps data scientists become more efficient and productive.
In this post we present a step-by-step tutorial on how PyCaret can be used to build an Automated Machine Learning Solution within Power BI, thus allowing data scientists and analysts to add a layer of machine learning to their Dashboards without any additional license or software costs. PyCaret is an open source and free to use Python library that comes with a wide range of functions that are built to work within Power BI.
By the end of this article you will learn how to implement the following in Power BI:
- Setting up Python conda environment and install pycaret==2.0.
- Link the newly created conda environment with Power BI.
- Build your first AutoML solution in Power BI and present the performance metrics on dashboard.
- Productionalize / deploy your AutoML solution in Power BI.
Microsoft Power BI
Power BI is a business analytics solution that lets you visualize your data and share insights across your organization, or embed them in your app or website. In this tutorial, we will use Power BI Desktop for machine learning by importing the PyCaret library into Power BI.
What is Automated Machine Learning?
Automated machine learning (AutoML) is the process of automating the time consuming, iterative tasks of machine learning. It allows data scientists and analysts to build machine learning models with efficiency while sustaining the model quality. The final goal of any AutoML solution is to finalize the best model based on some performance criteria.
Traditional machine learning model development process is resource-intensive, requiring significant domain knowledge and time to produce and compare dozens of models. With automated machine learning, you’ll accelerate the time it takes to get production-ready ML models with great ease and efficiency.
How Does PyCaret works?
PyCaret is a workflow automation tool for supervised and unsupervised machine learning. It is organized into six modules and each module has a set of functions available to perform some specific action. Each function takes an input and returns an output, which in most cases is a trained machine learning model. Modules available as of the second release are:
- Classification
- Regression
- Clustering
- Anomaly Detection
- Natural Language Processing
- Association Rule Mining
All modules in PyCaret supports data preparation (over 25+ essential preprocessing techniques, comes with a huge collection of untrained models & support for custom models, automatic hyperparameter tuning, model analysis and interpretability, automatic model selection, experiment logging and easy cloud deployment options.

To learn more about PyCaret, click here to read our official release announcement.
If you want to get started in Python, click here to see a gallery of example notebooks to get started.
“PyCaret is democratizing machine learning and the use of advanced analytics by providing free, open source, and low-code machine learning solution for business analysts, domain experts, citizen data scientists, and experienced data scientists”.
Before we start
If you are using Python for the first time, installing Anaconda Distribution is the easiest way to get started. Click here to download Anaconda Distribution with Python 3.7 or greater.
Setting up the Environment
Before we start using PyCaret’s machine learning capabilities in Power BI we need to create a virtual environment and install pycaret. This is a three-step process:
✅ Step 1 — Creating an anaconda environment
Open Anaconda Prompt from start menu and execute the following code:
conda create --name myenv python=3.7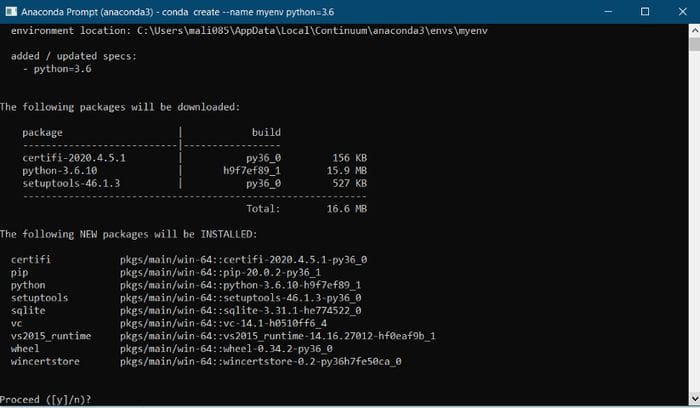
✅ Step 2 — Installing PyCaret
Execute the following code in Anaconda Prompt:
pip install pycaret==2.0Installation may take 15–20 minutes. If you are having issues with installation, please see our GitHub page for known issues and resolutions.
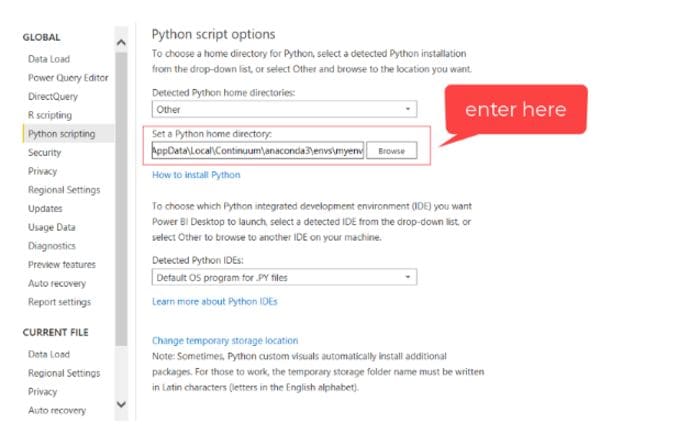
✅Step 3 — Setting up a Python Directory in Power BI
The virtual environment created must be linked with Power BI. This can be done using Global Settings in Power BI Desktop (File → Options → Global → Python scripting). Anaconda Environment by default is installed under:
C:\Users\username\AppData\Local\Continuum\anaconda3\envs\myenv
???? Lets get started
Setting the Business Context
An insurance company wants to improve its cash flow forecasting by better predicting the patient charges using the demographic and basic patient health risk metrics at the time of hospitalization.
Objective
To train and select the best performing regression model that predicts patient charges based on the other variables in the dataset i.e. age, sex, bmi, children, smoker, and region.
???? Step 1 — Load the dataset
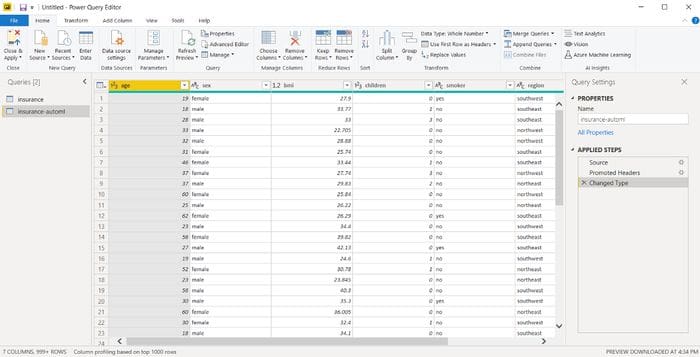
You can load dataset directly from out GitHub by going to Power BI Desktop → Get Data → Web
Link to dataset: https://raw.githubusercontent.com/pycaret/pycaret/master/datasets/insurance.csv

Create a duplicate dataset in Power Query:
???? Step 2— Run AutoML as Python Script
Run the following code in Power Query (Transform → Run Python script):
# import regression module
from pycaret.regression import *# init setup
reg1 = setup(data=dataset, target = 'charges', silent = True, html = False)# compare models
best_model = compare_models()# finalize best model
best = finalize_model(best_model)# save best model
save_model(best, 'c:/users/moezs/best-model-power')# return the performance metrics df
dataset = pull()
The first two line of code is for importing the relevant module and initializing the setup function. The setup function performs several imperative steps required in machine learning such as cleaning missing values (if any), splitting the data into train and test, setting up cross validation strategy, defining metrics, performing algorithm-specific transformations etc.
The magic function that trains multiple models, compares and evaluates performance metrics is compare_models. It returns the best model based on ‘sort’ parameter that can be defined inside compare_models. By default, it uses ‘R2’ for regression use-case and ‘Accuracy’ for classification use-case.
Rest of the lines are for finalizing the best model returned through compare_models and saving it as a pickle file in your local diretory. Last line returns the dataframe with details of model trained and their performance metrics.
Output:
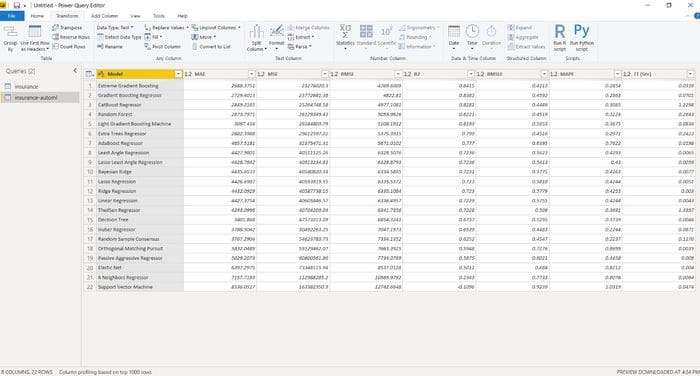
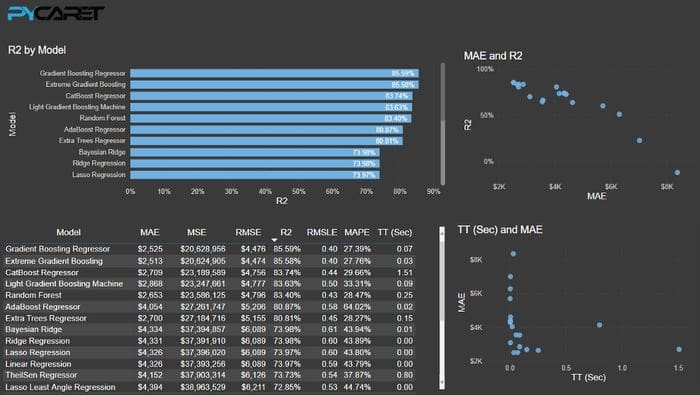
With just few lines we have trained over 20 models and the table presents the performance metrics based on 10 fold cross validation.
Top performing model Gradient Boosting Regressor will be saved along with the entire transformation pipeline as a pickle file in your local directory. This file can be consumed later to generate predictions on a new dataset (see step 3 below).
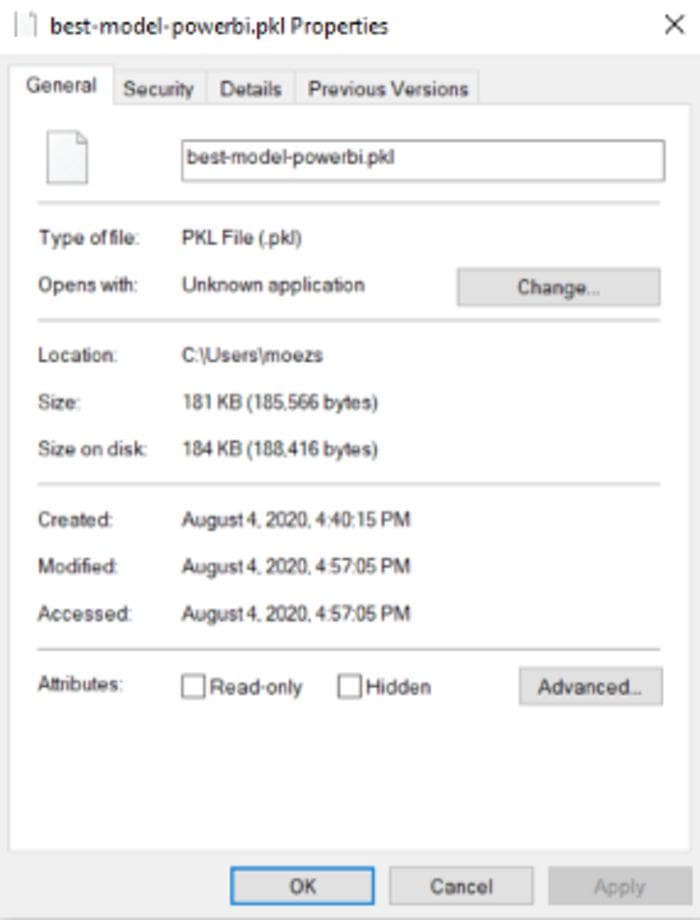
PyCaret works on the idea of modular automation. As such if you have more resources and time for training you can extend the script to perform hyperparameter tuning, ensembling, and other available modeling techniques. See example below:
# import regression module
from pycaret.regression import *# init setup
reg1 = setup(data=dataset, target = 'charges', silent = True, html = False)# compare models
top5 = compare_models(n_select = 5)
results = pull()# tune top5 models
tuned_top5 = [tune_model(i) for i in top5]# select best model
best = automl()# save best model
save_model(best, 'c:/users/moezs/best-model-power')# return the performance metrics df
dataset = results
We have now returned top 5 models instead of the one highest performing model. We have then created a list comprehension (loop) to tune hyperparameters of top candidate models and then finally automl function selects the single best performing model which is then saved as a pickle file (Note that we didn’t use finalize_model this time because automl function returns the finalized model).
Sample Dashboard
Sample dashboard is created. PBIX file is uploaded here.
???? Step 3 — Deploy Model to generate predictions
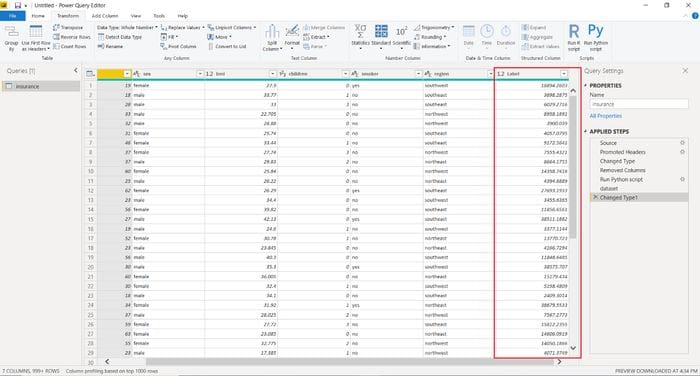
Once we have a final model saved as a pickle file we can use it to predict charges on the new dataset.
Loading new dataset
For demonstration purposes, we will load the same dataset again and remove the ‘charges’ column from the dataset. Execute the following code as a Python script in Power Query to get the predictions:
# load functions from regression module
from pycaret.regression import load_model, predict_model# load model in a variable
model = load_model(‘c:/users/moezs/best-model-powerbi’)# predict charges
dataset = predict_model(model, data=dataset)
Output :
Deploy on Power BI Service
When you publish a Power BI report with Python scripts to the service, these scripts will also be executed when your data is refreshed through the on-premises data gateway.
To enable this, you must ensure that the Python runtime with the dependent Python packages are also installed on the machine hosting your personal gateway. Note, Python script execution is not supported for on-premises data gateways shared by multiple users. Click here to read more about this.
PBIX files used in this tutorial is uploaded on this GitHub Repository: https://github.com/pycaret/pycaret-powerbi-automl
If you would like to learn more about PyCaret 2.0, read this announcement.
If you have used PyCaret before, you might be interested in release notes for current release.
There is no limit to what you can achieve using this light-weight workflow automation library in Python. If you find this useful, please do not forget to give us ⭐️ on our github repo.
To hear more about PyCaret follow us on LinkedIn and Youtube.
You may also be interested it:
Machine Learning in Power BI using PyCaret
Build your first Anomaly Detector in Power BI using PyCaret
How to implement Clustering in Power BI using PyCaret
Topic Modeling in Power BI using PyCaret
Important Links
Want to learn about a specific module?
Click on the links below to see the documentation and working examples.
Bio: Moez Ali is a Data Scientist, and is Founder & Author of PyCaret.
Original. Reposted with permission.
Related:
- GitHub is the Best AutoML You Will Ever Need
- 5 Things You Don’t Know About PyCaret
- Deploy a Machine Learning Pipeline to the Cloud Using a Docker Container


