Binary Classification with Automated Machine Learning
Check out how to use the open-source MLJAR auto-ML to build accurate models faster.
The rise of automated machine learning tools has enabled developers to build accurate machine learning models faster. These tools reduce the work of an engineer by performing feature engineering, algorithm selection, and tuning as well as documenting the model. One such library is the open-source MLJAR package. In this article, let’s take a look at how you can use the package for binary classification.
Getting started
The MLJAR package can be used to build a complete machine learning pipeline with feature engineering and hyperparameter tuning. The package also supports popular machine learning algorithms including:
- Neural networks
- XGBoost
- Catboost
- LightGBM and many more.
MLJAR builds several models depending on the algorithms selected and obtaining the final predictions via ensembling or stacking the models. Once training is done the package also provides visualizations that can be used to explain the models. Some of these include feature importance as well as a leaderboard that shows the performance of the various models.
In order to start using the package, you will need to install it via pip.
pip install mljar-supervised
Obtaining the data
For this illustration, let’s use Scikit-learn to create a classification dataset. This can be done using the make_classification function from the datasets module.
from sklearn.datasets import make_classification
X, y = make_classification(n_samples=100000, n_features=20, n_redundant=2)
The next step is to split this dataset into a training and a testing set.
from sklearn.model_selection import train_test_split
X_train, X_test, y_train, y_test = train_test_split( X, y, test_size=0.3)
Using MLJAR for binary classification
Surprisingly, using MLJAR for binary classification only requires a couple of lines of code. MLJAR takes care of all the machine learning magic behind the scenes. The first step here is to import the AutoML class.
from supervised.automl import AutoML
The next step is to create an instance of the class while specifying the algorithms you would like to use for the problem. Other parameters that one can set include:
- mode — the package ships with four built-in models. The
Explainmode is ideal for explaining and understanding the data. It results in visualizations of feature importance as well as tree visualizations. ThePerformis used when building ML models for production. TheCompeteis meant to build models used in machine learning competitions. TheOptunamode is used to search for highly-tuned ML models. - algorithms — specifies the algorithms you would like to use. They are usually passed in as a list.
- results_path — the path where the results will be stored
- total_time_limit — the total time in seconds for training the model
- train_ensemble — dictates if an ensemble will be created at the end of the training process
- stack_models — determines if a models stack will be created
- eval_metric — the metric that will be optimized. If
autotheloglossis used for classification problems while thermseis used for regression problems
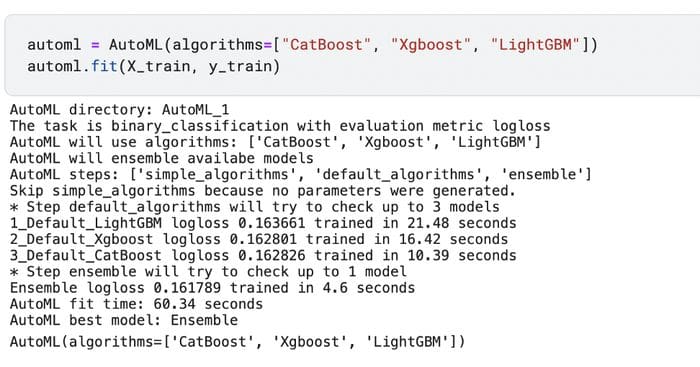
automl = AutoML(algorithms=["CatBoost", "Xgboost", "LightGBM"])
The next step is to fit the algorithm on the training and test set.
automl.fit(X_train, y_train)
MLJAR Explanations
Once the model is fitted, you can use the report function to obtain various model explanations. For example, you can see the leaderboard for the models that were fitted in this binary classification problem.
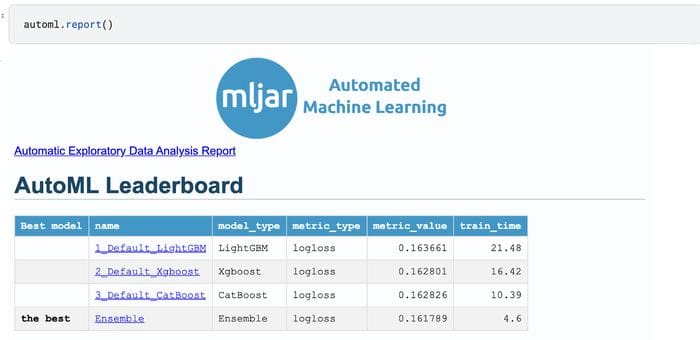
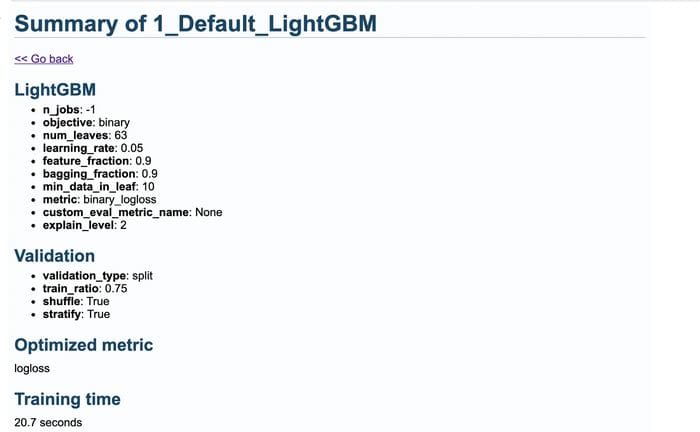
When you click on the individual models, you will also see several visualizations and a summary of the model.
For example, you will see the confusion matrix.

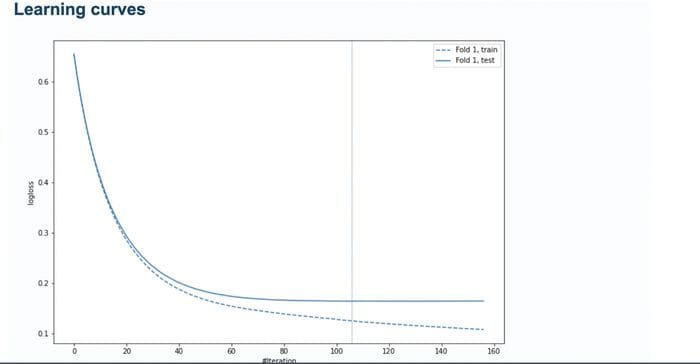
MLJAR will also show the learning curves of the training process by default. The learning curves are plotted for validation and training sets. The vertical line shows the optimal iteration number and is used while making predictions.
You can also find the importance of the features from the report. Here’s the permutation importance for example. It is computed using Sckit-learn’s permutation importance.

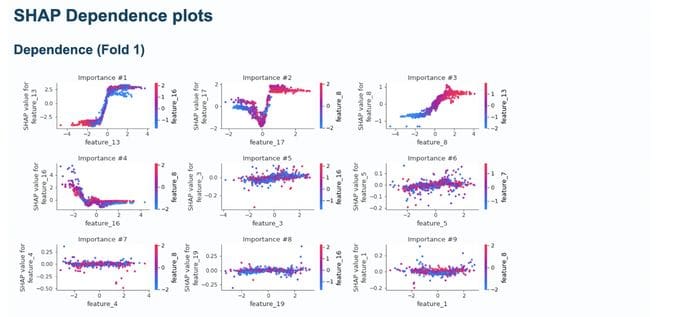
MLJAR also plots SHAP importance.

It also shows SHAP importance Dependence plots.
The MLJAR magic
There are a couple of things that happen behind the scenes when training a model with MLJAR. The training of the machine learning model happens in several steps. These steps entail:
- training of simple algorithms such as Decision Trees in order to get quick insights.
- training of models with default hyperparameters. Here one model is fitted for each algorithm.
- performing a random search over the given hyperparameters.
- construction of new features from the original data so to give the model more predictive power. MLJAR refers to these features as golden features. These features can be found in a file known as
golden_features.jsonin the results path. These features are added to the data and a new model is trained using the Xgboost, CatBoost, and LightGBM algorithms. - the best model obtained for each algorithm is selected and its hyperparameters are used to train a new model based on a set of selected features.
- models are tuned further and later ensembled.
Why would you use MLJAR
There are a couple of reasons why one would consider using MLJAR in their machine learning workflow:
- it performs feature preprocessing such as imputation of missing values and converting of categoricals
- performs advanced feature engineering
- capable of transforming time and date
- performs hyperparameter tuning
- provides extensive models explanations and visualizations
- creates Markdown reports for every experiment you run
Final thoughts
In this article, you have seen how to build binary classification models MLJAR auto-ML. You have seen that the process takes just a couple of steps. You have also seen that MLJAR auto-ML uses multiple algorithms to build multiple models for the classification problem. The next step here is for you to use the package on your own binary classification dataset.
Bio: Derrick Mwiti is a data scientist who has a great passion for sharing knowledge. He is an avid contributor to the data science community via blogs such as Heartbeat, Towards Data Science, Datacamp, Neptune AI, KDnuggets just to mention a few. His content has been viewed over a million times on the internet. Derrick is also an author and online instructor. He also trains and works with various institutions to implement data science solutions as well as to upskill their staff. You might want to check his Complete Data Science & Machine Learning Bootcamp in Python course.
Original. Reposted with permission.
Related:
- Automated Machine Learning in Python
- Machine Learning Pipeline Optimization with TPOT
- The Best Machine Learning Frameworks & Extensions for TensorFlow