
Orchestrate a Data Science Project in Python With Prefect
Learn how to optimize your data science workflow in a few lines of code.
Motivation
As a data scientist, why should you care about optimizing your data science workflow? Let’s start with an example of a basic data science project.
Imagine you were working with an Iris dataset. You started with building functions to process your data.
After defining the functions, you execute them.
Your code ran fine, and you saw nothing wrong with the output, so you think the workflow is good enough. However, there can be many disadvantages with a linear workflow like above.

Image by Author
The disadvantages are:
- If there is an error in the function
get_classes, the output produced by the functionencode_categorical_columnswill be lost, and the workflow will need to start from the beginning. This can be frustrating if it takes a long time to execute the functionencode_categorical_columns.
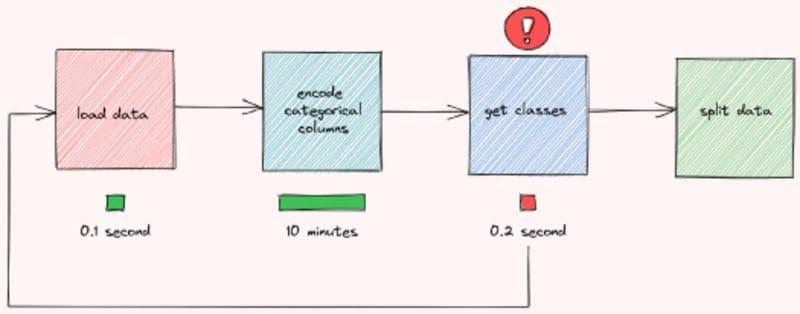
Image by Author
- Since the functions
encode_categorical_columnsandget_classesare not dependent on each other, they can be executed at the same time to save time:

Image by Author
Running the functions this way can also prevent wasting unnecessary time on functions that don’t work. If there is an error in the function get_classes , the workflow will restart right away without waiting for the function encode_categorical_columns to finish.
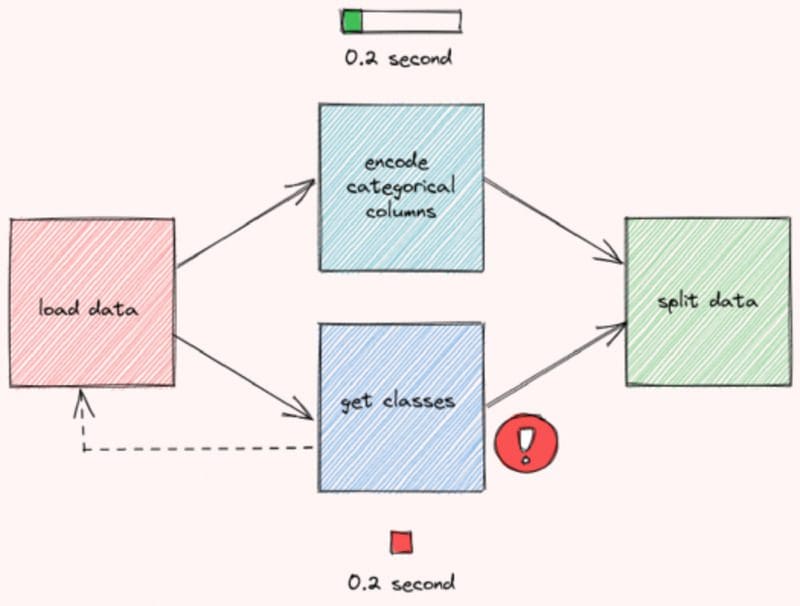
Image by Author
Now, you might agree with me that it is important to optimize the workflow of different functions. However, it can be a lot of works to manually manage the workflow.
Is there a way that you can automatically optimize the workflow by adding only several lines of code? That is when Prefect comes in handy.
What is Prefect?
Prefect is an open-sourced framework to build workflows in Python. Prefect makes it easy to build, run, and monitor data pipelines at scale.
To install Prefect, type:
pip install prefect
Build Your Workflow with Prefect
To learn how Prefect works, let’s encapsulate the workflow at the beginning of the article with Prefect.
First Step — Create Tasks
A Task is a discrete action in a Prefect flow. Start with turning the functions defined above into tasks using the decorator prefect.task :
Second Step — Create a Flow
A Flow represents the entire workflow by managing the dependencies between tasks. To create a flow, simply insert the code to run your functions inside the with Flow(...) context manager.
Note that none of these tasks are executed when running the code above. Prefect allows you to either run the flow right away or schedule for later.
Let’s try to execute the flow right away using flow.run():
Running the code above will give you the output similar to this:
To understand the workflow created by Prefect, let’s visualize the entire workflow.
Start with installing prefect[viz] :
pip install "prefect[viz]"
Then add the method visualize to the code:
And you should see the visualization of the data-engineer workflow like below!
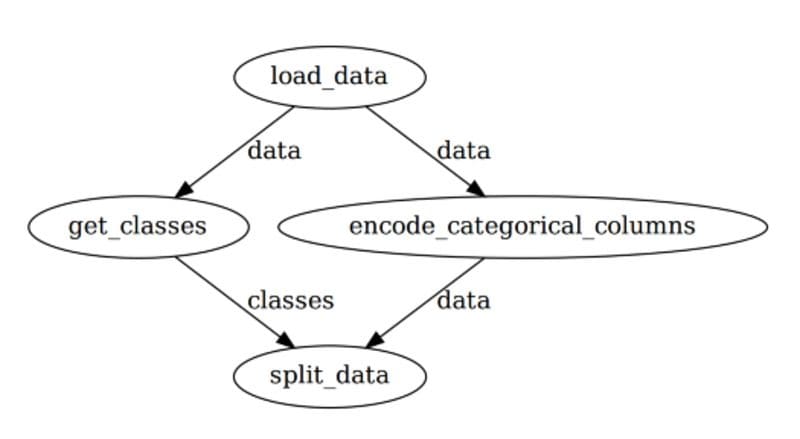
Image by Author
Note that Prefect automatically manages the orders of execution among tasks so that the workflow is optimized. This is pretty cool for a few additional pieces of code!
Third step — Add Parameters
If you find yourself frequently experimenting with different values of one variable, it’s ideal to turn that variable into a Parameter.
You can consider a Parameter as a Task , except that it can receive user inputs whenever a flow is run. To turn a variable into a parameter, simply use task.Parameter .
The first argument of Parameter specifies the name of the parameter. default is an optional argument that specifies the default value of the parameter.
Running flow.visualize again will give us an output like below:
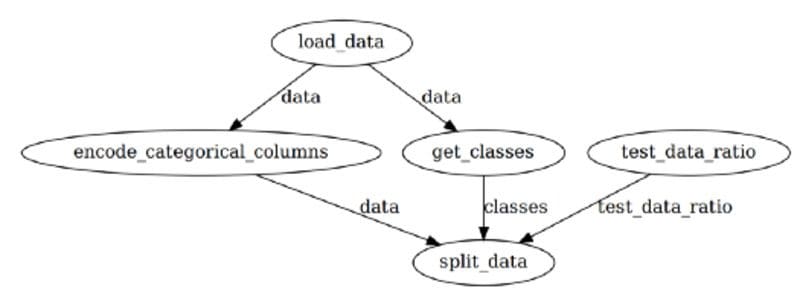
Image by Author
You can overwrite the default parameter for each run by:
- adding the argument
parameterstoflow.run():
- or using Prefect CLI:
- or using a JSON file:
Your JSON file should look similar to this:
You can also change parameters for each run using Prefect Cloud, which will be introduced in the next section.
Monitor Your Workflow
Overview
Prefect also allows you to monitor your workflow in Prefect Cloud. Follow this instruction to install relevant dependencies for Prefect Cloud.
After all of the dependencies are installed and set up, start with creating a project on Prefect by running:
$ prefect create project "Iris Project"
Next, start a local agent to deploy our flows locally on a single machine:
$ prefect agent local start
Then add:
...at the end of your file.
After running the file, you should see something similar to the below:
Click the URL in the output, and you will be redirected to an Overview page. The Overview page shows the version of your flow, when it is created, the flow’s run history, and its runs summary.

Image by Author
You can also view the summary of other runs, when they are executed, and their configurations.
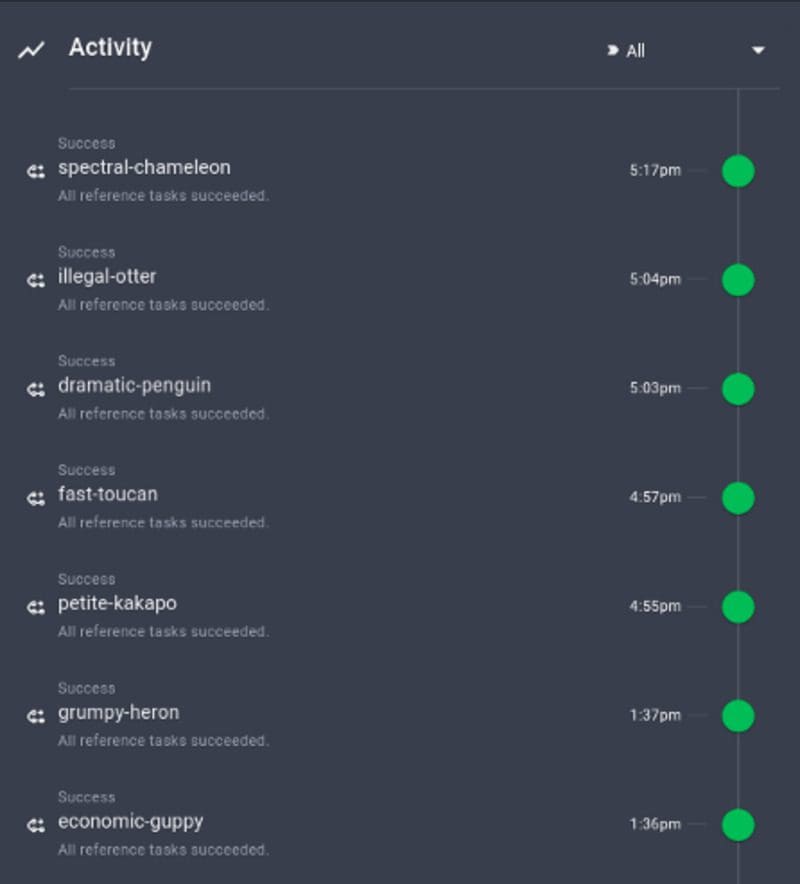
Image by Author
It is pretty cool how these important pieces of information are automatically tracked by Perfect!
Run the Workflow with Default Parameters
Note that the workflow is registered to Prefect Cloud, but it is not executed yet. To execute the workflow with the default parameters, click Quick Run in the top right corner.
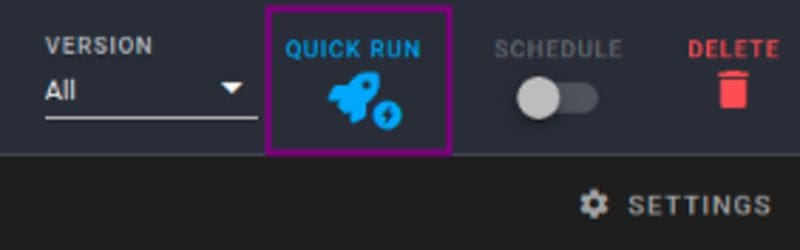
Image by Author
Click the run that is created. Now you will be able to see the activity for your new flow run in real-time!
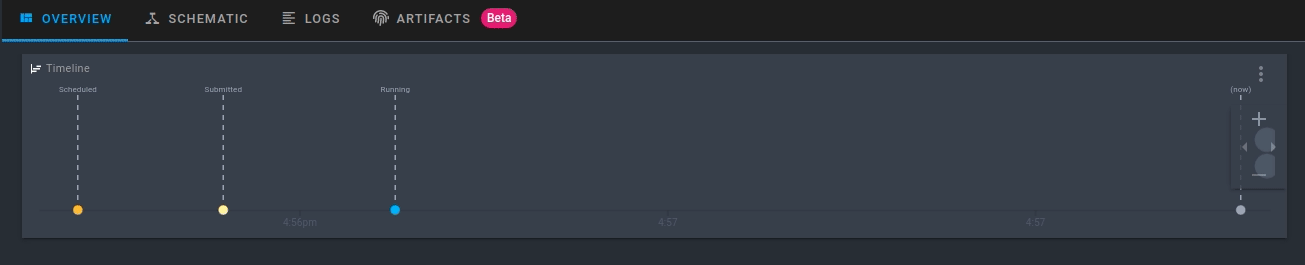
Image by Author
Run the Workflow with Custom Parameters
To run the workflow with custom parameters, click the Run tab, then change the parameters under Inputs.
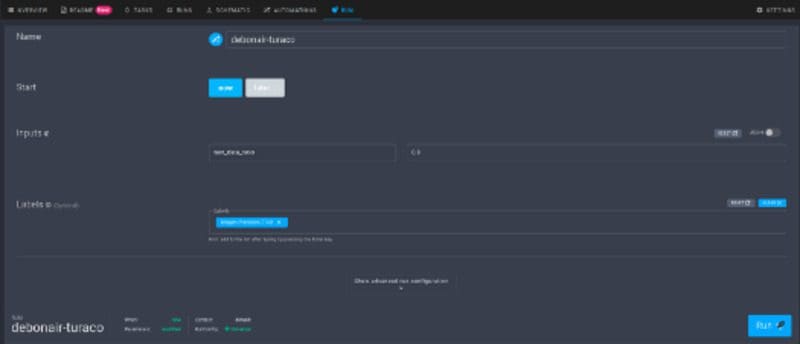
Image by Author
When you are satisfied with the parameters, simply click the Run button to start the run.
View the Graph of the Workflow
Clicking Schematic will give you the graph of the entire workflow.
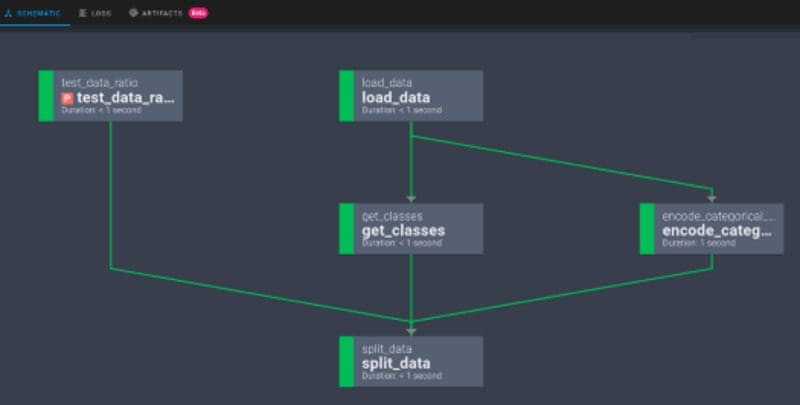
Image by Author
Other Features
Besides some basic features mentioned above, Prefect also provides some other cool features that will significantly increase the efficiency of your workflow.
Input Caching
Remember the problem we mentioned at the beginning of the article? Normally, if the function get_classes fails, the data created by the function encode_categorical_columns will be discarded and the entire workflow needs to start from the beginning.
However, with Prefect, the output of encode_categorical_columns is stored. Next time when the workflow is rerun, the output of encode_categorical_columns will be used by the next task without rerunning the task encode_categorical_columns .
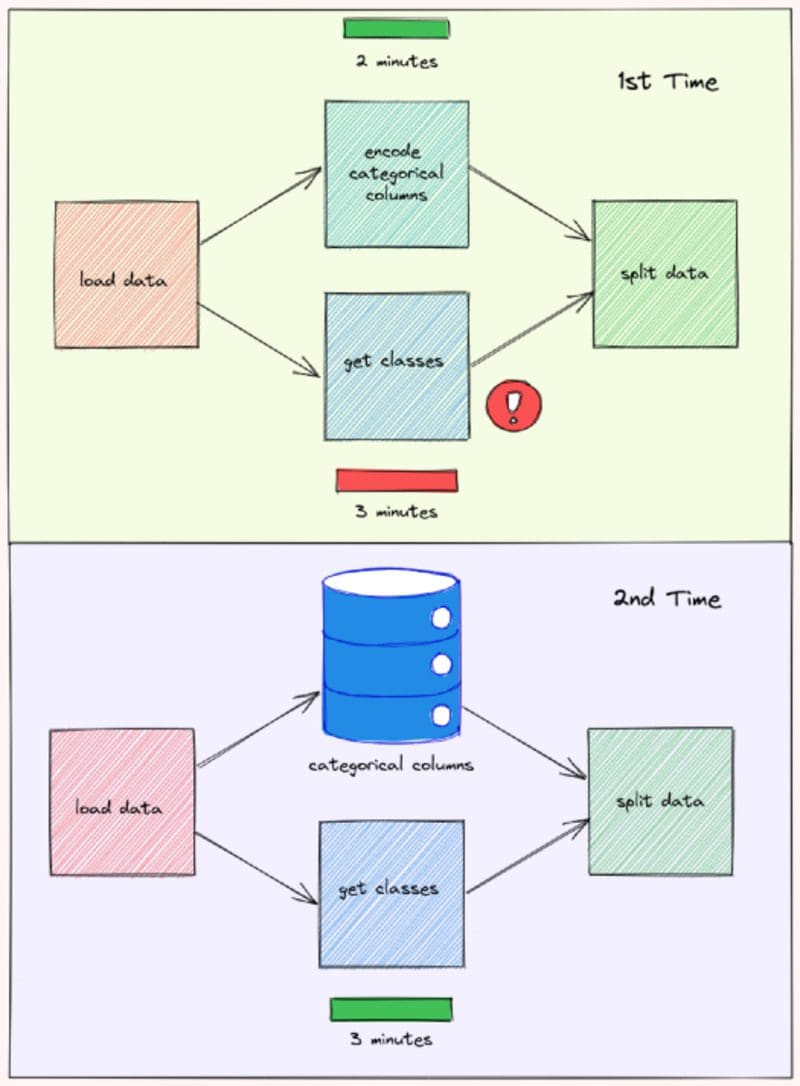
Image by Author
This can result in a huge decrease in the time it takes to run the workflow.
Persist Output
Sometimes, you might want to export your task’s data to an external location. This can be done by inserting to the task function the code to save the data.
However, doing that will make it difficult to test the function.
Prefect makes it easy to save the output of a task for each run by:
- setting the checkpoint to
True
$ export PREFECT__FLOWS__CHECKPOINTING=true
- and adding
result = LocalResult(dir=...))to the decorator@task.
Now the output of the task split_data will be saved to the directory data/processed ! The name will look something similar to this:
prefect-result-2021-11-06t15-37-29-605869-00-00
If you want to customize the name of your file, you can add the argument target to @task :
Prefect also provides other Result classes such as GCSResult and S3Result . You can check out API docs for results here.
Use Output of Another Flow for the Current Flow
If you are working with multiple flows, for example, data-engineer flow and data-science flow, you might want to use the output of the data-engineer flow for the data-science flow.

Image by Author
After saving the output of your data-engineer flow as a file, you can read that file using the read method:
Connect Dependent Flows
Imagine this scenario: You created two flows that depend on each other. The flow data-engineer needs to be executed before the flow data-science
Somebody who looked at your workflow didn’t understand the relationship between these two flows. As a result, they executed the flow data-science and the flow data-engineer at the same time and encountered an error!
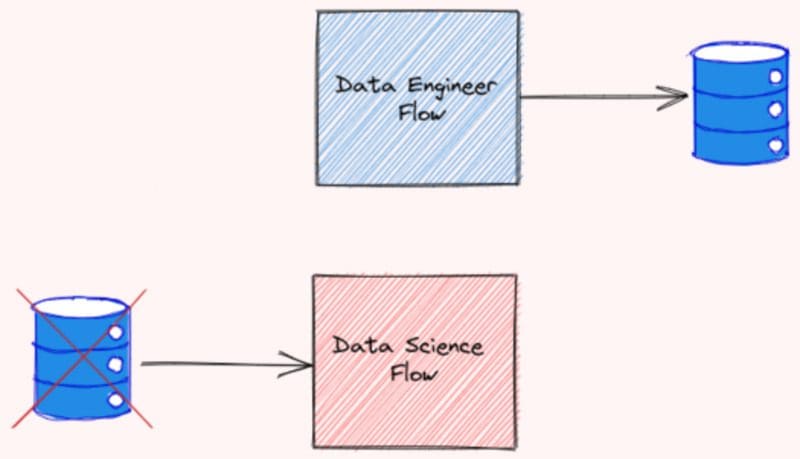
Image by Author
To prevent this from happening, we should specify the relationship between flows. Luckily, Prefect makes it easier for us to do so.
Start with grabbing two different flows using StartFlowRun . Add wait=True to the argument so that the downstream flow is executed only after the upstream flow finishes executing.
Next, calling data_science_flow under the with Flow(...) context manager. Use upstream_tasks to specify the tasks/flows that will be executed before the data-science flow is executed.
Now the two flows are connected like below:
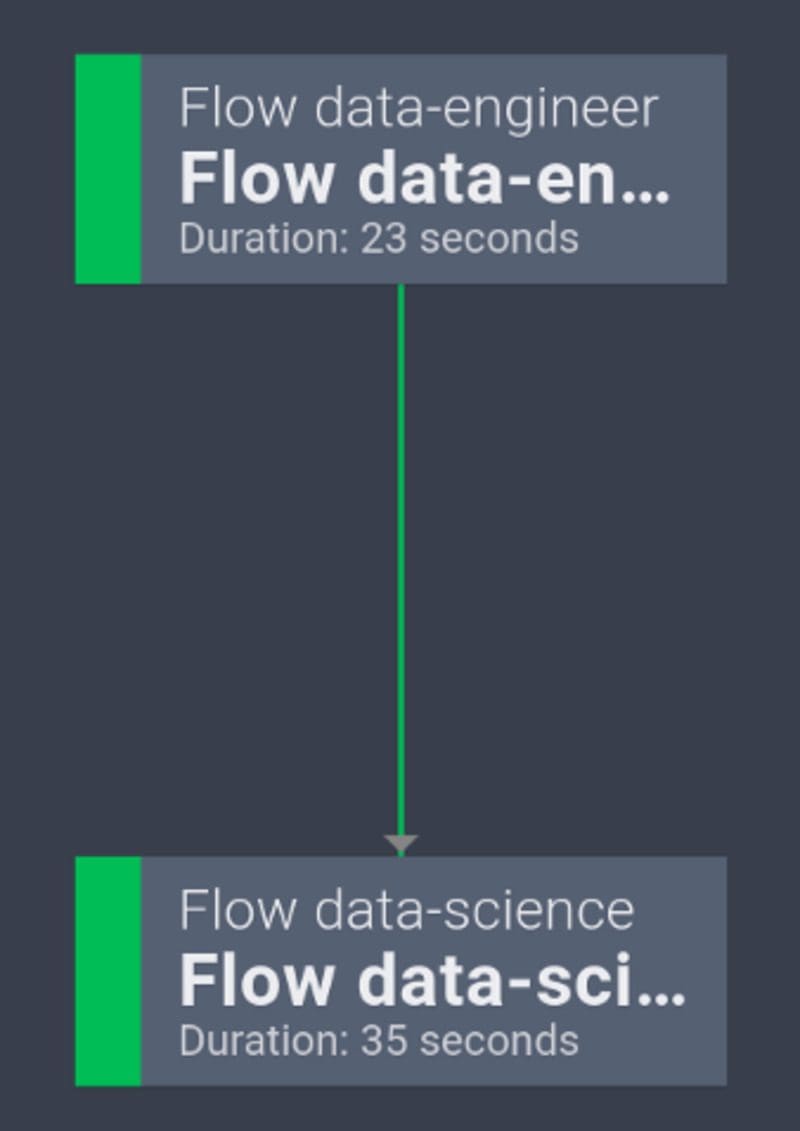
Image by Author
Pretty cool!
Schedule Your Flow
Prefect also makes it seamless to execute a flow at a certain time or at a certain interval.
For example, to run a flow every 1 minute, you can initiate the class IntervalSchedule and add schedule to the with Flow(...) context manager:
Now your flow will be rerun every 1 minute!
Learn more about different ways to schedule your flow here.
Logging
You can log the print statements within a task by simply adding log_stdout=True to @task :
And you should see an output like below when executing the task:
[2021-11-06 11:41:16-0500] INFO - prefect.TaskRunner | Model accuracy on test set: 93.33
Conclusion
Congratulations! You have just learned how Prefect can optimize your data science workflow in a few lines of Python code. Small optimization in your code can result in a huge increase in efficiency in the long run.
Feel free to play and fork the source code of this article here.
I like to write about basic data science concepts and play with different data science tools. You could connect with me on LinkedIn and Twitter.
Star this repo if you want to check out the codes for all of the articles I have written. Follow me on Medium to stay informed with my latest data science articles like these:
- Great Expectations: Always Know What to Expect From Your Data
- Kedro — A Python Framework for Reproducible Data Science Project
- Introduction to Weight & Biases: Track and Visualize your Machine Learning Experiments in 3 Lines…
- Introduction to Datapane: A Python Library to Build Interactive Reports
Khuyen Tran is a prolific data science writer, and has written an impressive collection of useful data science topics along with code and articles. She has shared over 400 tips about data science and Python on Data Science Simplified. Subscribe to her newsletter to receive her daily tips.
Original. Reposted with permission.