Here’s A Little Secret
If you want to analyze how fast 19 sparse BERT models perform inference, you’ll only need a YAML file and 16GB of RAM to find out. And spoiler alert:
… they run on CPUs.
… and they’re super fast!
The latest feature from Neural Magic’s DeepSparse repo is the DeepSparse Server! And the objective of this article is to show not only how seamless it is to serve up to 19 sparse BERT models, but how much the impact of sparsity has on model performance. For a bit of background, sparsification is the process of taking a trained deep learning model and removing redundant information from the over-parameterized network resulting in a faster and smaller model. And for this demo, we’ll be using various BERT models and loading them for inference to show the trade-off between accuracy and speed relative to the model’s sparsification.
The DeepSparse Server is built on top of our DeepSparse Engine and the popular FastAPI web framework allowing anyone to deploy sparse models in production with GPU-class speed but on CPUs! With the DeepSparse Engine, we can integrate into popular deep learning libraries (e.g., Hugging Face, Ultralytics) allowing you to deploy sparse models with ONNX.
As previously mentioned, all of the configuration required to run your models in production only requires a YAML file and a small bit of memory (thanks to sparsity). To get quickly started with serving four BERT models trained on the question answering task, this is what the config YAML file would look like:
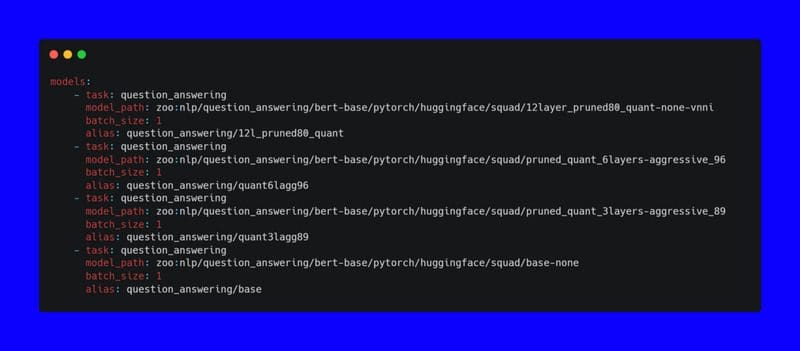
config.yaml
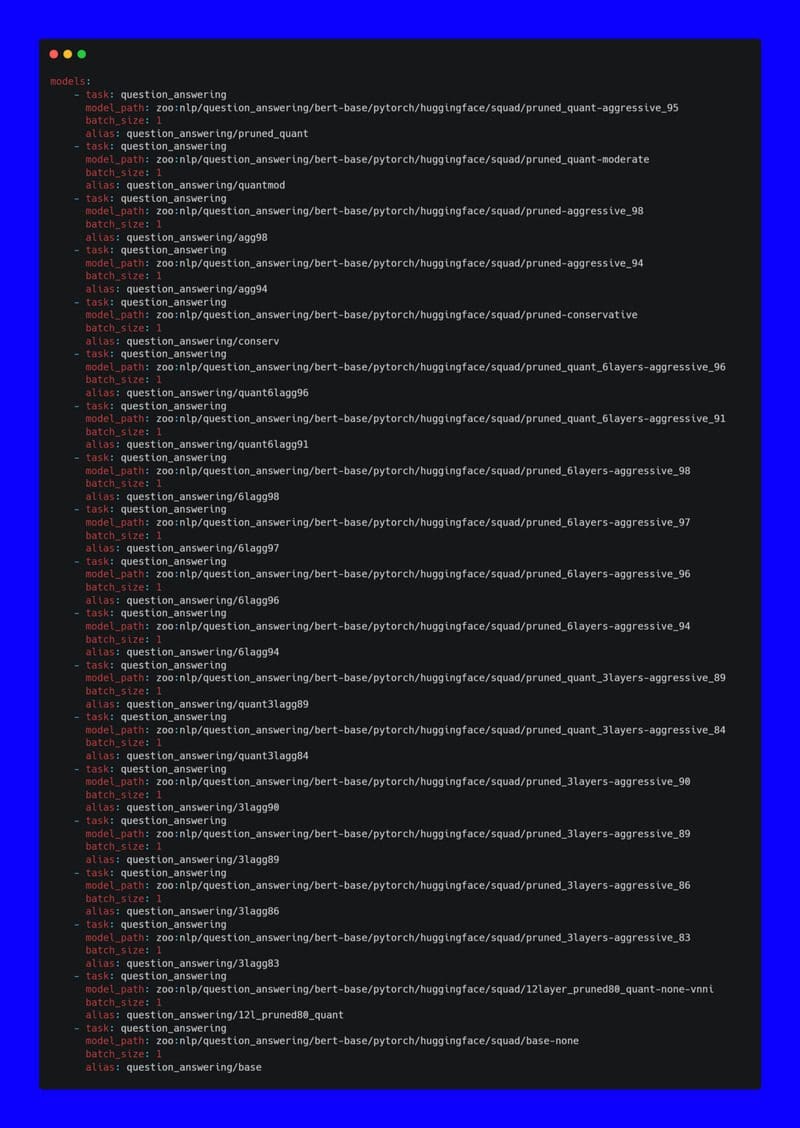
If you want to go big and load all of the 19 Neural Magic sparse BERT models: this is what the config file would look like ??:
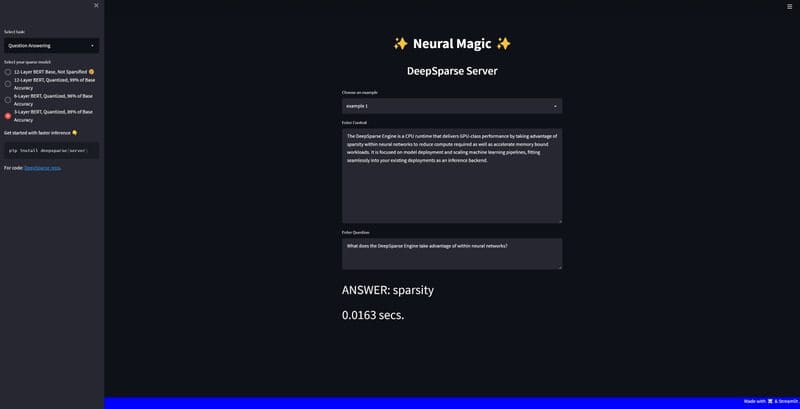
For ease of use, we’ve built a demo on top of Streamlit for anyone to demo the server and models for the question answering task in NLP. In order to test 19 models simultaneously, the app was tested on a virtual machine on the Google Cloud Platform.
To give some grounding on what I used for computing in my tests, here are the deets:
Specs:
  - Cloud Vendor: Google Cloud Platform
  - Instance:     c2-standard-4
  - CPU Type:     Intel Cascade Lake
  - Num of vCPUs: four
  - RAM:          16GB
Keep in mind that bare-metal machines will actually perform faster under the same computing constraints described in this article. However, since the models are already super fast, I feel comfortable showing their speed via virtualization.
We not only strongly encourage you to run the same tests on a VM for benchmarking performance but also so you’ll have the RAM required to load all 19 BERTs into memory, otherwise you’ll get this ??:
If you prefer to get started quickly on a local machine without worrying about out-of-memory problems, you should try only loading a few models into memory. And the code below will show you how to do exactly this with 4 models (even though most sparse models are super light and you can possibly add more at your discretion).
Getting Started With The SparseServer.UI
We split our app into separate server and client directories. The server directory holds the YAML files for loading the models and the client has the logic for the Streamlit app:
~sparseserver-ui/
         |__client/
            |__app.py
            |__pipelineclient.py
            |__samples.py
            |__settings.py
         |__server/
            |__big-config.yaml
            |__config.yaml
         |__requirements.txt
         |__README.md
1. Clone the DeepSparse repo:
>>> git clone https://github.com/neuralmagic/deepsparse.git
2. Install the DeepSparse Server and Streamlit:
>>> cd deepsparse/examples/sparseserver-ui>>> pip install -r requirements.txt
Before we run the server, you can configure the host and port parameters in our startup CLI command. If you choose to use the default settings, it will run the server on localhost and port 5543 . For more info on the CLI arguments run:
>>> deepsparse.server --help
3. Run the DeepSparse Server:
Ok! It’s time to serve all of the models defined in the config.yaml. This YAML file will download the four models from Neural Magic’s SparseZoo ??.
>>> deepsparse.server --config_file server/config.yaml
After downloading the models and your server is up and running, open a second terminal to test out the client.
If you altered the host and port configuration when you first ran the server, please adjust these variables in the pipelineclient.py module as well.
4. Run the Streamlit Client:
>>> streamlit run client/app.py --browser.serverAddress="localhost"
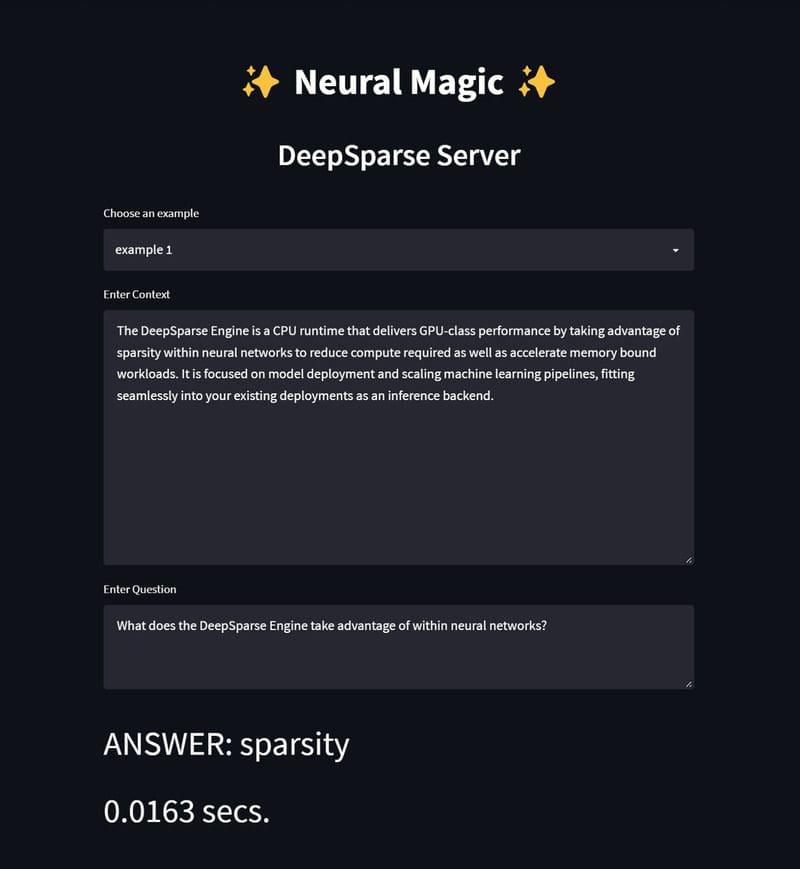
That’s it! Click on the URL in your terminal, and you are ready to start interacting with the demo. You can choose examples from a list, or you can add your own context and question.
In the future, we’ll be expanding the number of NLP tasks outside of just question answering so you get a wider scope in performance with sparsity.
For the full code: check out the SparseServer.UI …
…and don’t forget to give the DeepSparse repo a GitHub ⭐!
Ricky Costa is focused on User Interface at Neural Magic.
Original. Reposted with permission.