A Guide to Kedro: Your Production-Ready Data Science Toolbox
This article introduces and explores Kedro's main features, guiding you through its core concepts for a better understanding before diving deeper into this framework for addressing real data science projects.
Image by Editor
# Introduction
Data science projects usually begin as exploratory Python notebooks but need to be moved to production settings at some stage, which might be tricky if not planned carefully.
QuantumBlack's framework, Kedro, is an open-source tool that bridges the gap between experimental notebooks and production-ready solutions by translating concepts surrounding project structure, scalability, and reproducibility into practice.
This article introduces and explores Kedro's main features, guiding you through its core concepts for a better understanding before diving deeper into this framework for addressing real data science projects.
# Getting Started With Kedro
The first step to use Kedro is, of course, to install it in our running environment, ideally an IDE — Kedro cannot be fully leveraged in notebook environments. Open your favorite Python IDE, for instance, VS Code, and type in the integrated terminal:
pip install kedro
Next, we create a new Kedro project using this command:
kedro new
If the command works well, you'll be asked a few questions, including a name for your project. We will name it Churn Predictor. If the command doesn't work, it might be because of a conflict related to having multiple Python versions installed. In that case, the cleanest solution is to work in a virtual environment within your IDE. These are some quick workaround commands to create one (ignore them if the previous command to create a Kedro project already worked!):
python3.11 -m venv venv

source venv/bin/activate

pip install kedro

kedro --version
Then select in your IDE the following Python interpreter to work on from now onwards: ./venv/bin/python.
At this point, if everything worked well, you should have on the left-hand side (in the 'EXPLORER' panel in VS Code) a full project structure inside churn-predictor. In the terminal, let's navigate to our project's main folder:
cd churn-predictor/
Time to get a glimpse of Kedro's core features through our newly created project.
# Exploring the Core Elements of Kedro
The first element we will introduce — and create by ourselves — is the data catalog. In Kedro, this element is responsible for isolating data definitions from the main code.
There's already an empty file created as part of the project structure that will act as the data catalog. We just need to find it and populate it with content. In the IDE explorer, inside the churn-predictor project, go to conf/base/catalog.yml and open this file, then add the following:
raw_customers:
  type: pandas.CSVDataset
  filepath: data/01_raw/customers.csv

processed_features:
  type: pandas.ParquetDataset
  filepath: data/02_intermediate/features.parquet

train_data:
  type: pandas.ParquetDataset
  filepath: data/02_intermediate/train.parquet

test_data:
  type: pandas.ParquetDataset
  filepath: data/02_intermediate/test.parquet

trained_model:
  type: pickle.PickleDataset
  filepath: data/06_models/churn_model.pkl
In a nutshell, we have just defined (not created yet) five datasets, each one with an accessible key or name: raw_customers, processed_features, and so on. The main data pipeline we will create later should be able to reference these datasets by their name, hence abstracting and completely isolating input/output operations from the code.
We will now need some data that acts as the first dataset in the above data catalog definitions. For this example, you can take this sample of synthetically generated customer data, download it, and integrate it into your Kedro project.
Next, we navigate to data/01_raw, create a new file called customers.csv, and add the content of the example dataset we will use. The easiest way is to see the "Raw" content of the dataset file in GitHub, select all, copy, and paste into your newly created file in the Kedro project.
Now we will create a Kedro pipeline, which will describe the data science workflow that will be applied to our raw dataset. In the terminal, type:
kedro pipeline create data_processing
This command creates several Python files inside src/churn_predictor/pipelines/data_processing/. Now, we will open nodes.py and paste the following code:
import pandas as pd
from typing import Tuple

def engineer_features(raw_df: pd.DataFrame) -> pd.DataFrame:
    """Create derived features for modeling."""
    df = raw_df.copy()
    df['tenure_months'] = df['account_age_days'] / 30
    df['avg_monthly_spend'] = df['total_spend'] / df['tenure_months']
    df['calls_per_month'] = df['support_calls'] / df['tenure_months']
    return df

def split_data(df: pd.DataFrame, test_fraction: float) -> Tuple[pd.DataFrame, pd.DataFrame]:
    """Split data into train and test sets."""
    train = df.sample(frac=1-test_fraction, random_state=42)
    test = df.drop(train.index)
    return train, test
The two functions we just defined act as nodes that can apply transformations on a dataset as part of a reproducible, modular workflow. The first one applies some simple, illustrative feature engineering by creating several derived features from the raw ones. Meanwhile, the second function defines the partitioning of the dataset into training and test sets, e.g. for further downstream machine learning modeling.
There's another Python file in the same subdirectory: pipeline.py. Let's open it and add the following:
from kedro.pipeline import Pipeline, node
from .nodes import engineer_features, split_data

def create_pipeline(**kwargs) -> Pipeline:
    return Pipeline([
        node(
            func=engineer_features,
            inputs="raw_customers",
            outputs="processed_features",
            name="feature_engineering"
        ),
        node(
            func=split_data,
            inputs=["processed_features", "params:test_fraction"],
            outputs=["train_data", "test_data"],
            name="split_dataset"
        )
    ])
Part of the magic takes place here: notice the names used for inputs and outputs of nodes in the pipeline. Just like Lego pieces, here we can flexibly reference different dataset definitions in our data catalog, starting, of course, with the dataset containing raw customer data we created earlier.
One last couple of configuration steps remain to make everything work. The proportion of test data for the partitioning node has been defined as a parameter that needs to be passed. In Kedro, we define these "external" parameters to the code by adding them to the conf/base/parameters.yml file. Let's add the following to this currently empty configuration file:
test_fraction: 0.2
In addition, by default, the Kedro project implicitly imports modules from the PySpark library, which we will not really need. In settings.py (inside the "src" subdirectory), we can disable this by commenting out and modifying the first few existing lines of code as follows:
# Instantiated project hooks.
# from churn_predictor.hooks import SparkHooks  # noqa: E402

# Hooks are executed in a Last-In-First-Out (LIFO) order.
HOOKS = ()
Save all changes, ensure you have pandas installed in your running environment, and get ready to run the project from the IDE terminal:
kedro run
This may or may not work at first, depending on the version of Kedro installed. If it doesn't work and you get a DatasetError, the likely solution is to pip install kedro-datasets or pip install pyarrow (or maybe both!), then try to run again.
Hopefully, you may get a bunch of 'INFO' messages informing you about the different stages of the data workflow taking place. That's a good sign. In the data/02_intermediate directory, you may find several parquet files containing the results of the data processing.
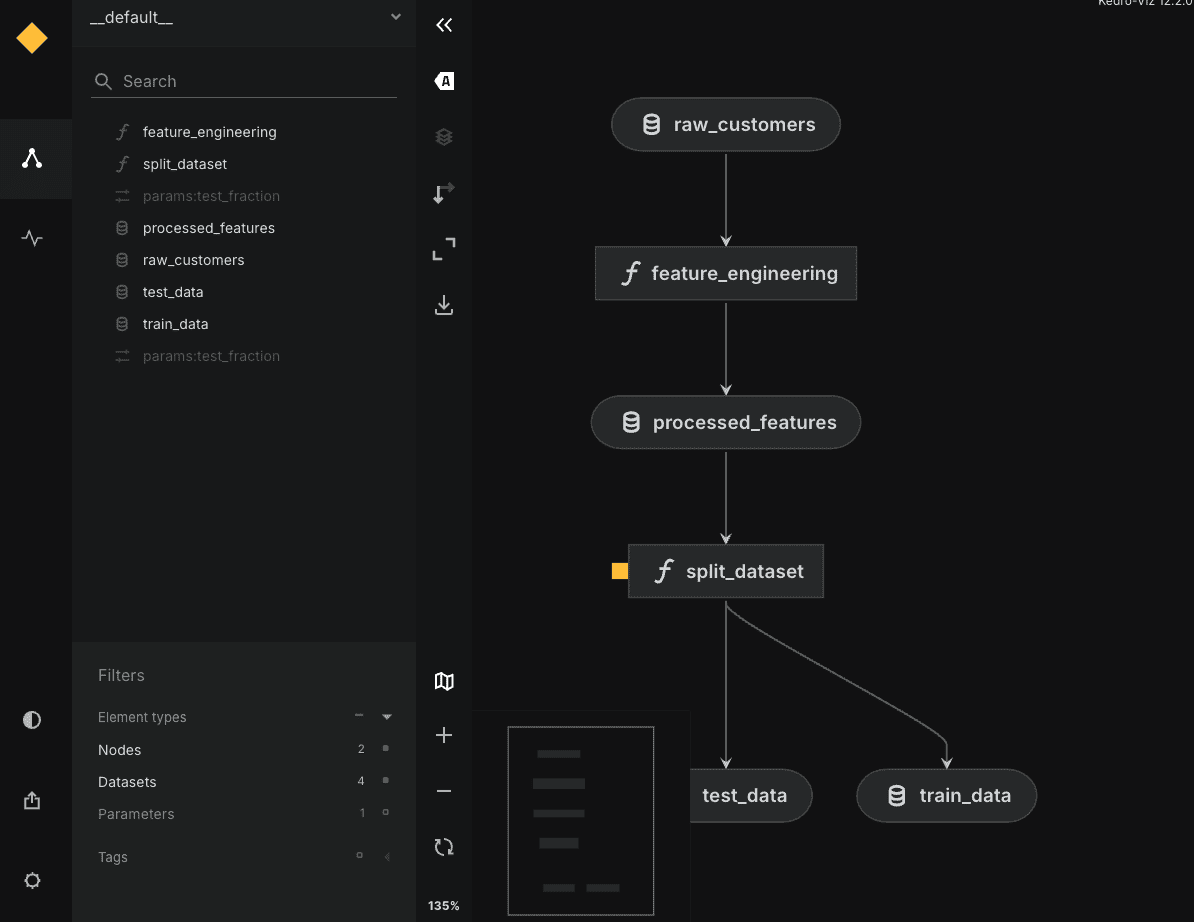
To wrap up, you can optionally pip install kedro-viz and run kedro viz to open up in your browser an interactive graph of your flashy workflow, as shown below:
# Wrapping Up
We will leave further exploration of this tool for a possible future article. If you got here, you were able to build your first Kedro project and learn about its core components and features, understanding how they interact along the way.
Well done!
Iván Palomares Carrascosa is a leader, writer, speaker, and adviser in AI, machine learning, deep learning & LLMs. He trains and guides others in harnessing AI in the real world.