How to Fine-Tune DeepSeek-R1 for Your Custom Dataset (Step-by-Step)
Fine-tune the DeepSeek model step by step... even if you're new to LLMs!
Image by Author | Canva
Fine-tuning adapts a pre-trained language model to a specific task or dataset by training it on new examples. This process is usually done with Hugging Face’s Transformers library, which demands high computational power and memory. However, Unsloth offers a more optimized approach, making fine-tuning possible even on slower GPUs. It reduces memory usage, speeds up downloads, and uses techniques like LoRA to fine-tune large models efficiently with minimal resources. While it currently lacks advanced features like multi-GPU support (model parallelism), it’s still an excellent choice for resource-efficient fine-tuning, especially if you don’t have a high-end GPU.
In this guide, I’ll walk you through fine-tuning the DeepSeek model step by step using Unsloth. By the end, you'll be able to fine-tune almost any large language model with a dataset of your choice.
Step 1: Install the Necessary Libraries
Before we begin, we need to install the Unsloth library along with its latest updates from GitHub.
%%capture
!pip install unsloth
!pip install --force-reinstall --no-cache-dir --no-deps git+https://github.com/unslothai/unsloth.git
Now that Unsloth is installed, we can proceed to load our model and tokenizer.
Step 2: Load the Model and Tokenizer
Now, we will load the DeepSeek model using Unsloth’s optimized methods. I am using the DeepSeek-R1-Distill-Llama-8B model.
from unsloth import FastLanguageModel
import torch

# Define configurations for loading the model
max_seq_length = 2048
dtype = None  # Automatically choose the best data type (float16, bfloat16, etc.)
load_in_4bit = True  # Enable 4-bit quantization to reduce memory usage

model, tokenizer = FastLanguageModel.from_pretrained(
    model_name="unsloth/DeepSeek-R1-Distill-Llama-8B",
    max_seq_length=max_seq_length,
    dtype=dtype,
    load_in_4bit=load_in_4bit
)
If you want to fine-tune another model, just change the model_name field.
Step 3: Apply LoRA Adapters for Efficient Fine-Tuning
Low-Rank Adaptation (LoRA) allows us to fine-tune only a small subset of the model’s parameters, making training faster and memory efficient.
model = FastLanguageModel.get_peft_model(
    model,
    r=16,  # LoRA rank (controls low-rank approximation quality)
    target_modules=["q_proj", "k_proj", "v_proj", "o_proj", "gate_proj", "up_proj", "down_proj"],  # Layers to apply LoRA
    lora_alpha=16, # Scaling factor for LoRA weights
    lora_dropout=0,
    bias="none",
    use_gradient_checkpointing="unsloth",
    random_state=3407,
    use_rslora=False,
    loftq_config=None
)
Step 4: Prepare the Training Dataset
Before we begin training, we need to load and preprocess our dataset. I am using the Sulav/mental_health_counseling_conversations_sharegpt dataset which is in ShareGpt style.
You can use any dataset of your choice, but if it is not formatted in the right way, you will need to manually code it to match the required format. The Hugging Face datasets processing guide is a great resource for learning how to manipulate and transform datasets for fine-tuning. Proper formatting helps avoid tokenization errors or input mismatches.
from datasets import load_dataset  # Load datasets from Hugging Face Hub

# Load a dataset
dataset = load_dataset("Sulav/mental_health_counseling_conversations_sharegpt", split="train")
Now we need to convert the dataset from ShareGPT style (“from”, ”value”) to Hugging face generic format(“role”, “content”).
from unsloth.chat_templates import standardize_sharegpt

# Convert dataset format from ShareGPT format to Hugging Face's standardized ("role", "content") structure
dataset = standardize_sharegpt(dataset)
For example, a dataset entry in ShareGPT format:
{"from": "system", "value": "You are an assistant"}
{"from": "human", "value": "What's the capital of France?"}
{"from": "gpt", "value": "The capital of France is Paris."}
is converted to role-based Hugging Face's format:
{"role": "system", "content": "You are an assistant"}
{"role": "user", "content": "What's the capital of France?"}
{"role": "assistant", "content": "The capital of France is Paris."}
Step 5: Format Prompts
Once the dataset is prepared, we need to ensure that the data is structured correctly to be used by the model. For this, we apply the appropriate chat template ( I have used the Llama-3.1 format.) using the get_chat_template function. This function basically prepares the tokenizer with the Llama-3.1 chat format for conversation-style fine-tuning.
from unsloth.chat_templates import get_chat_template

# Apply the Llama-3.1 chat template to the tokenizer
tokenizer = get_chat_template(
    tokenizer,  # Tokenizer being used
    chat_template="llama-3.1",  # The chat template format
)

# Function to format the conversation data into tokenized text
def formatting_prompts_func(examples):
    convos = examples["conversations"]
    texts = [tokenizer.apply_chat_template(convo, tokenize=False, add_generation_prompt=False) for convo in convos]
    return {"text": texts}

dataset = dataset.map(formatting_prompts_func, batched=True)
To understand how conversations are rendered in Llama-3.1 format, you can print out an item in both its original conversation format and formatted text format:
# Print an item in its original conversation format
print(dataset[0]["conversations"])

# Print the same item in its formatted text format
print(dataset[0]["text"])
This step ensures the data is formatted according to the model’s input requirements for training.
Step 6: Set Up and Configure the Trainer
Now, we will configure the fine-tuning process using Hugging Face’s SFTTrainer. It automates key tasks like tokenization, batching, and optimization, making fine-tuning easier. SFTTrainer works efficiently with Unsloth, reducing VRAM usage and speeding up training.
I have limited the fine-tuning to 60 steps to speed things up, but you can set num_train_epochs=1 for a full run, and max_steps=None.
from trl import SFTTrainer
from transformers import TrainingArguments, DataCollatorForSeq2Seq
from unsloth import is_bfloat16_supported


# Define training configurations
trainer = SFTTrainer(
    model=model,
    tokenizer=tokenizer,
    train_dataset=dataset,
    dataset_text_field="text",
    max_seq_length=max_seq_length,
    data_collator=DataCollatorForSeq2Seq(tokenizer=tokenizer),
    dataset_num_proc=2,
    packing=False,

    args=TrainingArguments(
        per_device_train_batch_size=2,  # Number of examples per GPU batch
        gradient_accumulation_steps=4,  # Accumulate gradients over 4 batches before updating model
        warmup_steps=5,  # Number of warmup steps for learning rate schedule
        max_steps=60,  # Limit training steps to 60 (for quick testing)
        # num_train_epochs=1
        learning_rate=2e-4,
        fp16=not is_bfloat16_supported(),
        bf16=is_bfloat16_supported(),
        logging_steps=1,  # Log training metrics after every step
        optim="adamw_8bit",
        weight_decay=0.01,
        lr_scheduler_type="linear",  # Linear decay of learning rate
        seed=3407,
        output_dir="outputs",  # Directory to save model checkpoints
        report_to="none",  # Use this for WandB etc

    ),
)
Step 7: Train Only on Assistant Responses
To improve training efficiency, we will focus only on the assistant’s responses rather than user inputs.
from unsloth.chat_templates import train_on_responses_only
trainer = train_on_responses_only(
trainer,
instruction_part="<|start_header_id|>user<|end_header_id|>\n\n", # Mark user input
response_part="<|start_header_id|>assistant<|end_header_id|>\n\n", # Mark assistant response
)
# Start training the model
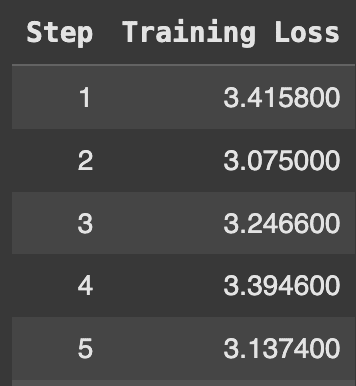
trainer_stats = trainer.train()
The model only trains on the assistant outputs and ignores the loss on the user's inputs. The training loss reduces gradually as:
.
.
.

The reduction of training loss here is a bit less because we have only fine-tuned the model for 60 steps. For better results, it is recommended to train your dataset for 2-3 epochs on a large dataset and 3-5 epochs on a small dataset. Aim for at least 500+ steps, but if resources allow, training for 1000+ steps can further improve model performance.
Step 8: Inference
After fine-tuning, we can use the trained model for inference to generate responses.
tokenizer = get_chat_template(
   tokenizer,
   chat_template = "llama-3.1",
)
# Set the PAD token to be the same as the EOS token to avoid tokenization issues
tokenizer.pad_token = tokenizer.eos_token
FastLanguageModel.for_inference(model) # Enable native 2x faster inference

messages = [
   {"role": "user", "content": "I am sad because I failed my Maths test today"}]
# Tokenize the user input with the chat template
inputs = tokenizer.apply_chat_template(
   messages,
   tokenize=True,
   add_generation_prompt=True,
   return_tensors="pt",
   padding=True,  # Add padding to match sequence lengths
).to("cuda")

attention_mask = inputs != tokenizer.pad_token_id

outputs = model.generate(
   input_ids=inputs,
   attention_mask=attention_mask,
   max_new_tokens=64,
   use_cache=True,  # Use cache for faster token generation
   temperature=0.6,  # Controls randomness in responses
   min_p=0.1,  # Set minimum probability threshold for token selection
)

# Decode the generated tokens into human-readable text
text = tokenizer.decode(outputs[0], skip_special_tokens=True)
print(text)
Outputs
System
Cutting Knowledge Date: December 2023
Today Date: 26 July 2024

User: I am sad because I failed my Maths test today

Assistant: It is important to recognize that failing a test is not a reflection of your worth.  It is a reflection of your performance on that test.  It is a momentary failure, not a lifetime of failure.  You may have been tired, or not well rested.
This output and especially the assistant response shows that the model is successfully fine-tuned.
Step 9: Saving the Model & Tokenizer
You can save the model & tokenizer locally by save_pretrained:
my_model="MindSeek-8B"
model.save_pretrained(my_model)  # Local saving
tokenizer.save_pretrained(my_model)
You can also save the model online by pushing it to the Hugging Face.
model.push_to_hub("your_name/your_model_name") # Online saving
tokenizer.push_to_hub("your_name/your_model_name")
These both only save the LoRA adapters and not the full model. GGUF is designed for efficient inference, especially on CPUs. To save the full model in GGUF format, use the following command:
%%capture
model.push_to_hub_gguf(my_model, tokenizer, quantization_method = "q4_k_m")
It saves the full model (base model + fine-tuned LoRA weights). The quantization method q4_k_m compresses the model to reduce size and improve inference speed.
Recommended Practices for Working with DeepSeek-R1 Models
To ensure you get the best results when working with DeepSeek-R1 models, consider these practices:
- Set the temperature between 0.5 and 0.7, with 0.6 being the optimal value. This range helps balance creativity and coherence, reducing the likelihood of repetitive or illogical outputs.
- Do not include system prompts. All necessary instructions should be incorporated directly within the user prompt to ensure the model functions as intended.
- For mathematical tasks, guide the model by adding instructions like:
"Please solve step by step and place your final answer inside \boxed{}." - When evaluating the model’s performance, it’s best to run multiple tests and calculate the average of the results for more reliable insights.
By following these steps, you can efficiently fine-tune DeepSeek or any other large language model with minimal setup for your specific use case. Additionally, you can also view Unsloth Documentation and visit this github repository that contains demos of fine-tuning various large language models. Please drop your questions in the comments section if you get stuck at any point!
Kanwal Mehreen is a machine learning engineer and a technical writer with a profound passion for data science and the intersection of AI with medicine. She co-authored the ebook "Maximizing Productivity with ChatGPT". As a Google Generation Scholar 2022 for APAC, she champions diversity and academic excellence. She's also recognized as a Teradata Diversity in Tech Scholar, Mitacs Globalink Research Scholar, and Harvard WeCode Scholar. Kanwal is an ardent advocate for change, having founded FEMCodes to empower women in STEM fields.