Implementing Your Own k-Nearest Neighbor Algorithm Using Python
A detailed explanation of one of the most used machine learning algorithms, k-Nearest Neighbors, and its implementation from scratch in Python. Enhance your algorithmic understanding with this hands-on coding exercise.
By Natasha Latysheva.
Editor's note: Natasha is active in the Cambridge Coding Academy, which is holding an upcoming Data Science Bootcamp in Python on 20-21 February 2016, where you can learn state-of-the-art machine learning techniques for real-world problems.
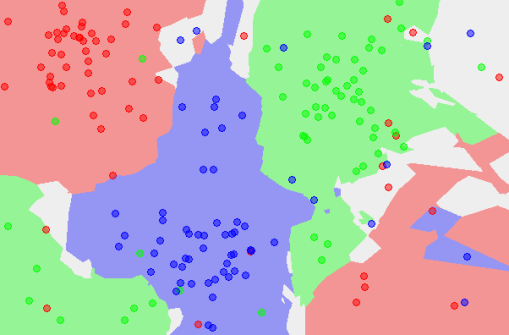
In machine learning, you may often wish to build predictors that allows to classify things into categories based on some set of associated values. For example, it is possible to provide a diagnosis to a patient based on data from previous patients. Classification can involve constructing highly non-linear boundaries between classes, as in the case of the red, green and blue classes below:

Many algorithms have been developed for automated classification, and common ones include random forests, support vector machines, Naïve Bayes classifiers, and many types of neural networks. To get a feel for how classification works, we take a simple example of a classification algorithm - k-Nearest Neighbours (kNN) - and build it from scratch in Python 2. You can use a mostly imperative style of coding, rather than a declarative/functional one with lambda functions and list comprehensions to keep things simple if you are starting with Python. Here, we will provide an introduction to the latter approach. kNN classifies new instances by grouping them together with the most similar cases. Here, you will use kNN on the popular (if idealized) iris dataset, which consists of flower measurements for three species of iris flower. Our task is to predict the species labels of a set of flowers based on their flower measurements. Since you’ll be building a predictor based on a set of known correct classifications, kNN is a type of supervised machine learning (though somewhat confusingly, in kNN there is no explicit training phase; see lazy learning). The kNN task can be broken down into writing 3 primary functions:
1. Calculate the distance between any two points
2. Find the nearest neighbours based on these pairwise distances
3. Majority vote on a class labels based on the nearest neighbour list
The steps in the following diagram provide a high-level overview of the tasks you'll need to accomplish in your code.
The algorithm
Briefly, you would like to build a script that, for each input that needs classification, searches through the entire training set for the k-most similar instances. The class labels of the most similar instances should then be summarised by majority voting and returned as predictions for the test cases.
The complete code is at the end of the post. Now, let's go through the different parts separately and explain what they do.
Loading the data and splitting into train and test sets To get up and running, you’ll use some helper functions: although we can download the iris data ourselves and use csv.reader to load it in, you can also quickly fetch the iris data straight from scikit-learn. Further, you can do a 60/40 train/test split using the train_test_split function, but you could have also randomly assigned the rows yourself (see this type of implementation here). In machine learning, the train/test split is used in order to reduce overfitting - training models on the full dataset tends to lead to the model being overfitted to the noise and peculiarities of the data, rather than the real, underlying trend. You do any sort of model tuning (e.g. picking the number of neighbours, k) on the training set only - the test set acts as a stand-alone, untouched dataset that you use to test your final model performance on.
Here is an overview of the iris dataset, the data split, and a quick guide to the indexing.
Editor's note: Natasha is active in the Cambridge Coding Academy, which is holding an upcoming Data Science Bootcamp in Python on 20-21 February 2016, where you can learn state-of-the-art machine learning techniques for real-world problems.
In machine learning, you may often wish to build predictors that allows to classify things into categories based on some set of associated values. For example, it is possible to provide a diagnosis to a patient based on data from previous patients. Classification can involve constructing highly non-linear boundaries between classes, as in the case of the red, green and blue classes below:
Many algorithms have been developed for automated classification, and common ones include random forests, support vector machines, Naïve Bayes classifiers, and many types of neural networks. To get a feel for how classification works, we take a simple example of a classification algorithm - k-Nearest Neighbours (kNN) - and build it from scratch in Python 2. You can use a mostly imperative style of coding, rather than a declarative/functional one with lambda functions and list comprehensions to keep things simple if you are starting with Python. Here, we will provide an introduction to the latter approach. kNN classifies new instances by grouping them together with the most similar cases. Here, you will use kNN on the popular (if idealized) iris dataset, which consists of flower measurements for three species of iris flower. Our task is to predict the species labels of a set of flowers based on their flower measurements. Since you’ll be building a predictor based on a set of known correct classifications, kNN is a type of supervised machine learning (though somewhat confusingly, in kNN there is no explicit training phase; see lazy learning). The kNN task can be broken down into writing 3 primary functions:
1. Calculate the distance between any two points
2. Find the nearest neighbours based on these pairwise distances
3. Majority vote on a class labels based on the nearest neighbour list
The steps in the following diagram provide a high-level overview of the tasks you'll need to accomplish in your code.

The algorithm
Briefly, you would like to build a script that, for each input that needs classification, searches through the entire training set for the k-most similar instances. The class labels of the most similar instances should then be summarised by majority voting and returned as predictions for the test cases.
The complete code is at the end of the post. Now, let's go through the different parts separately and explain what they do.
Loading the data and splitting into train and test sets To get up and running, you’ll use some helper functions: although we can download the iris data ourselves and use csv.reader to load it in, you can also quickly fetch the iris data straight from scikit-learn. Further, you can do a 60/40 train/test split using the train_test_split function, but you could have also randomly assigned the rows yourself (see this type of implementation here). In machine learning, the train/test split is used in order to reduce overfitting - training models on the full dataset tends to lead to the model being overfitted to the noise and peculiarities of the data, rather than the real, underlying trend. You do any sort of model tuning (e.g. picking the number of neighbours, k) on the training set only - the test set acts as a stand-alone, untouched dataset that you use to test your final model performance on.
from sklearn.datasets import load_iris
from sklearn import cross_validation
import numpy as np

# load dataset and partition in training and testing sets
iris = load_iris()
X_train, X_test, y_train, y_test = cross_validation.train_test_split(iris.data, iris.target, test_size=0.4, random_state=1)

# reformat train/test datasets for convenience
train = np.array(zip(X_train,y_train))
test = np.array(zip(X_test, y_test))
Here is an overview of the iris dataset, the data split, and a quick guide to the indexing.
