An Intuitive Explanation of Convolutional Neural Networks
This article provides a easy to understand introduction to what convolutional neural networks are and how they work.
By Ujjwal Karn.
What are Convolutional Neural Networks and why are they important?
Convolutional Neural Networks (ConvNets or CNNs) are a category of Neural Networks that have proven very effective in areas such as image recognition and classification. ConvNets have been successful in identifying faces, objects and traffic signs apart from powering vision in robots and self driving cars.

Figure 1: Source [1]
In Figure 1 above, a ConvNet is able to recognize scenes and the system is able to suggest relevant tags such as ‘bridge’, ‘railway’ and ‘tennis’ while Figure 2 shows an example of ConvNets being used for recognizing everyday objects, humans and animals. Lately, ConvNets have been effective in several Natural Language Processing tasks (such as sentence classification) as well.

Figure 2: Source [2]
ConvNets, therefore, are an important tool for most machine learning practitioners today. However, understanding ConvNets and learning to use them for the first time can sometimes be an intimidating experience. The primary purpose of this blog post is to develop an understanding of how Convolutional Neural Networks work on images.
If you are new to neural networks in general, I would recommend reading this short tutorial on Multi Layer Perceptrons to get an idea about how they work, before proceeding. Multi Layer Perceptrons are referred to as “Fully Connected Layers” in this post.
The LeNet Architecture (1990s)
LeNet was one of the very first convolutional neural networks which helped propel the field of Deep Learning. This pioneering work by Yann LeCun was named LeNet5 after many previous successful iterations since the year 1988 [3]. At that time the LeNet architecture was used mainly for character recognition tasks such as reading zip codes, digits, etc.
Below, we will develop an intuition of how the LeNet architecture learns to recognize images. There have been several new architectures proposed in the recent years which are improvements over the LeNet, but they all use the main concepts from the LeNet and relatively easier to understand if you have a clear understanding of the former.

Figure 3: A simple ConvNet. Source [5]
The Convolutional Neural Network in Figure 3 is similar in architecture to the original LeNet and classifies an input image into four categories: dog, cat, boat or bird (the original LeNet was used mainly for character recognition tasks). As evident from the figure above, on receiving a boat image as input, the network correctly assigns the highest probability for boat (0.94) among all four categories. The sum of all probabilities in the output layer should be one (explained later in this post).
There are four main operations in the ConvNet shown in Figure 3 above:
- Convolution
- Non Linearity (ReLU)
- Pooling or Sub Sampling
- Classification (Fully Connected Layer)
These operations are the basic building blocks of every Convolutional Neural Network, so understanding how these work is an important step to developing a sound understanding of ConvNets. We will try to understand the intuition behind each of these operations below.
Images are a matrix of pixel values
Essentially, every image can be represented as a matrix of pixel values.
Figure 4: Every image is a matrix of pixel values. Source [6]
Channel is a conventional term used to refer to a certain component of an image. An image from a standard digital camera will have three channels – red, green and blue – you can imagine those as three 2d-matrices stacked over each other (one for each color), each having pixel values in the range 0 to 255.
A grayscale image, on the other hand, has just one channel. For the purpose of this post, we will only consider grayscale images, so we will have a single 2d matrix representing an image. The value of each pixel in the matrix will range from 0 to 255 – zero indicating black and 255 indicating white.
The Convolution Step
ConvNets derive their name from the “convolution” operator. The primary purpose of Convolution in case of a ConvNet is to extract features from the input image. Convolution preserves the spatial relationship between pixels by learning image features using small squares of input data. We will not go into the mathematical details of Convolution here, but will try to understand how it works over images.
As we discussed above, every image can be considered as a matrix of pixel values. Consider a 5 x 5 image whose pixel values are only 0 and 1 (note that for a grayscale image, pixel values range from 0 to 255, the green matrix below is a special case where pixel values are only 0 and 1):
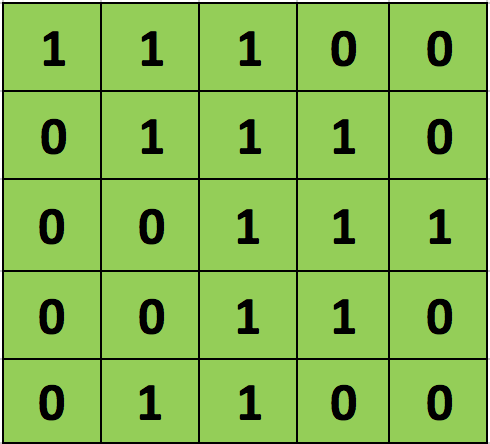
Also, consider another 3 x 3 matrix as shown below:

Then, the Convolution of the 5 x 5 image and the 3 x 3 matrix can be computed as shown in the animation in Figure 5 below:
Figure 5: The Convolution operation. The output matrix is called Convolved Feature or Feature Map. Source [7]
Take a moment to understand how the computation above is being done. We slide the orange matrix over our original image (green) by 1 pixel (also called ‘stride’) and for every position, we compute element wise multiplication (between the two matrices) and add the multiplication outputs to get the final integer which forms a single element of the output matrix (pink). Note that the 3×3 matrix “sees” only a part of the input image in each stride.
In CNN terminology, the 3×3 matrix is called a ‘filter‘ or ‘kernel’ or ‘feature detector’ and the matrix formed by sliding the filter over the image and computing the dot product is called the ‘Convolved Feature’ or ‘Activation Map’ or the ‘Feature Map‘. It is important to note that filters acts as feature detectors from the original input image.
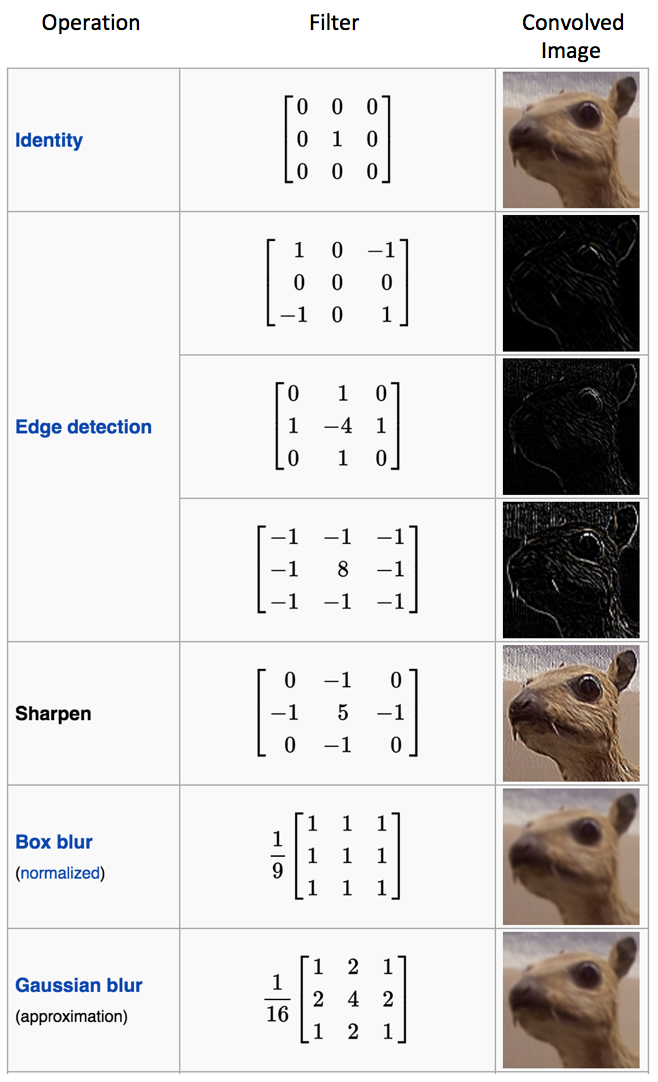
It is evident from the animation above that different values of the filter matrix will produce different Feature Maps for the same input image. As an example, consider the following input image:
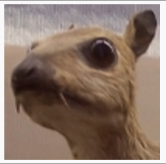
In the table below, we can see the effects of convolution of the above image with different filters. As shown, we can perform operations such as Edge Detection, Sharpen and Blur just by changing the numeric values of our filter matrix before the convolution operation [8] – this means that different filters can detect different features from an image, for example edges, curves etc. More such examples are available in Section 8.2.4 here.