 Predict Age and Gender Using Convolutional Neural Network and OpenCV
 Predict Age and Gender Using Convolutional Neural Network and OpenCV
Age and gender estimation from a single face image are important tasks in intelligent applications. As such, let's build a simple age and gender detection model in this detailed article.

Automatic age and gender classification has become relevant to an increasing amount of applications, particularly since the rise of social platforms and social media. Nevertheless, performance of existing methods on real-world images is still significantly lacking, especially when compared to the tremendous leaps in performance recently reported for the related task of face recognition. — Age and Gender Classification using Convolutional Neural Networks
Introduction
Age and gender, two of the key facial attributes, play a very foundational role in social interactions, making age and gender estimation from a single face image an important task in intelligent applications, such as access control, human-computer interaction, law enforcement, marketing intelligence and visual surveillance, etc.
Real world use-case :

Recently I came across Quividi which is an AI software application which is used to detect age and gender of users who passes by based on online face analyses and automatically starts playing advertisements based on the targeted audience.
Another example could be AgeBot which is an Android App that determines your age from your photos using facial recognition. It can guess your age and gender along with that can also find multiple faces in a picture and estimate the age for each face.
Inspired by the above use cases we are going to build a simple Age and Gender detection model in this detailed article. So let's start with our use-case:
Use-case — we will be doing some face recognition, face detection stuff and furthermore, we will be using CNN (Convolutional Neural Networks) for age and gender predictions from a youtube video, you don’t need to download the video just the video URL is fine. The interesting part will be the usage of CNN for age and gender predictions on video URLs.
Requirements :
pip install OpenCV-python
numpy
pip install pafy
pip install youtube_dl (to know more about youtube_dl)
pafy : Pafy library is used to retrieve YouTube content and metadata(such as Title, rating, viewcount, duration, rating, author, thumbnail, keywords etc). To know more about pafy. Let's check one sample :
import pafy

url = 'https://www.youtube.com/watch?v=c07IsbSNqfI&feature=youtu.be'
vPafy = pafy.new(url)
print vPafy.title
print vPafy.rating
print vPafy.viewcount
print vPafy.author
print vPafy.length
print vPafy.description
Output :
Testing file uploads with Postman (multipart/form-data)
4.87096786499
11478
Valentin Despa
1688
➡️➡️➡️ ???? Check my online course on Postman. Get it for only $10 (limited supply):
https://www.udemy.com/postman-the-complete-guide/?couponCode=YOUTUBE10

I will show you how to debug an upload script and demonstrate it with a tool that can make requests encoded as "multipart/form-data" so that you can send also a file.

After this, we will go even further and write tests and begin automating the process.

Here is the Git repository containing the files used for this tutorial:
https://github.com/vdespa/postman-testing-file-uploads
Steps to follow :
- Get the video URL from YouTube.
- Face detection with Haar cascades
- Gender Recognition with CNN
- Age Recognition with CNN
1.Get a video URL from YouTube:
Get the Youtube video URL and try to get the attributes of the video using pafy as explained above.
2. Face detection with Haar cascades :
This is a part most of us at least have heard of. OpenCV/JavaCV provide direct methods to import Haar-cascades and use them to detect faces. I will not be explaining this part in deep. You guys can refer to my previous article to know more about face detection using OpenCV.
3. Gender Recognition with CNN:
Gender recognition using OpenCV's fisherfaces implementation is quite popular and some of you may have tried or read about it also. But, in this example, I will be using a different approach to recognize gender. This method was introduced by two Israel researchers, Gil Levi and Tal Hassner in 2015. I have used the CNN models trained by them in this example. We are going to use the OpenCV’s dnn package which stands for “Deep Neural Networks”.
In the dnn package, OpenCV has provided a class called Net which can be used to populate a neural network. Furthermore, these packages support importing neural network models from well known deep learning frameworks like caffe, tensorflow and torch. The researchers I had mentioned above have published their CNN models as caffe models. Therefore, we will be using the CaffeImporter import that model into our application.
4. Age Recognition with CNN
This is almost similar to the gender detection part except that the corresponding prototxt file and the caffe model file are “deploy_agenet.prototxt” and “age_net.caffemodel”. Furthermore, the CNN’s output layer (probability layer) in this CNN consists of 8 values for 8 age classes (“0–2”, “4–6”, “8–13”, “15–20”, “25–32”, “38–43”, “48–53” and “60-”)
A caffe model has 2 associated files,
1 .prototxt — The definition of CNN goes in here. This file defines the layers in the neural network, each layer’s inputs, outputs and functionality.
2 .caffemodel — This contains the information of the trained neural network (trained model).
Download .prtotxt and .caffemodel from Here.
Download haar cascade for face detection from Here.
So let's start coding our model.
Source Code:
import cv2
import numpy as np
import pafy

#url of the video to predict Age and gender
url = 'https://www.youtube.com/watch?v=c07IsbSNqfI&feature=youtu.be'
vPafy = pafy.new(url)
play = vPafy.getbest(preftype="mp4")

cap = cv2.VideoCapture(play.url)

cap.set(3, 480) #set width of the frame
cap.set(4, 640) #set height of the frame

MODEL_MEAN_VALUES = (78.4263377603, 87.7689143744, 114.895847746)

age_list = ['(0, 2)', '(4, 6)', '(8, 12)', '(15, 20)', '(25, 32)', '(38, 43)', '(48, 53)', '(60, 100)']

gender_list = ['Male', 'Female']

def load_caffe_models():

 age_net = cv2.dnn.readNetFromCaffe('deploy_age.prototxt', 'age_net.caffemodel')

gender_net = cv2.dnn.readNetFromCaffe('deploy_gender.prototxt', 'gender_net.caffemodel')

return(age_net, gender_net)

def video_detector(age_net, gender_net):
  font = cv2.FONT_HERSHEY_SIMPLEX

while True:

  ret, image = cap.read()

  face_cascade = cv2.CascadeClassifier('haarcascade_frontalface_alt.xml')

  gray = cv2.cvtColor(image, cv2.COLOR_BGR2GRAY)
  faces = face_cascade.detectMultiScale(gray, 1.1, 5)

if(len(faces)>0):
   print("Found {} faces".format(str(len(faces))))

for (x, y, w, h )in faces:
   cv2.rectangle(image, (x, y), (x+w, y+h), (255, 255, 0), 2)

#Get Face
   face_img = image[y:y+h, h:h+w].copy()
   blob = cv2.dnn.blobFromImage(face_img, 1, (227, 227), MODEL_MEAN_VALUES, swapRB=False)

#Predict Gender
   gender_net.setInput(blob)
   gender_preds = gender_net.forward()
   gender = gender_list[gender_preds[0].argmax()]
   print("Gender : " + gender)

#Predict Age
   age_net.setInput(blob)
   age_preds = age_net.forward()
   age = age_list[age_preds[0].argmax()]
   print("Age Range: " + age)

overlay_text = "%s %s" % (gender, age)
   cv2.putText(image, overlay_text, (x, y), font, 1, (255, 255, 255), 2, cv2.LINE_AA)

cv2.imshow('frame', image)
#0xFF is a hexadecimal constant which is 11111111 in binary.
if cv2.waitKey(1) & 0xFF == ord('q'):
   break

if __name__ == "__main__":
age_net, gender_net = load_caffe_models()

video_detector(age_net, gender_net)
Now let's understand the code :
Step 1: Import all the required libraries.
import cv2
import numpy as np
import pafy
Step 2: Get the Youtube video URL and create an object ‘play’ which contains the best resolution of the video in webm/mp4 format.
url = 'https://www.youtube.com/watch?v=c07IsbSNqfI&feature=youtu.be'
vPafy = pafy.new(url)
play = vPafy.getbest(preftype="mp4")
Step 3: Often, we have to capture live stream with a camera. OpenCV provides a very simple interface to this. We can capture the video from the camera, convert it into grayscale video and display it. Just a simple task to get started.
To capture a video, you need to create a video capture object. Its argument can be either the device index or the name of a video file. Device index is just the number to specify which camera. Normally one camera will be connected (as in my case). So I simply pass 0 (or -1). You can select the second camera by passing 1 and so on. After that, you can capture frame-by-frame.
cap = cv2.VideoCapture(0) #if you are using webcam
But in my case I’m reading an online video URL, for that, I’ll pass ‘play’ object to VideoCapture().
cap = cv2.VideoCapture(play.url)
Step 4: Using set() I’ll set the height and width of our video frame. cap.set(propId, value), here 3 is the propertyId of width and 4 is for Height.
cap.set(3, 480) #set width of the frame
cap.set(4, 640) #set height of the frame
Step 5: Create 3 separate lists for storing Model_Mean_Values, Age and Gender.
MODEL_MEAN_VALUES = (78.4263377603, 87.7689143744, 114.895847746)
age_list = ['(0, 2)', '(4, 6)', '(8, 12)', '(15, 20)', '(25, 32)', '(38, 43)', '(48, 53)', '(60, 100)']
gender_list = ['Male', 'Female']
Step 6: I have defined a function to load caffemodel and prototxt of both age and gender detector, these are basically pre-trained CNN models which will do the detection.
def load_caffe_models():

 age_net = cv2.dnn.readNetFromCaffe('deploy_age.prototxt', 'age_net.caffemodel')

gender_net = cv2.dnn.readNetFromCaffe('deploy_gender.prototxt', 'gender_net.caffemodel')

return(age_net, gender_net)
Step 7: Now we will perform face detection, Age detection, and Gender detection and for that create a function video_detector(age_net, gender_net) inside your main function and pass age_net and gender_net as its parameters.
if __name__ == "__main__":
age_net, gender_net = load_caffe_models()

video_detector(age_net, gender_net)
Step 8: Read the cap object which is created from VideoCapture() in step 3.
cap.read() returns a bool (True/False). If the frame is read correctly, it will be True.
#So you can check the end of the video by checking this return value.
#Sometimes, the cap may not have initialized the capture. In that case, this code shows error.
#You can check whether it is initialized or not by the method cap.isOpened(). If it is True, OK. Otherwise, open it using cap.open().
ret, image = cap.read()
Step 9: Convert the image to gray image as OpenCV face detector expects gray images.
gray = cv2.cvtColor(image, cv2.COLOR_BGR2GRAY)
Step 10: Load the pre-built model for facial detection.
face_cascade = cv2.CascadeClassifier('haarcascade_frontalface_alt.xml')
Step 11: Now, how do we detect a face from an image using the CascadeClassifier ?
Well, again OpenCV’s CascadedClassifier has made it simple for us because of detectMultiScale(), which detects exactly what you need.
detectMultiScale(image, scaleFactor, minNeighbors)
Below are arguments which should pass to detectMultiScale().
This is a general function to detect objects, in this case, it’ll detect faces since we called in the face cascade. If it finds a face, it returns a list of positions of said face in the form “Rect(x,y,w,h).”, if not, then returns “None”.
- Image: The first input is the grayscale image.
- scaleFactor: This function compensates a false perception in size that occurs when one face appears to be bigger than the other simply because it is closer to the camera.
- minNeighbors: Detection algorithm that uses a moving window to detect objects, it does so by defining how many objects are found near the current one before it can declare the face found.
faces = face_cascade.detectMultiScale(gray, 1.1, 5)
Step 12: Loop through the list of faces and draw rectangles on the human faces in the video. Here basically we’re finding faces, breaking the faces, their sizes, and drawing rectangles.
for (x, y, w, h )in faces:
   cv2.rectangle(image, (x, y), (x+w, y+h), (255, 255, 0), 2)

# Get Face
   face_img = image[y:y+h, h:h+w].copy()
Step 13 : OpenCV provides a function to facilitate image preprocessing for deep learning classification: blobFromImage(). It performs :
- Mean subtraction
- Scaling
- And optionally channel swapping
So blobFromImage creates 4-dimensional blob from image. Optionally resizes and crops image from center, subtract mean values, scales values by scalfactor , swap Blue and Red channels
blob = cv2.dnn.blobFromImage(image, scalefactor=1.0, size, mean, swapRB=True)
- image: This is the input image we want to preprocess before passing it through our deep neural network for classification.
- scale factor: After we perform mean subtraction we can optionally scale our images by some factor. This value defaults to
1.0(i.e., no scaling) but we can supply another value as well. It’s also important to note that scale factor should be 1/σ as we’re actually multiplying the input channels (after mean subtraction) by the scale factor. - size: Here we supply the spatial size that the Convolutional Neural Network expects. For most current state-of-the-art neural networks this is either 224×224, 227×227, or 299×299.
- mean: These are our mean subtraction values. They can be a 3-tuple of the RGB means or they can be a single value in which case the supplied value is subtracted from every channel of the image. If you’re performing mean subtraction, ensure you supply the 3-tuple in
(R, G, B)order, especially when utilizing the default behavior of swapRB=True. - swapRB : OpenCV assumes images are in BGR channel order; however, the
meanvalue assumes we are using RGB order. To resolve this discrepancy we can swap the R and B channels in the image by setting this value toTrue. By default, OpenCV performs this channel swapping for us.
blob = cv2.dnn.blobFromImage(face_img, 1, (227, 227), MODEL_MEAN_VALUES, swapRB=False)
Step 14: Predict the gender.
#Predict Gender
gender_net.setInput(blob)
gender_preds = gender_net.forward()
gender = gender_list[gender_preds[0].argmax()]
Step 15: Predict the Age.
#Predict Age
age_net.setInput(blob)
age_preds = age_net.forward()
age = age_list[age_preds[0].argmax()]
Step 16: Now we have to put text on our output frame using putText() module of openCV.
cv2.putText() takes parameters as :
- Text data that you want to write
- Position coordinates of where you want to put it ( i.e. bottom-left corner where data starts).
- Font type (Check cv2.putText() docs for supported fonts)
- Font Scale (specifies the size of font)
- regular things like color, thickness, lineType etc. For better look, lineType = cv2.LINE_AA is recommended.
overlay_text = "%s %s" % (gender, age)
cv2.putText(image, overlay_text, (x, y), font, 1, (255, 255, 255), 2, cv2.LINE_AA)
Step 17: Finally print your final output.
cv2.imshow('frame', image)
At the end we have :
if cv2.waitKey(1) & 0xFF == ord('q'):
   break
Our program waits up to 1 millisecond for the user to press a key. It then takes the value of the key read and ANDs it with 0xFF which removes anything above the bottom 8-bits and compares the result of that with the ASCII code for the letter q which would mean the user has decided to quit by pressing qon the keyboard.
Output : Video URL-1: https://www.youtube.com/watch?v=iH1ZJVqJO3Y
Video URL-2: https://www.youtube.com/watch?v=qLNhVC296YI
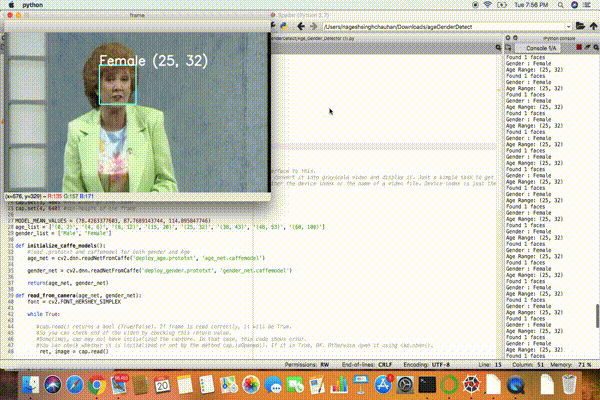
Quite interesting isn’t it? Not very accurate though.
Conclusion :
As we have seen in this article that in just a few lines of code we have built an age and gender detection model, from here on you can also incorporate emotion detection and object detection in the same model and create a fully functional application.
Hopefully, you found this article to be a good read and useful in your quest for recognizing a person’s age and gender. Let me know your doubts in the comment section.
Happy Learning :)
Get in touch with me on LinkedIn.
Bio: Nagesh Singh Chauhan is a Data Science enthusiast. Interested in Big Data, Python, Machine Learning.
Original. Reposted with permission.
Related:
- A Beginner’s Guide to Linear Regression in Python with Scikit-Learn
- How to do Everything in Computer Vision
- Pedestrian Detection in Aerial Images Using RetinaNet