Build Dog Breeds Classifier Step By Step with AWS Sagemaker
This post takes you through the basic steps for creating a cloud-based deep learning dog classifier, with everything accomplished from the AWS Management Console.
By John Burt, AICamp Student
John Burt is a student of class C20031717: Full Stack Deep Learning in AWS at AICamp.
Imagine you’re an app developer, and you want to make a mobile app that tells users the breed of a dog just by pointing their phone at it and taking a picture. This seems like a pretty cool idea, and it could be applied to any number of other things people might want to identify like birds, flowers, cars, etc. The app would need a classifier to predict dog breed from an image, and the best models for that are Deep Learning neural networks like ResNet. But DL models are large and processing intensive, so you should host your dog breed classifier in the cloud where the mobile app can access it via an API.
Luckily for you, AWS SageMaker makes it incredibly easy to build, train and tune machine learning models in the cloud. Once you have a trained model it’s a simple step to implement a scalable inference microservice using the AWS API Gateway. In this post I’ll take you through the basic steps for how to do this using a project I created for AICamp’s class Full Stack Deep Learning in AWS. For this project I did everything from the AWS Management Console.
My project GitHub site is here: Dog breed identification from images, and it includes more details about how to set up your inference microservice on AWS.
The data
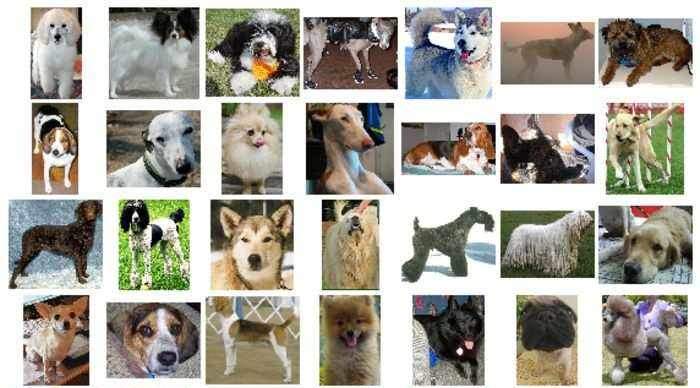
If I want to build a Deep Learning model to ID dog breeds, then I’m going to need need a lot of labeled dog images. For this I chose the Stanford Dogs dataset, a set of 20580 images of 120 dog breeds, with 100–150 image samples for each breed. SageMaker expects the model training data to be in the cloud, so I uploaded the images to an S3 bucket, placing them into a folder “dogs”. During model training and testing, I set up my SageMaker training job to access this folder.
The model
SageMaker offers a built-in image-classifier, which is a ResNet deep learning model. ResNet is a large convolutional neural network, and would normally need a lot more training images than the Stanford Dogs dataset provides, but SageMaker offers the option of transfer learning, which greatly reduces the number of training images required as well as training time. Transfer learning is a procedure where the network is pre-trained to a generic classification task with a very large image dataset (in this case ImageNet), and then you re-train the model using your smaller more specific training set.
Another training feature that SageMaker provides is early stopping, where the training job will stop if the model loss metric doesn’t improve or gets worse. Early stopping and transfer learning greatly reduces training times, which also results in lower compute costs per job.
Hyperparameter tuning
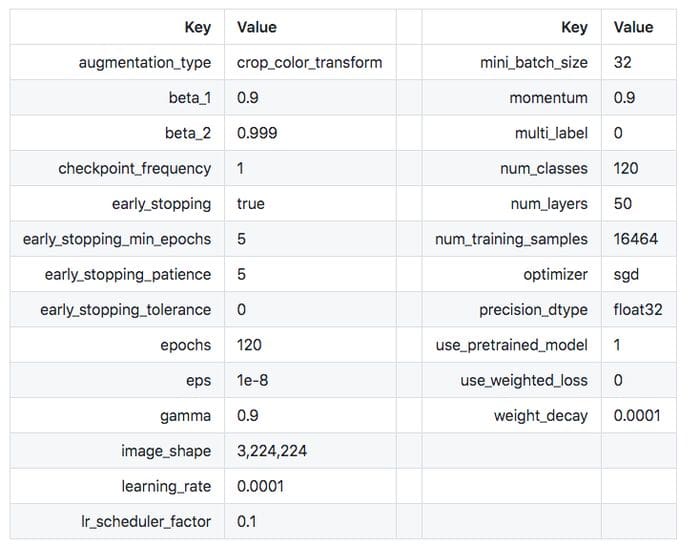
You can read about all the SageMaker image classifier hyperparameters here. I tried several different resnet model sizes, and 50 layers seemed to be the minimum size that worked well so I chose that. I tried using hyperparameter tuning for several other hyperparameters, but ended up canceling the training job because it was eating up processing time and costing me too much for not much improvement. I settled on the following hyperparameters based on defaults and manual tweaking. I found that learning rate was the most important parameter to ensure good training: too large and the model would often never train properly, but too small and the model would take longer than necessary to train. I used a learning rate of 0.0001 here, but I think the ideal rate for this task is actually around 0.0005. I also enabled image augmentation during training, where the training images are randomly cropped, rotated, sheared and color modified. This reduces overfitting and helps the model to generalize better.
After tuning and testing, I chose the following hyperparameters:
The training job
For the model training job I needed to specify the class of each image and which images to assign for training and testing (validation). To do that, I generated a set of tab delimited text files, one for training and one for testing (dog_breeds_all_fold_1_train.lst and dog_breeds_all_fold_1_test.lst), that listed the class ID and path of each training image (training and testing image sets were mutually exclusive). These LST files were placed into the dogs folder on the s3 bucket used for model training.
From the AWS SageMaker Studio console, I created a training job, selecting the image classifier model and configuring the hyperparameters as above, telling the job where to find the images and the LST files, and specifying a few additional configurations. The training job took 2.7 hrs (costing around $7). The final overall validation accuracy was 83%, which is not too bad, though something we’d want to improve on later.
Creating the Deep Learning inference microservice
After training the model, I needed to get it running on a server and then expose it to the world via a REST API so that my mobile app can access it. There are three components to this system:
- The SageMaker model instance and endpoint: an instance of the trained model, with an endpoint allowing access to it.
- A Lambda function: AWS Lambda acts as a switchboard, using a small piece of your own code to pass images from the API to the model for prediction, and then to pass the model results to the API.
- The API: AWS API Gateway provides a REST API service.
So how does this all work? In my case it’s very simple: the API receives a POST request containing image data for prediction. The API passes the image data to the Lambda function, which converts it to the correct format and passes it to the SageMaker model instance via the model’s endpoint. The model makes a prediction and then returns a result to the Lambda, which passes it to the API and then out to the device that sent the image.
Using the API
There’s a notebook in my github project folder that shows how to use the microservice API I created (dog_breed_id_test_API_manual.ipynb) The notebook lets you select a JPG dog image on your local drive, converts the image to a base64 format, wraps it into a json payload and then passes it to the API URL via a POST request. The model prediction is returned in another json payload. For this notebook to work, you’d need to swap in your own deployed API URL, since I’ve shut down my own service.
Testing model performance
Before you deploy a model to production, it’s important to take a closer look at what the model is doing. How uniform is the model accuracy? Are there classes with poor performance, and if so, why and how can this be fixed?
I analyzed the trained model performance in more detail by evaluating performance of a the test image set across classes. The model has 83% validation accuracy overall, but accuracy was not uniform: some classes performed better and others much worse.

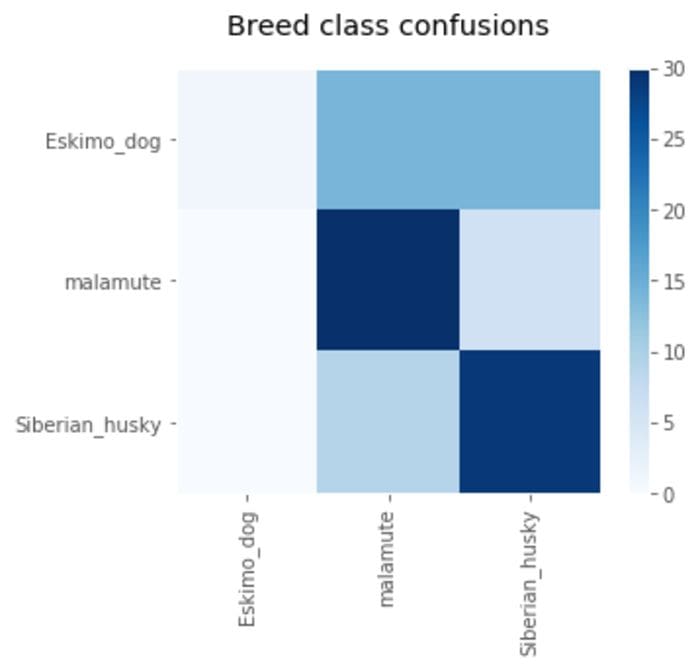
The worst performing dog breed class was “Eskimo dog”, with a recall score of just 3%. So, which other classes are “Eskimo dog” images being confused with? If I look at a confusion matrix, it appears that only two other classes are accounting for most of the errors: “malamute” and “Siberian husky”.
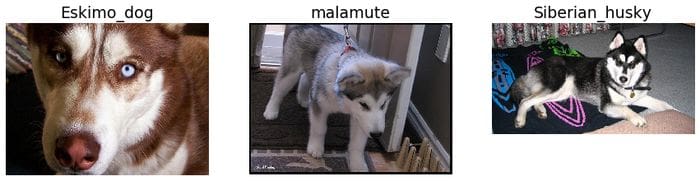
Looking at some comparison images from each class is helpful way to track down the cause of the error: most of the images labeled “Eskimo dog” are actually huskies and malamutes: this is a labeling error.
Other low performing classes had different issues: the same breed split into multiple size classes (Poodle), or different breeds that just look very similar (Lhasa Apso, Maltese Dog, Shi Tzu). Another problem I found was that the images aren’t well curated: there are pictures of plush toys and dogs obscured by objects and barely visible. A serious effort to build a production quality dog breed predictor would require a cleaner dataset with more accurate labeling. Perhaps this would be a good use of Amazon SageMaker Ground Truth.
Results summary:
Training the model was a fairly simple procedure, though sometimes it was a bit fussy to get everything configured just right. The classifier performed very well overall, with most classes at > 80% recall. Hyperparameter tuning was more complicated, and was expensive, since every training run cost money to complete. I would not recommend hyperparameter tuning except as an exercise, your model is performing badly or you’re planning to deploy the model in production. For manual tuning, it helped to tune with a simpler task (in this case, classify only 10 breeds rather than the full 120), which greatly reduced training time.
Setting up the inference microservice was also reasonably simple, though again, there were some details that took me a while to figure out. However, once you know what to do, it is a surprisingly simple procedure.
Bio: John Burt is a student at AICamp. He is the head organizer of the Portland Data Science Group.
Original. Reposted with permission.
Related:
- Few-Shot Image Classification with Meta-Learning
- Deep Learning for Image Classification with Less Data
- Why do we need AWS SageMaker?