
Photo by Andrew Stutesman on Unsplash
Introduction
When dealing with large datasets for machine learning, have you ever come across an address column that looks like this?
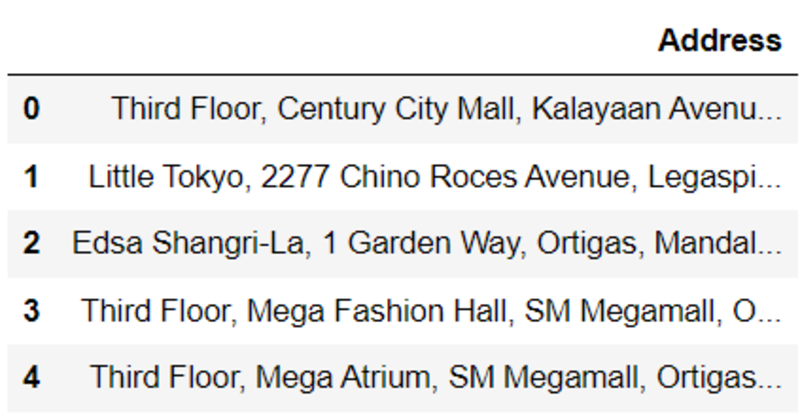
Image by Author
Location data can be very messy and difficult to process.
It is difficult to encode addresses, since they are of very high cardinality. If you try to encode a column like this with a technique like one-hot encoding, it will lead to high dimensionality, and your machine learning model might not perform well.
The easiest way to overcome this problem is to geocode these columns.
What is Geocoding?
Geocoding is the process of converting addresses into geographical coordinates. This means that you’ll be transforming raw addresses into latitude/longitude pairs.
Geocoding in Python
There are many different libraries available that can help you do this with Python. The fastest is the Google Maps API, which I recommend if you have more than 1000 addresses you need to convert in a short period of time.
However, the Google Maps API isn’t free. You will need to pay around $5 per 1000 request.
A free alternative to the Google Maps API is the OpenStreetMap API. However, the OpenStreetMap API is a lot slower, and also slightly less accurate.
In this article, I will walk you through the geocoding process with these two APIs.
Method 1: Google Maps API
Let's first use the Google Maps API to convert addresses into lat/long pairs. You will first need to create a Google Cloud account to do this and enter your credit card information.
Although this is a paid service, Google gives you $200 in free credit when you first create a Google Cloud account. This means that you can make around 40,000 calls with their geocoding API before you get charged for it. As long as you don’t hit this limit, your account will not be charged.
First, set up a free account with Google Cloud. Then, once you’ve set up an account, you can follow this tutorial to get your Google Maps API key.
Once you’ve received your API key, you can start coding!
Pre-requisites
We are going to use the Zomato Restaurants Kaggle dataset for this tutorial. Make sure to have the dataset installed in your path. Then, install the googlemaps API package with this command:
pip install -U googlemaps
Imports
Run the following lines of code to import the libraries you need to get started:
pip install -U googlemaps
Reading the dataset
Now, lets read the dataset and check the head of the dataframe:
data = pd.read_csv('zomato.csv',encoding="ISO-8859-1")
df = data.copy()
df.head()

Image by Author
This dataframe has 21 columns and 9551 rows.
We only need the address column for geocoding, so I’m going to drop all the other columns. Then, I am going to drop duplicates so we only get unique addresses:
df = df[['Address']]
df = df.drop_duplicates()
Taking a look at the head of the dataframe again, we can see only the address column:

Image by Author
Great! We can start geocoding now.
Geocoding
First, we need to access our API key with Python. Run the following lines of code to do this:
gmaps_key = googlemaps.Client(key="your_API_key")
Now, lets try geocoding one address first, and take a look at the output.
add_1 = df['Address'][0]
g = gmaps_key.geocode(add_1)
lat = g[0]["geometry"]["location"]["lat"]
long = g[0]["geometry"]["location"]["lng"]
print('Latitude: '+str(lat)+', Longitude: '+str(long))
The output of the above code looks like this:

Image by Author
If you get the above output, great! Everything works.
We can now replicate this process for the entire dataframe:
# geocode the entire dataframe:

def geocode(add):
    g = gmaps_key.geocode(add)
    lat = g[0]["geometry"]["location"]["lat"]
    lng = g[0]["geometry"]["location"]["lng"]
    return (lat, lng)

df['geocoded'] = df['Address'].apply(geocode)
Lets check the head of the dataframe again to see if this worked:
df.head()
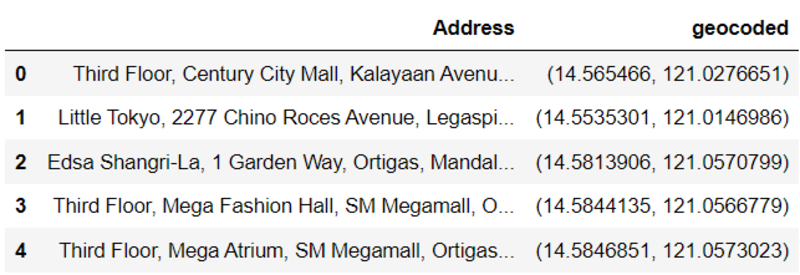
If your output looks like the screenshot above, congratulations! You have successfully geocoded addresses in an entire dataframe.
Method 2: OpenStreetMap API
The OpenStreetMap API is completely free, but is slower and less accurate than the Google maps API.
This API was unable to locate many of the addresses in the dataset, so we will be using the locality column this time instead.
Before we start with the tutorial, lets look at the difference between the address and locality column. Run the following lines of code to do this:
print('Address: '+data['Address'][0]+'\n\nLocality: '+data['Locality'][0])
Your output will look like this:

Image by Author
The address column is a lot more granular than the locality column, and it provides the exact location of the restaurant, including the floor number. This might be the reason the address isn’t recognized by the OpenStreetMap API, but the locality is.
Lets geocode the first locality and take a look at the output.
Geocode
Run the following lines of code:
import url
import requests

data = data[['Locality']]

url = 'https://nominatim.openstreetmap.org/search/' + urllib.parse.quote(df['Locality'][0]) +'?format=json'
response = requests.get(url).json()
print('Latitude: '+response[0]['lat']+', Longitude: '+response[0]['lon'])
The output of the above codes is very similar to the result generated by the Google Maps API:

Image by Author
Now, lets create a function to find the coordinates of the entire dataframe:
def geocode2(locality):
    url = 'https://nominatim.openstreetmap.org/search/' + urllib.parse.quote(locality) +'?format=json'
    response = requests.get(url).json()
    if(len(response)!=0):
        return(response[0]['lat'], response[0]['lon'])
    else:
        return('-1')

data['geocoded'] = data['Locality'].apply(geocode2)
Great! Now, lets take a look at the head of the dataframe:
data.head(15)
Notice that this API was unable to come up with coordinates for many of the localities in the dataframe.
Although its a great free alternative to the Google Maps API, you risk losing a lot of data if you geocode with OpenStreetMap.
That’s all for this tutorial! I hope you learnt something new from here, and have a better understanding on dealing with geospatial data.
Good luck with your data science journey, and thanks for reading!
Natassha Selvaraj is a self-taught data scientist with a passion for writing. You can connect with her on LinkedIn.
Original. Reposted with permission.