9 Tips For Training Lightning-Fast Neural Networks In Pytorch
Who is this guide for? Anyone working on non-trivial deep learning models in Pytorch such as industrial researchers, Ph.D. students, academics, etc. The models we're talking about here might be taking you multiple days to train or even weeks or months.
By William Falcon, AI Researcher

Let's face it, your model is probably still stuck in the stone age. I bet you're still using 32bit precision or *GASP* perhaps even training only on a single GPU.
????.
I get it though, there are 99 speed-up guides but a checklist ain't 1? (yup, that just happened). Well, consider this the ultimate, step-by-step guide to making sure you're squeezing all the (GP-Use) ????‚ out of your model.
This guide is structured from simplest to most PITA modifications you can make to get the most out of your network. I'll show example Pytorch code and the related flags you can use in the Pytorch-Lightning Trainer in case you don't feel like coding these yourself!
Who is this guide for? Anyone working on non-trivial deep learning models in Pytorch such as industrial researchers, Ph.D. students, academics, etc. The models we're talking about here might be taking you multiple days to train or even weeks or months.
We'll cover (from simplest to most PITA)
- Using DataLoaders.
- Number of workers in DataLoader.
- Batch size.
- Accumulated Gradients.
- Retained graphs.
- Moving to a single GPU.
- 16-bit mixed-precision training.
- Moving to multiple GPUs (model duplication).
- Moving to multiple GPU-nodes (8+GPUs).
- My tips for thinking through model speed-ups
Pytorch-Lightning

You can find every optimization I discuss here in the Pytorch library called Pytorch-Lightning. Lightning is a light wrapper on top of Pytorch that automates training for researchers while giving them full control of the critical model parts. Check out this tutorial for a more robust example.
Lightning uses the latest best practices and minimizes the places where you can make a mistake.
We'll define our LightningModel for MNIST here and fit using the Trainer.
1. DataLoaders

This is probably the easiest place to get some speed gains. The days of saving h5py or numpy files to speed up your data loading are gone (wait... you guys weren't doing that?? ). With Pytorch dataloader loading image data is trivial (for NLP data, check out TorchText)
In lightning you don't need to specify a training loop, just define the dataLoaders and the Trainer will call them when needed.
2. Number Of Workers in DataLoaders

Another magical place for speed-up comes from allowing batches to be loaded in parallel. So instead of loading one batch at a time, you can load nb_workers batches at a time.
3. Batch size

Before starting the next optimization steps, crank up the batch size to as much as your CPU-RAM or GPU-RAM will allow.
The next sections will focus on helping decrease the RAM footprint so you can continue to increase the batch size.
Remember you'll likely have to update your learning-rate again. A good rule of thumb is to double learning rate if you double batch size.
4. Accumulated Gradients
In the case where you have maxed out your compute resources, and your batch size is still too low (say 8), then we need to simulate a larger batch size for gradient descent to provide a good estimate.
Let's say we want to get to a batch size of 128. Then we'll do 16 forward and backward passes with a batch-size of 8 before doing a single optimizer step.
In lightning, this is all done for you though. Just set this flag.
5. Retained Graphs

A simple place to blow up your RAM is not releasing the pointer to the computational graph by say... storing your loss for logging purposes
losses = []...
losses.append(loss)print(f'current loss: {torch.mean(losses)'})
The problem above is that loss still has a copy of the graph. In this case, call .item() to release it.
# bad
losses.append(loss)# good
losses.append(loss.item())
Lightning takes special care to make sure it never retains copy of the graph (here's an example).
6. Single GPU training

Once you've maxed out the previous steps, it's time to move into GPU training. Training on the GPU will parallelize the mathematical computations across the many GPU cores. The speed-up you get depends on the type of GPU you're using. I recommend the 2080Ti for personal use and the V100 for corporate use.
It may seem overwhelming at first but you really only need to do two things: 1) move your model to the GPU, 2) whenever you run data through it, put the data on the GPU.
If you're using Lightning, you don't have to do anything to your code. Just set this flag:
The main thing to take care of when training on GPUs is to limit the number of transfers between CPU and GPU.
# expensive
x = x.cuda(0)# very expensive
x = x.cpu()
x = x.cuda(0)
If you run out of RAM for example, don't move data back to the CPU to save RAM. Try to optimize your code in other ways or distribute across GPUs before resorting to that.
Another thing to watch out for is calling operations which force the GPUs to synchronize. An example would be clearing the memory cache.
# really bad idea. Stops all the GPUs until they all catch up
torch.cuda.empty_cache()
If you use Lightning, however, the only places this could be an issue are when you define your Lightning Module. Lightning takes special care to not make these kinds of mistakes.
7. 16-bit precision
Sixteen-bit precision is an amazing hack to cut your memory footprint in half. The majority of models are trained using 32-bit precision numbers. However, recent research has found that models can work just as well with 16-bit. Mixed-precision means you use 16-bit for certain things but keep things like weights at 32-bit.
To use 16-bit precision in Pytorch, install the apex library from NVIDIA and make these changes to your model.
The amp package will take care of most things for you. It'll even scale the loss if the gradients explode or go to zero.
In lightning, it's trivial to enable 16-bit without having to modify anything in your model or do what I wrote above.
8. Moving to Multiple GPUs
Now, this is where things get really interesting. There are 3 (maybe more?) ways of doing multi-GPU training.
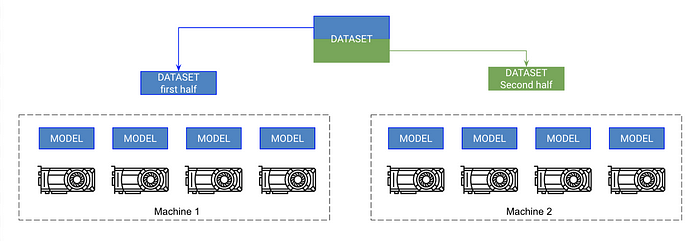
Split-batch Training

The first way should just be called split-batch training. This strategy copies the model onto each GPU and each GPU gets a portion of the batch.
In lightning, you can just increase the number of GPUs you tell the trainer about without having to do anything of the above.
Split Model Training
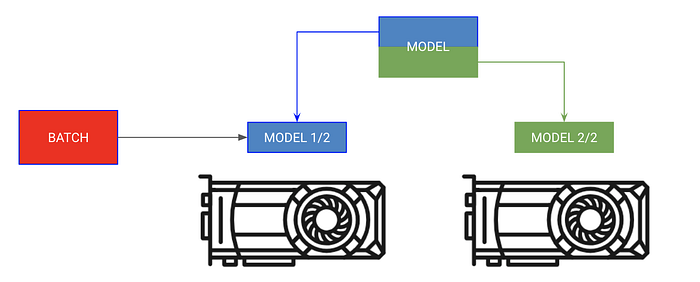
Sometimes your model can be too big too fit in memory. For example a sequence to sequence model with an encoder and a decoder might take up 20 GB of RAM when generating outputs. In this case, we want to put the encoder and decoder on separate GPUs.
For this type of training, don't give Lightning trainer any GPUs. Instead, put your own modules in the LightningModule on the correct GPU
Mixing both
In the case above, both the encoders and decoders can still benefit from parallelizing each operation. We can get more creative now.
Caveats to think about when using multiple GPUs
- model.cuda() won't do anything if it's already on that device.
- Always put the inputs on the first device in the devices list.
- Transferring data across devices is expensive, do it as a last resort.
- The optimizer and gradients will be stored on GPU 0. Thus the memory used on GPU 0 will likely be much greater than the others.
9. Multi-Node GPU training
If you've made it this far, you're now in the realm of training Imagenet in minutes! This isn't as hard as you might think, but it might require a bit more knowledge about your compute cluster. These instructions assume you're using SLURM on your cluster.
Pytorch allows multi-node training by copying the model on each GPU across every node and syncing the gradients. So, each model is initialized independently on each GPU and in essence trains independently on a partition of the data, except they all receive gradient updates from all models.
At a high-level:
- Init a copy of a model on each GPU (make sure to set the seed so each model inits to the same weights or it will fail).
- Cut the dataset into subsets (with DistributedSampler). Each GPU trains only on its own little subset.
- On .backward() all copies receive a copy of the gradients for all models. This is the only time the models communicate with each other.
Pytorch has a nice abstraction called DistributedDataParallel which can do this for you. To use DDP you need to do 4 things:
Pytorch team has a nice tutorial to see this in full detail.
However, in Lightning, this comes out of the box for you. Just set the number of nodes flag and it takes care of the rest for you.
Lightning also comes with a SlurmCluster manager to easily help you submit the correct details for the SLURM job (example).
10. Bonus! Faster multi-GPU training on a single node
Turns out, that the distributedDataParallel is soooo much faster than DataParallel because the only communication it performs is gradient syncing. So, a good hack is to replace DataParallel with this even when training on a single machine
In Lightning, this is easy to achieve by setting the distributed_backend to ddp and setting the number of GPUs.
Thinking Through Model Speed-Ups
Although this guide will give you a list of tricks to speed up your networks, I'll explain how I think through finding bottlenecks.
I break up the model into a few parts:
First, I make sure I have no bottlenecks in my data loading. For this I use existing data loading solutions I described, but if none fit what you need, think about offline processing and caching into high-performance data-stores such as h5py.
Next look at what you're doing in the training step. Make sure your forward pass is fast, avoid excessive computations and minimize data transfer between CPU and GPU. Finally, avoid doing things to slow down the GPU (covered in this guide)
Next, I try to maximize my batch size which will usually be bounded by the amount of GPU memory. From there it's a game about distributing across GPUs while minimizing latency to effectively use a large batch size (for instance on Imagenet I might try to get an effective batch size of 8,000+ across many GPUs.)
However, you need to be careful with large batch sizes. Consult the literature for your specific problem to see what people have gotten away with!
Acknowledgments
Thank you to Jeff Johnson for awesome CUDA insights, and the Pytorch teams for their help with getting DDP to work (not to mention their awesome framework and documentation). Thanks to testing help from my lab members (especially Cinjon Resnick).
Bio: William Falcon is an AI Researcher, startup founder, CTO, Google Deepmind Fellow, and current PhD AI research intern at Facebook AI.
Original. Reposted with permission.
Related:
- Pytorch Cheat Sheet for Beginners and Udacity Deep Learning Nanodegree
- Getting started with NLP using the PyTorch framework
- XLNet Outperforms BERT on Several NLP Tasks