 How to deploy Machine Learning/Deep Learning models to the web
 How to deploy Machine Learning/Deep Learning models to the web
The full value of your deep learning models comes from enabling others to use them. Learn how to deploy your model to the web and access it as a REST API, and begin to share the power of your machine learning development with the world.

If you are in the field of machine learning for some time, you must have created some machine learning or deep learning models. You must have thought about how will people use your Jupyter notebook? The answer is they won’t.
People can not use your Jupyter notebooks, and you need to deploy your model either as an API or as a complete web service, or in a mobile device, Raspberry PI, etc.
In this article, you will learn how to deploy your deep learning model as a REST API, and add a form to take the input from the user, and return the predictions from the model.
We will use FastAPI to create it as an API and deploy it for free on Heroku.
Step 1: Installations
You need to install the necessary packages.
1. FastAPI + Uvicorn
We will be FastAPI for API and Uvicorn server to run and host this API.
$ pip install fastapi uvicorn
2. Tensorflow 2
We will be using Tensorflow 2 for this tutorial, and you can use the framework of your own choice.
$ pip install tensorflow==2.0.0
3. Heroku
You can install Heroku on Ubuntu directly from the terminal using the following command,
$ sudo snap install --classic heroku
On macOS, you can install it via,
$ brew tap heroku/brew && brew install heroku
For windows, you can install the compressed files from the official website here.
4. Git
You also need to install git and make an account on GitHub so that we can push directly to GitHub and connect the main branch to our Heroku, so it will automatically deploy.
You can use apt to install git on Debian.
$ sudo apt install git-all
To install it on Windows, you can download it directly from here.
To install on macOS, you can install XCode command-line tools and run the following command to activate it,
git --version
You can also install it from the website of git on macOS.
Step 2: Creating our Deep Learning Model
We will create a simple deep learning model, which is related to sentiment analysis. The dataset used can be downloaded from Kaggle, which is related to GOP tweets.
We will create this model, train it, and save it so that we can use the saved model in our API, and we do not have to train the model weights every time our API starts. We will create this model in the file model.py.
import pandas as pd
from tensorflow.keras.preprocessing.text import Tokenizer
from tensorflow.keras.preprocessing.sequence import pad_sequences
from tensorflow.keras.models import Sequential
from tensorflow.keras.layers import Dense, Embedding, LSTM, SpatialDropout1D
from sklearn.model_selection import train_test_split
import re
Here we have imported the important libraries, which will help us in the creation of the model and cleaning of data. I will not dive into details of the deep learning model or working of Tensorflow. For that, you can check this article on KDnuggets, and for working on the sentiment analysis model, check out this article at CNVRG.
We will read the data using Pandas.
data = pd.read_csv('archive/Sentiment.csv')

# Keeping only the neccessary columns
data = data[['text','sentiment']]
We will create a function to remove unwanted characters in Tweets using Regex.
def preProcess_data(text):
   text = text.lower()
   new_text = re.sub('[^a-zA-z0-9\s]','',text)
   new_text = re.sub('rt', '', new_text)
   return new_text

data['text'] = data['text'].apply(preProcess_data)
We will use Tensorflow’s tokenizer to tokenize our dataset, and Tensorflow’s pad_sequences to pad our sequences.
max_fatures = 2000

tokenizer = Tokenizer(num_words=max_fatures, split=' ')
tokenizer.fit_on_texts(data['text'].values)
X = tokenizer.texts_to_sequences(data['text'].values)
X = pad_sequences(X, 28)

Y = pd.get_dummies(data['sentiment']).values
Now we will split the dataset into training and testing portions.
X_train, X_test, Y_train, Y_test = train_test_split(X,Y, test_size = 0.20)
It is now time to design and create the deep learning model. We will simply use an embedding layer and some LSTM layers with dropout.
embed_dim = 128
lstm_out = 196

model = Sequential()
model.add(Embedding(max_fatures, embed_dim,input_length = X.shape[1]))
model.add(SpatialDropout1D(0.4))
model.add(LSTM(lstm_out, dropout=0.3, recurrent_dropout=0.2, return_sequences=True))
model.add(LSTM(128,recurrent_dropout=0.2))
model.add(Dense(3,activation='softmax'))

model.compile(loss = 'categorical_crossentropy', optimizer='adam',metrics = ['accuracy'])
We will now fit the model.
batch_size = 512

model.fit(X_train, Y_train, epochs = 10, batch_size=batch_size, validation_data=(X_test, Y_test))
Now the deep learning model is trained, we will save the model so that we do not have to train every time we reload our server. Instead, we just use the trained model. Note that I have not done much hyper-parameter tuning or model improvement, as you can do it by yourself to deploy an improved model.
model.save('sentiment.h5')
Here we have saved our model in ‘hdf5’ format. You can learn more about model saving and loading in this article.
Step 3: Creating a REST API using FAST API
We will create a REST API using FAST API. We will create a new file named app.py. We will first do the important imports.
import numpy as np
from fastapi import FastAPI, Form
import pandas as pd
from starlette.responses import HTMLResponse
from tensorflow.keras.preprocessing.text import Tokenizer
from tensorflow.keras.preprocessing.sequence import pad_sequences
import tensorflow as tf
import re
Here we have imported FastAPI and Form from the fast API library, using which we will create an Input Form and endpoint for our API. We have imported HTMLResponse from starlette.response, which will help in creating an input form.
We will start by creating an input form so that users can input data, i.e., a test string on which we can test the sentiment.
app = FastAPI()

@app.get('/predict', response_class=HTMLResponse)
def take_inp():
    return '''
        <form method="post">
        <input maxlength="28" name="text" type="text" value="Text Emotion to be tested" />
        <input type="submit" />'''
We have created our FastAPI app in the first line and used the get method on the /predict route, which will return an HTML response so that the user can see a real HTML page, and input the data on forms using the post method. We will use that data to predict on.
You can run your app now by running the following command.
uvicorn app:app --reload
This will run your app on localhost. On the http://127.0.0.1:8000/predict route, you can see the input form.

Now let us define some helper functions, which we will use to preprocess this data.
data = pd.read_csv('archive/Sentiment.csv')
tokenizer = Tokenizer(num_words=2000, split=' ')
tokenizer.fit_on_texts(data['text'].values)

def preProcess_data(text):
    text = text.lower()
    new_text = re.sub('[^a-zA-z0-9\s]','',text)
    new_text = re.sub('rt', '', new_text)
    return new_text

def my_pipeline(text):
    text_new = preProcess_data(text)
    X = tokenizer.texts_to_sequences(pd.Series(text_new).values)
    X = pad_sequences(X, maxlen=28)
    return X
These functions are essentially doing the same work for cleaning and preprocessing data, which we have used in our model.py file.
Now we will create a POST request at the "/predict" route so that the data posted using the form can be passed into our model, and we can make predictions.
@app.post('/predict')
def predict(text:str = Form(...)):
    clean_text = my_pipeline(text) #clean, and preprocess the text through pipeline
    loaded_model = tf.keras.models.load_model('sentiment.h5') #load the saved model
    predictions = loaded_model.predict(clean_text) #predict the text
    sentiment = int(np.argmax(predictions)) #calculate the index of max sentiment
    probability = max(predictions.tolist()[0]) #calulate the probability
    if sentiment==0:
         t_sentiment = 'negative' #set appropriate sentiment
    elif sentiment==1:
         t_sentiment = 'neutral'
    elif sentiment==2:
         t_sentiment='postive'
    return { #return the dictionary for endpoint
         "ACTUALL SENTENCE": text,
         "PREDICTED SENTIMENT": t_sentiment,
         "Probability": probability
    }
Now that is quite some code. Let us break it down. We have defined a route "/predict" on a POST request, where the data from the forms will be our input. We have specified this in the function parameter as Form(…). We pass our text to the pipeline function so that it can return the cleaned and preprocessed data, which we can feed to our loaded model and get the predictions. We can get the index of highest predictions using the argmax function from numpy. We can pick the maximum probability using the max function from Python. Note that an endpoint in FastAPI has to return a dictionary or a Pydantic base model.
You can now run your app via
$ uvicorn app:app --reload
At the "/predict" route, you can give an input to your model.

On which the model will predict the sentiment, and return the results.

We can also make a dummy route on the home page, i.e., “/” so that it is also working.
@app.get('/')
def basic_view():
    return {"WELCOME": "GO TO /docs route, or /post or send post request to /predict "}
You can see the complete code here:
Docs route on FastAPI
FastAPI has an amazing “/docs” route for every application, where you can test your API and the requests and routes it has.
On our API, we have 3 routes in total:
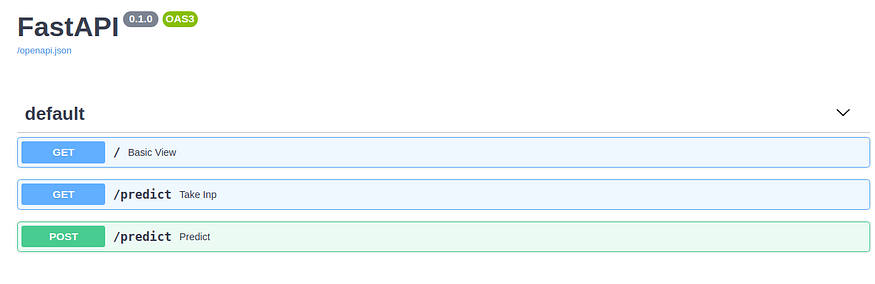
We can test all 3 by clicking on them. We will test the most important one, that is, the POST request on predict route, which performs all our calculations.

Click on ‘Try it out’ to pass in the desired text to get its sentiment:

Now you can check the results in the responses:

A response of 200 means that the request is successful, and you will get a valid desired output.
Step 4: Adding appropriate files helpful to deployment
To define a Python version for your app on Heroku, you need to add a runtime.txt file in your folder. In that file, you can define your Python version. Just write in it the suitable Python version. Note that it is a sensitive file, so make sure to write it in the correct format, as specified, or else Heroku will throw some errors.
python-3.6.13
To run the uvicorn server on Heroku, you need to add a Procfile. Note that this file has no extension. Just create a file named “Procfile“. Add the following command in Procfile.
web: uvicorn app:app --host=0.0.0.0 --port=${PORT:-5000}
Note that you need to run the server on 0.0.0.0, and the port should be 5000 on Heroku.
Another important file is requirments.txt file. Add all the important libraries that your project needs.
sklearn
fastapi
pandas
pydantic
tensorflow==2.0.0
uvicorn
h5py==2.10.0
python-multipart
You can add a .gitignore file to ignore the files which you will not use:
__pycache__
model.py
Step 5: Deploying on Github
The next step is to deploy this web app on Github. You need to create a new repository on GitHub. Then open the command line and change the directory to the project directory.
You need to initialize the repository:
$ git init
Then add all the files:
$ git add -A
Commit all the files:
$ git commit -m "first commit"
Change the branch to main:
$ git branch -M main
Connect the folder to the repository on GitHub:
$ git remote add origin https://github.com/username/reponame.git
Push the repository:
$ git push -u origin main
Step 6: Deploying on Heroku
You need to create a new app on the Heroku dashboard.
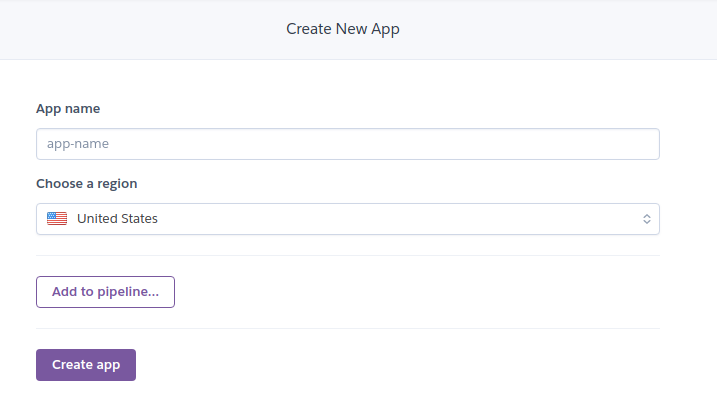
Choose an appropriate name for your app.
In the deploy section, in the deployment method, choose GitHub.
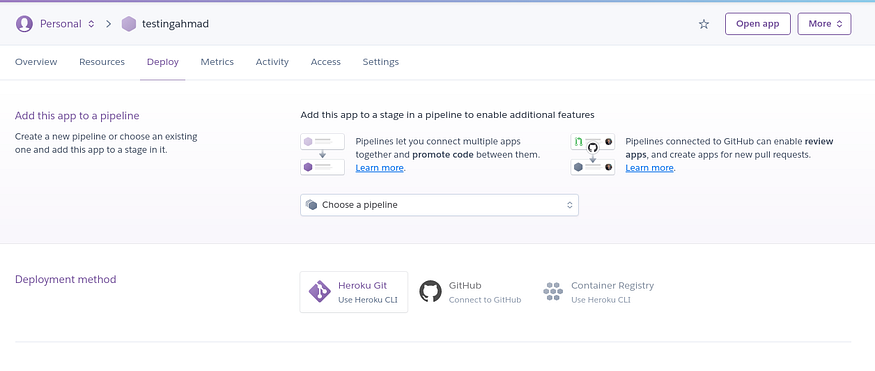
Search your repo here, and connect to it.

You can choose automatic deploys so that every change in the deployment branch on GitHub will be automatically deployed to the app. For the first time, you need to manually deploy the app. Then every time you update your deployment branch on GitHub, it will be automatically be deployed.

By clicking on Deploy Branch, it will start the deployment process, and you can see the logs by clicking on “More”, which can help you see the logs of applications, and you can see any error if you face.

Once the build is successful, you can check your app by clicking on Open app. You can go to all the routes you have defined earlier in your app, and test them.

Seeing Deployment history
You can check the deployment history of your app on GitHub by checking the environment tab on the bottom left.

It will also show you all the history of deployment.

Accessing your API using Python Requests
You can access your API, which means that you can use this API on your normal code to perform sentiment analysis tasks.
import requests #install using pip if not already

url = 'https://sentiment-analysis-gopdebate.herokuapp.com/predict'
data = {'text':'Testing Sentiments'} #test is the function params

resp = requests.post(url, data=data) #post request
print(resp.content)

And you will receive the output just like you were seeing the output in the endpoint.
Accessing your API using Curl
Curl is a command-line tool (you can download it from here) used to make requests from the command line. We can send the request using the following command.
$ curl -X 'POST' \
   'https://sentiment-analysis-gopdebate.herokuapp.com/predict' \
   -H 'accept: application/json' \
   -H 'Content-Type: application/x-www-form-urlencoded' \
   -d 'text=WORST%20SHOW%20EVER
Here we have mentioned the type of request after -X argument, i.e., POST request. Then -H shows the headers our API is using, which are application/JSON and content type. Then we have to give data using the -d argument and pass in the text. To add space, use %20.

You can check the complete code at my GitHub repository here.
Learning Outcome
In this article, you learned how to deploy your machine learning/deep learning model on the web as a REST API using Heroku and GitHub. You also learned how to access that API using Python requests module and using CURL.
Related: