Getting Started with PyTorch
A practical walkthrough on how to use PyTorch for data analysis and inference.

Introduction
PyTorch is nowadays one of the fastest-growing Python frameworks for Deep Learning. This library was in fact first used mainly by researchers in order to create new models, but thanks to recent advancements is gaining lots of interests also from many companies. Some of the reasons for the interest in this framework are:
- GPU optimized tensor computation (matrix-like data structures) using an interface closely resembling Numpy in order to facilitate adoption.
- Neural Networks training using Automatic Differentiation (to keep track of all the operations which happened to a tensor and automatically calculate gradients).
- Dynamic Computation Graph (using PyTorch it is not necessary in order to run a model to define first the entire computational graph like in Tensorflow).
PyTorch is freely available to be installed on any operating system following the documentation instructions. Some of the main elements which compose this library are the:
- Autograd module: is used to record the operations performed on a tensor and perform them backwards to compute gradients (this property can be extremely useful to speed up neural networks operations and to allow PyTorch to follow the imperative programming paradigm).
- Optim module: is used in order to easily import and apply various optimization algorithms for neural networks training such as Adam, Stochastic Gradient Descent,etc..
- nn module: provides a set of functions which can help us to quickly design any type of neural network layer by layer.
Demonstration
In this article, I will walk you through a practical example in order to get started using PyTorch. All the code used throughout this article (and more!) is available on my GitHub and Kaggle accounts. For this example, we are going to use the Kaggle Rain in Australia dataset in order to predict if tomorrow is going to rain or not.
Importing Libraries
First of all, we need to import all the necessary libraries.
Data Preprocessing
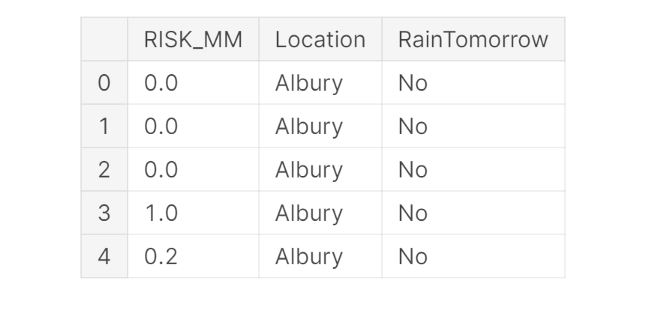
For this example, we will focus to just use the RISK_MM and Location indicators as our model features (Figure 1). Once divided our data into training and test sets, we can then convert our Numpy arrays into PyTorch tensors and create a training and test data-loader to use in order to fed in data to our neural network.
Modelling
At this point, using PyTorch nn module, we can then design our Artificial Neural Network (ANN). In PyTorch, neural networks can be defined as classes constituted by two main functions: __inti__() and forward().
In the __inti__() function, we can set up our network layers while in the forward() function we decide how to stack the different elements of our network together. In this way, debugging and experimenting can take place relatively easily by just adding print statements in the forward() function to inspect any part of the network at any point in time.
Additionally, PyTorch provides also a Sequential Interface which can be used in order to create models in a similar way to how they are constructed using Keras Tensorflow API.
In this simple network, we are taking as input 50 features since that we previously converted our input categorical variables into dummy/indicator variables using the Pandas get_dummies() functionality. Therefore, our network will be composed of 50 neurons at the input, a hidden layer of 20 neurons and an output layer of a single neuron. The size of the hidden layer can certainly be varied and more hidden layer can be easily added, but this would probably lead to risking overfitting to our data, considering the limited amount of data available. When staking together successive layers, we then just need to make sure the number of output features of one layer is equal to the number of input features in the successive layer.
Once instantiated our model, we can then also print out the network architecture.
ANN(
  (fc1): Linear(in_features=50, out_features=20, bias=True)
  (fc2): Linear(in_features=20, out_features=1, bias=True)
)
ANN Training
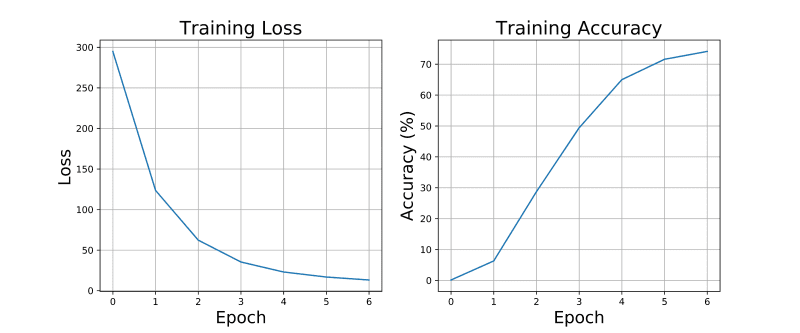
We are now finally ready to train our model. In the following code snippet, we first define Binary Cross Entropy as our loss function and Adam as the optimiser for our model parameters. Finally, we create a training loop of 7 iterations and store some key metrics parameters such as the overall loss and model accuracy for each iteration.
Epoch: 0, Loss: 294.88, Accuracy: 0.13%
Epoch: 1, Loss: 123.58, Accuracy: 6.31%
Epoch: 2, Loss: 62.27, Accuracy: 28.72%
Epoch: 3, Loss: 35.33, Accuracy: 49.40%
Epoch: 4, Loss: 22.99, Accuracy: 64.99%
Epoch: 5, Loss: 16.80, Accuracy: 71.59%
Epoch: 6, Loss: 13.16, Accuracy: 74.13%
As can be summarised in Figure 2, our model successfully managed to achieve a good accuracy without risking to overfit the original data (both the training loss and accuracy are just about to reach a plateau). This can be furthermore validated by implementing also a train/validation split to train our model and tune its parameters (as demonstrated in this GitHub notebook).
Evaluation
Finally, we can now create a second loop to test our model against some brand new data (in order to ensure our model is not training anymore and can be used just for inference, please note the model.eval() statement).
Test Accuracy: 74.66 %As can be seen from the printed output, our model testing accuracy closely matched our final training accuracy (74.66 % vs 74.13%).
Conclusion
In case you are interested in finding out more about PyTorch potentialities, PyTorch Lighting and Livelossplot are two great packages which can help you in developing, debugging and evaluating your PyTorch models.
I hope you enjoyed this article, thank you for reading!
Contacts
If you want to keep updated with my latest articles and projects follow me on Medium and subscribe to my mailing list. These are some of my contacts details:
Bio: Pier Paolo Ippolito is a Data Scientist and MSc in Artificial Intelligence graduate from the University of Southampton. He has a strong interest in AI advancements and machine learning applications (such as finance and medicine). Connect with him on Linkedin.
Original. Reposted with permission.
Related:
- The Most Complete Guide to PyTorch for Data Scientists
- PyTorch LSTM: Text Generation Tutorial
- PyTorch for Deep Learning: The Free eBook