Overview of AutoNLP from Hugging Face with Example Project
AutoNLP is a beta project from Hugging Face that builds on the company’s work with its Transformer project. With AutoNLP you can get a working model with just a few simple terminal commands.

What is AutoNLP and How Do You Use It?
AutoNLP is an automated way to train, evaluate, and deploy state-of-the-art NLP models for varying tasks. AutoNLP is a beta project from Hugging Face that builds on the company’s work with its Transformer project. It automatically fine tunes a working model for deployment based on the dataset that you provide.
With AutoNLP you can get a working model with just a few simple terminal commands.
Getting Started With an NLP Project
Whether you need a customer service bot or to analyze sentiment in online comments, getting off the ground with a natural language processing (NLP) project is not a simple process. It's intensely technical.
You need to decide which pre-trained model is best based on your dataset. You might also want to look at which architecture is best to apply to your use case, or whether you should be combing through the latest academic papers to be on the cutting edge. That's all very well and good for companies that have the time and money to create something unique, but so much of this work amounts to duplication of effort.
What if you could skip all that, prepare your training data, upload it to the cloud (or add to your on-premise system), pay a few bucks, and be up and running with a fine-tuned model ready to deploy in no time?
Hugging Face, a start-up based in New York, has a product that does just that. Hugging Face's AutoNLP builds on existing NLP models to create something that is ready to use, and all you need to do is type a few commands into your terminal.
What is Hugging Face?
Hugging Face is a private company with a mission to democratize machine learning tools and make them more easily accessible.

"Our open source and open science contributions make the latest Machine Learning science accessible to as many researchers and practitioners around the world as possible," Jeff Boudier, the head of product and growth at Hugging Face said.
"Our commercial products and services accelerate companies taking the latest ML science into production."
Hugging Face wants to be the leading source for machine learning collaboration. An online community where people can share, access, and contribute new machine learning models. The company already houses a free library of more than 13,000 pre-trained and fine-tuned models for NLP, as well as speech and computer vision tasks based on over 60 different base architectures.
What is Natural Language Processing (NLP)?
NLP has a unique history, but simply put it's all about getting a computer to work with language independently from human intervention by using what are known as models. Think of a model as a reference engine for a computer to properly categorize a given piece of language.
With a well-trained NLP model, a computer can scan thousands of pages of documents for key phrases or names and then categorize those mentions. It can also, for example, look at a statement and determine whether it is a positive or negative comment. NLP can also be used to try to understand what a person wants during a text chat, and then try to direct them towards a solution.
How well an NLP model works, however, depends on the base model and the dataset used to train that model.
What Does AutoNLP Do?
Hugging Face's AutoNLP helps data scientists and machine learning engineers get up and running with an NLP model relatively quickly. In fact, it's so easy that even a non-expert who's familiar with Python and the command line can easily play around with AutoNLP, although it does cost money.
Currently Hugging Face offers a free model that allows you to play around a bit, but to create and serve AutoNLP models you would have to shell out $9/month for their first tier paid account. Which isn't all that bad!
AutoNLP uses a principle known as Transfer Learning, which is what makes the process so much simpler. The basic idea is to take an existing, pre-trained base model for NLP and then, through the use of your data set (training and validation files), turn it into a fine-tuned model ready for deployment.
The beauty of AutoNLP is that it automatically selects the base model for you based on the task you want to perform and the training data you supply. AutoNLP then does all the fine tuning and hyper-parameter optimization behind the scenes. In the end it deploys the models on Hugging Face's servers with an available endpoint URL for use in your projects and programs.
What AutoNLP won't do, however, is work on your data. It's still up to you to supply a clean dataset for the computer to process.
Thomas Wolf Tweet with NLP Library Dataset, Source
So while AutoNLP can automate some of the process it won't do all of the work for you.
Hugging Face's AutoNLP can currently train models for a number of tasks including binary classification, multi-class classification, regression, entity recognition, summarization, and automatic speech recognition. AutoNLP supports a wide range of languages including English, French, German, Hindi, and Japanese. The available languages vary based on the task you want to carry out.
You can find a list of supported languages in the AutoNLP user documentation.
How to Use AutoNLP
So, let's work through an example! For this task we're going to keep it simple and create a working model for binary classification. The goal is to have a model that can take a social media post and decide whether the content is positive or negative. If we were doing multi-class classification then the model would detect whether the statement was positive, neutral, or negative.
Data can be uploaded as JSON, CSV, or TSV. Hugging Face deletes your training data once the training is complete. For our example we used data from the Sentiment140 project.
Before getting started there are a few prerequisites required for AutoNLP.
As of this writing, you need at least Python 3.7 for AutoNLP to work correctly. While most of the work is done on Hugging Face's servers, there are a few Python modules on the client side that help get the job done. In fact, it's advisable to have the most up-to-date stable version of Python as Hugging Face is frequently updating this project.
You also need Git and GitHub's Git LFS (Large File Storage) extension, which is a special tool for managing large files with Git.
Finally, sign-up for a Hugging Face account on the web. Then, since AutoNLP is in beta at this writing, request access from the project's landing page.
Once the prerequisites are taken care of, open a command line, and install AutoNLP:
python3 pip install -U autonlpNow we need to login to the system. This is a one-time operation that requires your API key from the website. To access your API key, login to Hugging Face and go to the tokens area of your account settings. There you'll find your API token, which you can copy to the clipboard.
autonlp login --api-key YOUR_API_KEYIf at any time you need help with autonlp commands type the following command to see the options:
autonlp -hThere are also help guides for each command such as:
autonlp create_project -hNow that we've logged into the system we're ready to create a project.
In this step we'll give the project a name, tell AutoNLP which language our data is in using the standard two-letter ISO codes, decide on the machine learning task (binary classification in this example), and specify the maximum number of models to create.
autonlp create_project --name NLPIsFun --language en --task binary_classification --max_models 10Remember that AutoNLP is not free so the number of models, the type of models, as well as the size of your dataset, impacts the cost. Our example here cost $27.50 for creating 10 models using a training data file of 10,000 CSV rows and a much smaller 500 rows for validation data.

Terminal output from AutoNLP project.
After creating your project, you should see a screen as pictured here that includes basic information about your project including the name, owner, status, task, time of creation, and so on.
Next, we have to upload our data, which needs two columns for our example: one column contains sentiment data and one column contains text. In this example we named our columns "sentiment" and "text" and mapped them to AutoNLP's columns, which are "target" and "text."
autonlp upload --project NLPIsFun --split train --col_mapping sentiment:target,text:text --files ~/FILE_LOCATION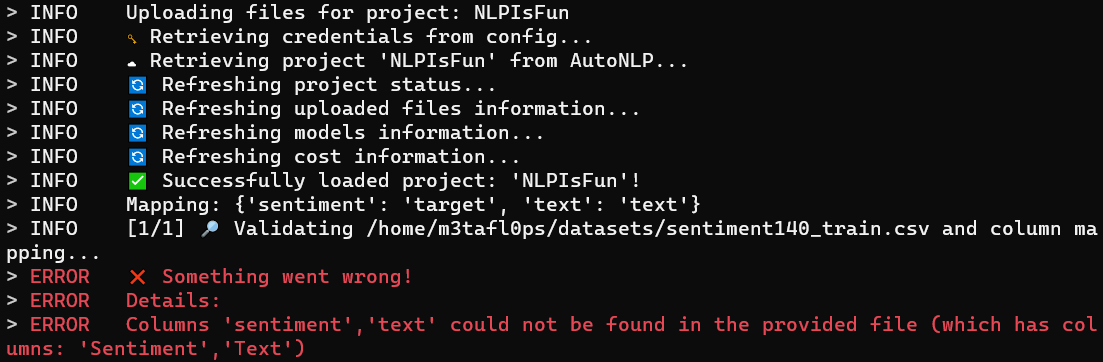
Demonstrating AutoNLP upload.
Keep in mind that column mapping is case sensitive so if your column is named "Sentiment" and you use "sentiment" you'll see an error as seen here.
Next, we upload the validation data using almost the same command:
autonlp upload --project NLPIsFun --split valid --col_mapping sentiment:target,text:text --files ~/FILE_LOCATIONBefore starting a training job let's take a quick look at what's going on with the project:
autonlp project_info --name NLPIsFun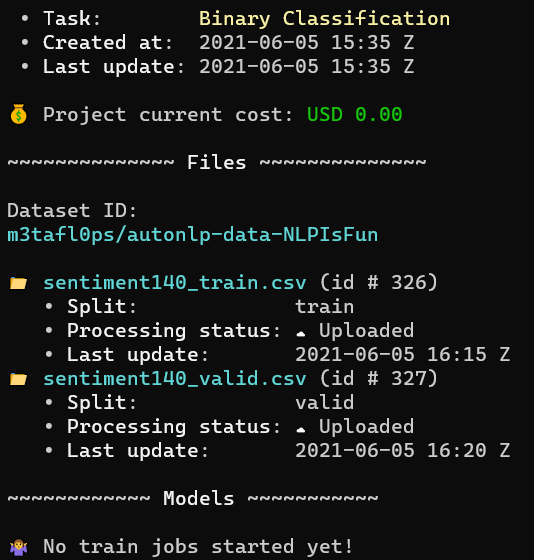
AutoNLP project info command in terminal.
This command shows us a similar screen to what we saw after creating the project. Now, however, we can see we have dataset files uploaded and ready for use.
Let's start a training job:
autonlp train --project NLPIsFun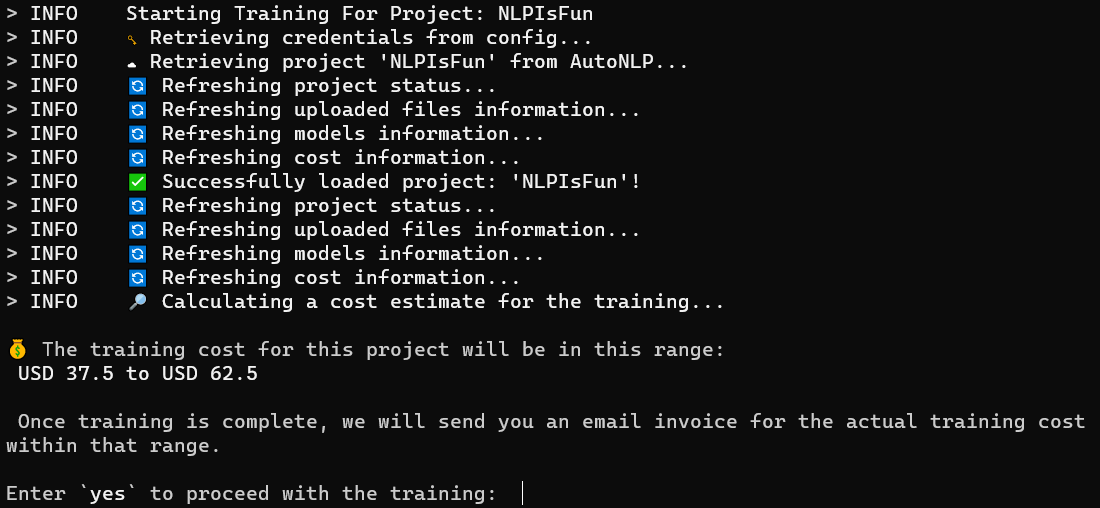
Starting an AutoNLP training job in terminal.
After asking the training job to start, AutoNLP estimates the price range of your job. If the estimated cost looks fine to you then type in yes.
Now all you have to do is wait for the models to be ready. You can check the status of your models at any time with the command:
project_infoIn our example, with relatively small datasets we had about six working models in less than 20 minutes. Another four took a little longer, but all models were ready in less than an hour.
Once the models are ready we can take a look at their metrics in two ways. The first is to use the command line:
autonlp metrics --project NLPIsFun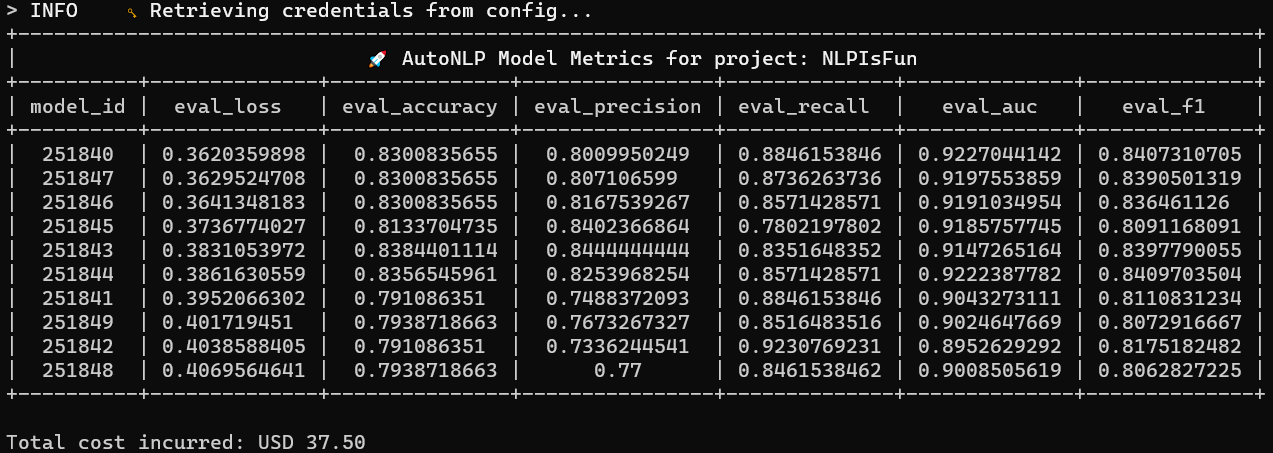
AutoNLP metrics command in terminal.
This command shows the results for your models. As you can see here we have a seven column table including each model's ID number, the F-score for each model, and other metrics such as accuracy, precision, and recall.
Now if you want to use your models there are a few ways to do it. One is to use the predict command like so:
autonlp predict --model_id YOUR_MODEL_ID --project YOUR_PROJECT --sentence "YOUR_SENTENCE_FOR_EVALUATION"The other option is to go straight to the website and login to your Hugging Face account. Here you’ll see all your models. Click one to arrive on its dedicated page. The page shows the metrics for the model, as well as some example code for accessing the model via cURL or Python.
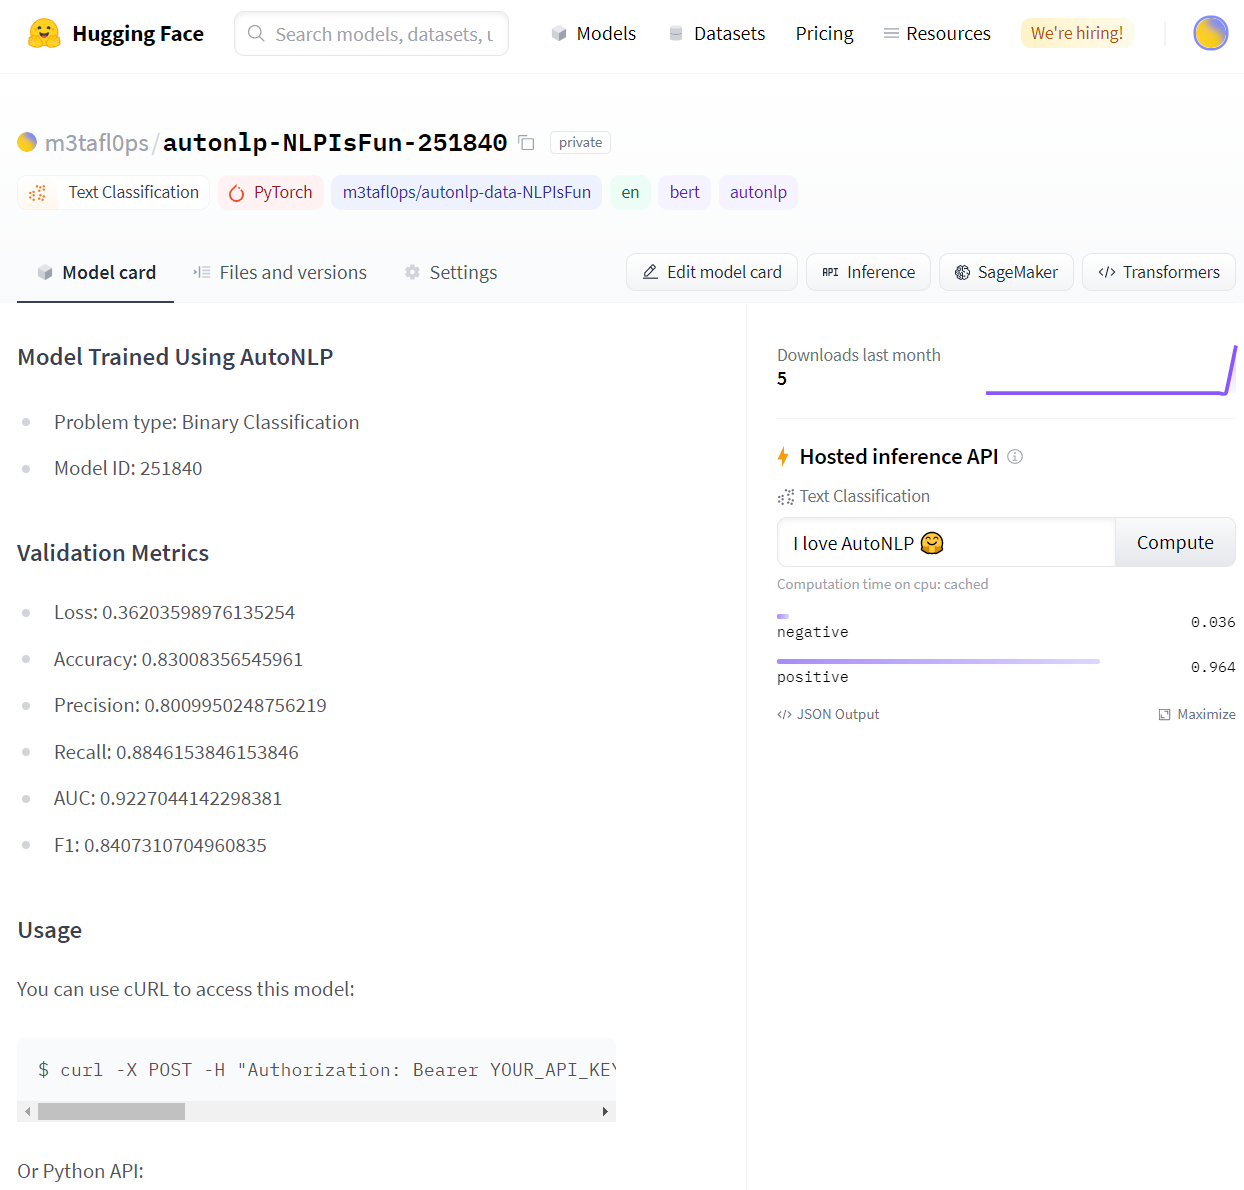
Viewing AutoNLP metrics on the Hugging Face website.
On the right side of this page there’s a text entry box entitled "Hosted inference API." Drop any sentence you like into the box, and press the Compute button to see the results. It takes a few seconds for the model to load, but once it does the results appear with a rounded up score for each sentiment.
AutoNLP Tutorial Project
And there you have a working AutoNLP project and a basic tour of AutoNLP.
From the Hugging Face website, you can discover how to download the files as a git repository, use it with Hugging Face's Transformers project for more fine tuning, grab the API endpoints for the model to use on a website, or even train the model further with Amazon SageMaker.
AutoNLP is incredibly easy to use and is a quick way to get a working NLP model with just a few commands.
Original. Reposted with permission.
Related:
- How to Create and Deploy a Simple Sentiment Analysis App via API
- The Best Way to Learn Practical NLP?
- A Graph-based Text Similarity Method with Named Entity Information in NLP